

Follow the Yellow Brick Road

In honor of the 73rd anniversary of the Wizard of Oz, let’s look at how to make a Yellow Brick Road using InDesign Stroke Styles. For this yellow brick road, we need multiple wavy dashed lines; but InDesign will only let us use one stroke style per stroke… that’s okay, we’ll also learn to to expand your stroke styles and apply multiple stroke styles in sequence.
Step 1: Make a yellow stroke using the wavy stroke style.
Mine is 38 points, but we’ll be changing the stroke width later. The stroke width is what determines the number of waves. InDesign has a fairly strict limit on the amplitude of the waves, and there’s really nothing you can do within InDesign to have control over the amplitude. I chose 38 points my stroke because it gives me roughly the number of waves that I want.

Yellow Wavy Stroke
Step 2: Copy and paste the stroke into Illustrator.
Copying and pasting into Illustrator is the foundation of this lesson. There are certain things that Illustrator can do to strokes that InDesign simply cannot, and expanding stroke styles is one of them. Illustrator cannot recognize InDesign stroke styles, so it will convert the straight-stroke-with-a-wavy-stroke-style into a solid-stroke-that-happens-to-have-waves-in-it.

Wavy Stroke in Illustrator: Preview Mode
The image above is the stroke as it looks when pasted into Illustrator. You’ll notice that it looks like it’s inside of a frame. That’s because it is. When objects are pasted from InDesign into Illustrator, they come in with a clipping path (which is the Illustrator version of an object frame).
You can more easily see the clipping path in Illustrator by viewing in Outline mode (View > Outline). You can toggle between Outline mode and Preview mode by pressing Cmd/Ctrl + Y.

Wavy Stroke in Illustrator: Outline Mode
We need to get just the wavy stroke back into InDesign. The easiest way to delete the clipping path is by selecting part of it with the Direct Selection Tool (which I fondly refer to as White Arrow), and press the delete key twice. Then switch back to the Selection Tool (Black Arrow) and select the wavy stroke, copy and paste it back into InDesign. Now, take a look at the difference of the stroke before and after the round-trip through Illustrator.
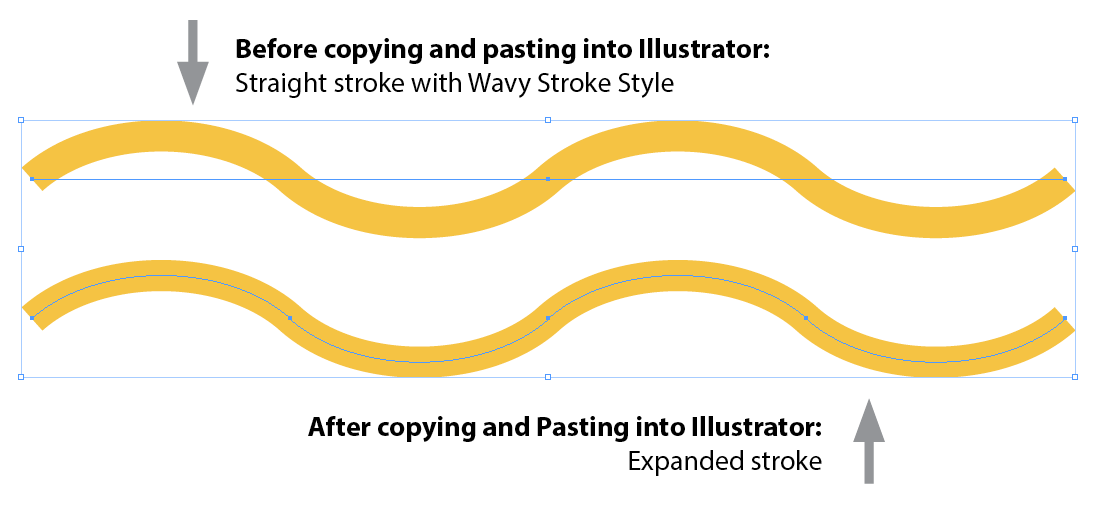
Before and After the round trip through Illustrator
Step 3: Stretch the object to the size you desire.
Now that the stroke is back in InDesign and the stroke style is expanded, we have access to the various points, and can stretch the object at will, with full control over the amplitude of the waves. You can stretch the object and make the waves as tall as you want them to be.

Wave with Larger Amplitude
Step 4: Now that you have an editable wavy stroke, apply a striped stroke style to it.
I’m using a striped stroke style with seven stripes. This is the stroke style I made in my American Flag Stroke Style post. I made my stroke 58 pts.

Super Wavy Stroke with a Striped Stroke Style
Step 5: Round-trip the striped stroke through Illustrator.
Copy and paste the striped stroke into Illustrator. Delete the clipping path. Copy and paste it back into InDesign.

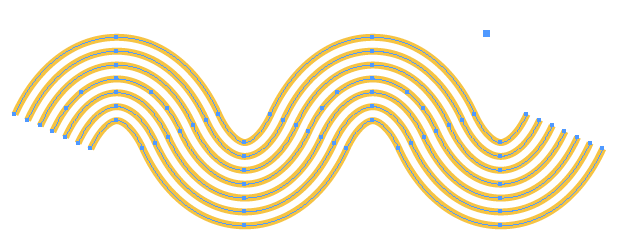
Seven Stripe Stroke in Illustrator with Layers Panel
For reasons unknown to me, InDesign applies seemingly random compound paths to the objects. My seven yellow wavy stripes came back from Illustrator as two sets of compound paths: one with five stripes, and another with two stripes.

Why are there two compound paths? I don’t know.
In this case, it’s perfectly fine to leave them as a compound path, but I prefer to have all seven stripes in a single compound path. To accomplish this: select both compound paths, Object > Paths > Release Compound Paths. Then go Object > Path > Make Compound Path. Then all seven stripes will live happily together as a unit.
One Big Happy Compound Path with Seven Stripes
Step 6: Select the compound path and change the Stroke Type to Dashed.
Give it a 12 point dash and a 2 point gap. Be sure the set the corners to ‘Adjust Dashes.’ This will make it look more like real bricks, because the spacing between the dashes will always remain the same. The result will be as if a real live stone mason had hand cut each individual brick to make it fit perfectly within the wave pattern.
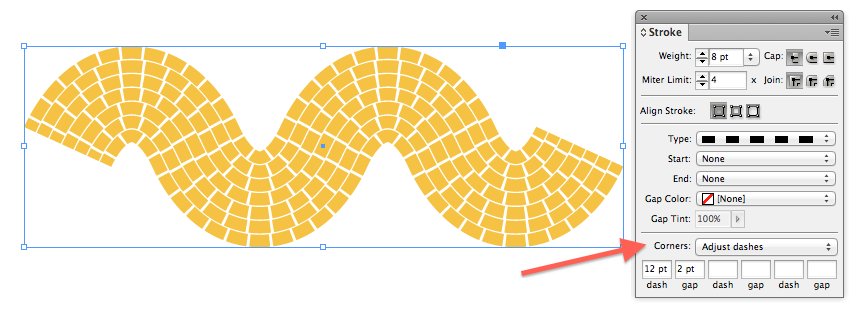
Change the Stroke Type to “Dashed”
Step 7: Add some effects.
I used inner shadow and bevel and emboss. Here are my settings:
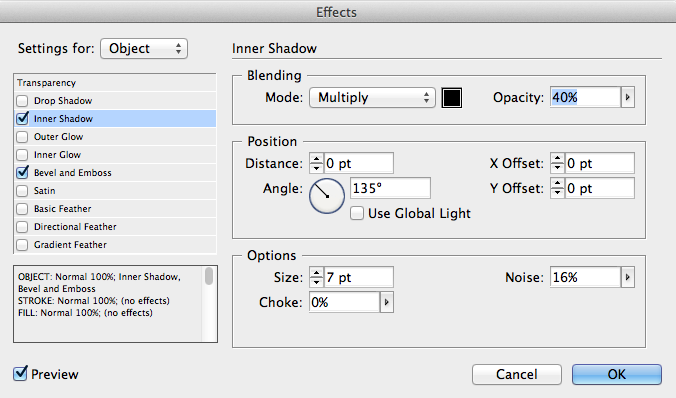
Inner Shadow Settings
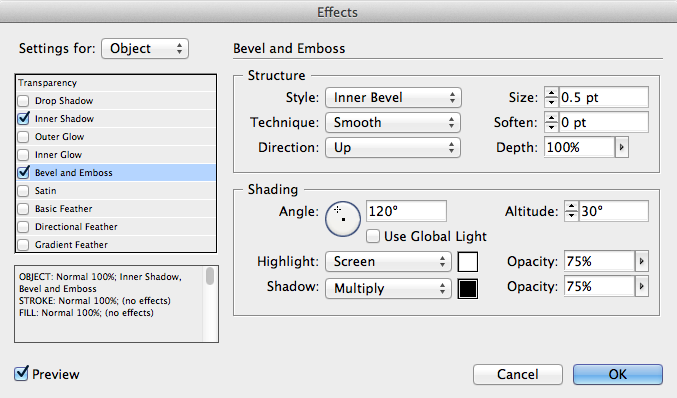
Bevel and Emboss Settings
And here is the completed yellow brick road.

Completed Yellow Brick Road
I’ve always thought that Illustrator was the best InDesign plugin ever, and hopefully now you will think so as well!
[and… Stay tuned for another awesome Wizard of Oz post coming from Mike Rankin soon!]
Step 4 kinda tripped me up lol – you have to go to the Stroke Panel and create a new stroke with 7 stripes …
It’s very inventive way of creating the effect though – works quite well.
Kelly, this is really clever (and twisted!). Very nice!
I was wondering where you were going with this … lol. Inventive and clever! And maybe even useful! Thanks.
So I guess what InDesign needs is an Expand Appearance panel!
Or … I tell you, I’d be inclined to just drag out a curvy line with the Pen tool in InDesign, step and repeat it a bunch of times, select them and make them a compound path, then jump in at your Step 6.
@Anne-Marie: I tried the steps and repeat method at first. The tight inner curve on one side of the road is actually the wide outer curve on the other side of the road. I found that using a striped stroke style on the wavy line keeps the spacing even in between the all the lines.
And yes, I agree, InDesign should have an appearance panel as well as the ability to outline strokes. Hey InDesign developers: plugin idea!
I created a line in Indesign and made a stroke around it. I then copied it into Illustrator and it had the frame around it as shown. Then I clicked on the wave with the white arrow and hit delete, delete, and the entire wave disappears. Am I missing something? I’ve only been using Indesign for 6 months (self-taught) so any help you can provide is appreciated. Thanks!