

Ruling headers… (or, Placing a Rule Behind a Header)

Consider this part 2 in the series ‘working with text on a tinted background ;-) Part 1 being yesterday’s blog-post Center that vertically? (Framed).
Where the previous post pointed to framed text frames, which are useful for ads, book-cover designs, poster designs etc. Today’s paragraph rules work well for those headings that appear as part of your text flow. Often I see people cut such heading text out of the text-flow and place it in a separate frame so that it can have a background colour.
That gives its own issues:
- unpredictable Table of Contents order where text from these paragraphs is filtered out.
- a change in one part of the text flow would mean having to manually move all of those headings (unless you’ve thought of anchoring those boxes ;-) )
Paragraph Rule
InDesign’s paragraph rule feature allows you add a ‘line’ to a paragraph, in fact it allows you to add ‘two’ lines to a paragraph. These lines can be varying width and they can be repositioned, making them suitable for generating that background colour on a heading/subheading type paragraph, as these generally only are one or two lines in length.

The Paragraph Rule settings are found in the Paragraph Styles Options dialog, the Control panel menu and the Paragraph panel menu.

Increase the Weight to change the thickness of the line. And amend the Offset to move the line upwards or downwards.

There one more setting I’d normally enable on a ‘Rule Above’ especially when the paragraph can appear at the top of a text frame, and that is the “Keep in Frame” option. This ensures the line doesn’t stick outside the top of the frame.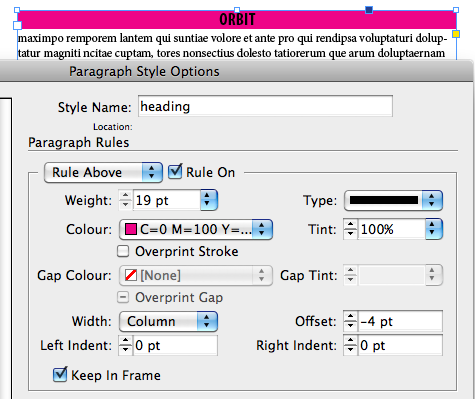
Naturally there are a range of other settings to play with…
- Width can be set to Column (the width of the text column, minus the left/right indent setting that might have been applied to the text) or Text.
- The ‘Left and Right Indent” can contain negative values… and yes… you can push a rule outside the text frame :) or counter balance a left/right indent setting with this, or add a little buffer around your text when using the ‘Text” option as width settings.
Some cooler things you can do with Paragraph Rules
- create a gradient swatch and use a gradient as rule colour
- build your own stroke style (Type) even a solid dash with ’round’ caps to ’round’ the edges of the rule
- apply a dual rule (above and below) with varying Left Indent/Right Indent settings or width settings to create some cool effects
- and more…
Feel free to share some of your creative results when working with paragraph rules in the comments.
Here’s two older ones I posted on my own blog some time ago:
- gradient + rounded corner https://carijansen.com/2007/09/01/tip-057/
- double line headers https://carijansen.com/2009/10/18/tip092/
I have a script that does a lot of the manual work:
https://mysite.verizon.net/zevt/index_files/BoxMaker.htm
@Fred :) thanks for sharing that link :)
@Fred
Brilliant script and rightly priced too… i can’t even get lunch for eight bucks, yet alone this fantastic time-saver!
I use a colored rule to create a box the full width of the text block and the height of my header text. Then I use underline of the same height but of a lighter color. I end up with text one color, say a dark green, with very light green immediately surrounding it and then an inbetween green filling in the rest of the box. Takes a little bit of time to set up the first time but as a paragraph style after that, easy!
@Sas. ha, rule above, rule below and then adding strikethrough or underline… now that’s a way to expanding levels of creativity :)
I’ve used these techniques many times. One of my favorites that I like to use is:
Set both rules to different colors, with the Rule Above taller than the Rule Below. Adjust Offset so the two Rules overlap behind the text. Now you’ve got a colored box with a wide top and bottom border of a different color. Just remember that the Rule Above will be behind the Rule Below (which kind of doesn’t make sense). You can also adjust the width of the Rule Below to make the border go all the way around it. :)
I had never thought of using my own stroke type, though…that may be very handy in the future. :)
I like to use a really thick rounded rule to round off the bottom of text frames. For some odd reason, using Live Corners interferes with the hidden geometry of the frame and affects paragraph rules that extend the full width of the column. Here is my solution: https://documentgeek.blogspot.com/2010/05/hey-rounded-cornersquit-messing-with-my.html
ha, that’s a lovely example Kelly. thanks for sharing :)
These are all great permutations! Thanks!
I have a problem with a paragraph rule, but it’s a little bit different. The rule is a paragraph style that always appears on right pages (chapter opening). I set a negative indent so the rule extends through all the left page. It appears ok, but when I export a pdf, the rule appears only in the right page, not in the left?
@Silvio, this problem occurs because InDesign considers the rule to belong on the other page. and when you output separate pages it won’t appear on the other page indeed (I’ve seen this happen in quite a few client projects). The work-around is to just use the line tool and draw two separate lines one on the Left and one on the Right page.
Cari
Thanks Cari, very useful tutorial. And for endash for pointing me here.
I used the paragraph rule to add a solid block at the start of the header section and indented my text, so the first two lines of the paragraph have a coloured square to set off the heading.
Settings for paragraph rule are:
weight: 15pt
colour: (text colour) crimson
type: solid
width: column
offset: -1mm
right indent: -81mm (so the block is about 4mm wide)
keep in frame: yes
Then, I adjusted the Indents and Spacing:
alignment: left
left indent: 5mm
The basic character formats are:
Myriad Pro, Bold, 12pts/ Leading 14.4pts
(used on day to day itinerary)
I should also mention that the text box width is 157.75mm (with three columns on a A4 page in landscape).
If it is different, then you need to adjust the right indent accordingly.
Do you know if there is a way to do this differently so I can use the paragraph rule on different width text areas but to maintain the width of the ‘colour block’?
Andy
*edit’
I should also mention that the text box width is 85mm (with three columns on a A4 page in landscape).
If it is different, then you need to adjust the right indent accordingly.
Do you know if there is a way to do this differently so I can use the paragraph rule on different width text areas but to maintain the width of the ‘colour block’?
Andy
Hi,
Can someone please help.
I’m trying to just get lines above and below TEXT. Please see here . Thank you.
https://imgur.com/9aVUgHt
Hi everyone,
I hope you can help me. This is regarding applying paragraph rules behind the text. Is there a way to apply a rule to a line if i’ve applied a forced return, which happens when I do a bulleted list. Thanks in advance.
Regards,
Mike
Mike: If you’re trying to put a color behind a whole paragraph, you’re probably going to be happier with the Paragraph Shading feature: https://creativepro.com/indesign-cc-2015-available-shading-graphic-cells-more.php
Hi, i have some case, that the paragraph rule always be below, even when i turn on the rules above. It’s applied to that specific text. For other text that i already tried is normal. Hopefully you ever face this and have a solution, thanks.