

Hidden Gems: The Layers Panel in CS5

As a long-time InDesign user, I’ll admit that I’ve often envied Adobe Illustrator’s Layers panel. While InDesign users could only create and manage top-level layers, Illustrator users could really go to town in its Layers panel?viewing object stacking order and changing it, showing and hiding the groups or objects, and locking and unlocking.
In InDesign CS5, you can let go of your envy. When you create an InDesign document, you can not only create top-level layers which appear on all the pages of your document. But also, if you click the disclosure triangle beside each document layer, you can also view all objects and their stacking order on the currently active spread. Groups, buttons and the new object states have their own disclosure triangles that can be expanded to see their contained objects. (Note that this is different than the way Illustrator does it. In Illustrator CS4 and CS5, if you’ve created multiple artboards, the objects for all artboards are viewed on the Layers panel at the same time.)

Layers Panel Collapsed

Layers Panel Expanded
InDesign reminds you that you’re only viewing the objects on the current spread because it shows you the page numbers it is currently displaying at the bottom of the panel. Objects like paths, circles and rectangles are, by default, called <path>, <circle>, or <rectangle>. Text is named the first few characters within that text frame. Placed images or multimedia is given the name of the placed file. However, these can be renamed (see below). Layer colors are now indicated by a colored bar to the left of all the objects in the layer, as they are in Illustrator.
As in Illustrator, you now have two ways to select objects. You can, as you did before in InDesign, select one or more objects in the layout, and the colored squares on the Layers panel indicate which objects (and the enclosing layer) are selected. But you can also click (or Shift-click) objects in the Layers panel, and they will then be selected in the layout as well. This can be a fabulous way to select artwork in a complex layout, especially when you have objects stacked on top of other objects! In the illustration below, clicking on the square beside <beach.psd> in the Layers panel selects the indicated image in the layout.
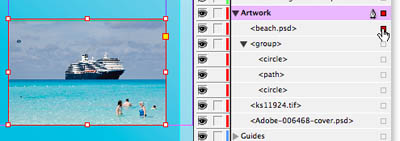
Select by Clicking Colored Square
Similarly, you can show and hide individual objects by clicking the “eyeball” icon to the left of the object name (the equivalent of choosing Object > Hide).
You can lock an object or a group by clicking in the second column to the left of the object or group name. The padlock icon indicates locked, and when you click again to clear it, the object is unlocked. In InDesign CS5, if you have a locked object, it now matches the behavior of Illustrator: A locked object cannot be edited. If you have Frame Edges showing in Normal mode, you’ll see a padlock icon on the edge of the frame (see below). You can also unlock by clicking on the frame padlock. (In previous versions of InDesign, locking a frame only locked its position on the page; you were still able to select the object and edit its contents.)

Lock from the Layers Panel
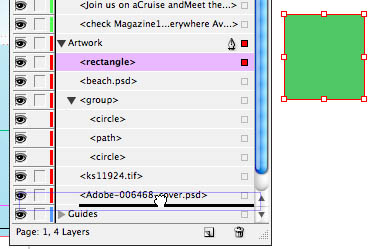
Creating a new object works the same as in previous versions of InDesign. When you create, paste, or place a new object, it appears on the target layer, the layer indicated by the pen icon on the Layers panel. By default, it appears at the top of the stacking order. In the illustration below, I’ve created a rectangle when the Artwork layer was targeted. By default, it is named <rectangle>.

Newly Created Object
To rename an object, click once on its name in the Layers panel, then pause, then click a second time. Then you’ll be able to edit the name. This is especially handy when you have several objects of the same kind, and you don’t want them all named <rectangle>.

Renaming an Object
Finally, it’s now much easier to change the stacking order in a complicated layout. Simply select the name or the colored square representing a particular object, and drag it up and down in the stacking order. (In the illustration below, I’m dragging the rectangle to the bottom of the stack in the Artwork layer.) You can even drag and drop items in and out of groups, buttons and object states!
Change Stacking Order
So, when you upgrade to InDesign CS5, be sure to try out these new more efficient ways of working on your layouts.
Another cool way to rename a layer is with the Animation Panel.
It has a Name text insertion box.
Change the name here and it also changes on the Layer.
If you’re doing anything with animation and timing make sure you give each sublayer the appropriate name.
As a reminder, for those of you who support others in template-based workflows, you may still want the pre-CS5 behavior for Lock where only the position of a frame is locked so that others can still change the frame contents. For example, you set up frames with placeholder content that you intend to have others swap out with the real content later. You can get the old behavior back in Preferences if needed.
IMO, InDesign’s sublayers works better than Illustrator’s, for the better self-naming, naming-update alone.
I just upgraded to the new Indesign CS5. Although I appreciate the many new changes, there is one change I hate and seriously do not like. In Indesign CS5, by default, it now HIDES all elements that are on all other pages in the Layer’s panel, except the page you are currently working on. And the problems is, hiding those elements on all other pages creates a major headache if you need to view or drag some element from one page to another page in a long document. In fact, I am currently working on just such a document right now, a document that is 100 pages long, and I constantly need to shuffle elements from one page to another as I arrange and build the document. In my older version of Indesign, dragging an element to a different page was never a problem because all elements on all layers were always visible in the Layers panel and I could just click on some element and drag it to wherever I wanted, even to another page. But I can’t do that now in the new CS5 because all those other page elements are now HIDDEN. So for me, this new feature is so undesirable and is so frustrating! At the very least, Adobe should have provided an option for users to enable or disable the layer hiding behavior!
@Jim: I must be missing something… the ability to see elements on layers is new in CS5. So how can it be worse than earlier versions? I don’t understand what you mean by “all elements on all layers were always visible in the Layers panel…” because in earlier versions NO elements were visible in the Layers panel. Please explain.
I’ve created a master page which contains loads of layers which I’ve set up so that I can hide or show depending on which bits I need on each particular page.
I can’t seem to find a way to make this work though. When I switch a layer off in one of the pages, it switches that same layer off in ALL the pages created form that master.
I’ve tried skipping the master thing and just duplicating the page but the same thing happens.
I then tried creating a blank page (no master) and copy all+paste in place but it strips out all the layers!
Is there a way of doing this?
Thanks
@Ces: No, sorry, layers are document wide, not page wide!
SELECTING OBJECTS ON SEVERAL LAYERS AT ONCE.
I was looking for a post to solve this problem without having to individually option/click each layer or image.
I’m working on a catalog and bringing in several images per page, each on a separate layer. The images provided by the art director were all too large for the page and had to be reduced for positioning.
I was looking for a way to select all the images on their respective layers once they were imported so I could reduce them together so they fit on the page for positioning.
So here’s what I discovered:
1. Select all the layers you want to affect by holding down the shift or command key while selecting them in the Layers panel. (If all the layers are in a row under each other, click the first one, hold down the shift key and click the last one to quickly select them all.)
2. Once you have the appropriate layers (or images) selected, hold down the option key and then click on one of the layers selected. This will select all the images on all the layers you chose all at one time.
3, Now you can move them, reduce them or whatever else you want to do as a global effect, saving lots of time.
Hope this helps someone.
Great tip, Skip! Thanks for sharing.
I’m not sure if anyone knows about this but here’s a tip about layers in InDesign that I often find useful. If you happen to have items in different layers and want to bring them together in one layer. And you want to keep them stacked in the order you want without moving one of them to the front or back.
For example:
1.) Create a new (red) layer at the bottom of the layers panel
2.) Select all items you want to move (blue, yellow, pink)
3.) Click and drag that pink small box over to the red layer
4.) Click and drag the yellow box over to the red layer
5.) Click and drag the blue box over to the red layer
That saves a lot of time. :)
I need help with activating buttons that overlay on top of each other. I can get the first one to work but when I turn on a second or third button that is on top of the first or second, it doesn’t respond to the button related to it. I hope this is understandable. What I am trying to do is create copy and a close button for several different items…hotspots if you will… I need all the close buttons in one place. But I can’t seem to get them to work if they are stacked on top of each other. They work if the buttons are located in different places. Any suggestions on how I can fix this. I really need it to work. Thanks.
@CC: These links might help? https://creativepro.com/creating-a-two-function-button-for-interactive-pdf-or-swf.php or https://creativepro.com/showing-and-hiding-objects-in-interactive-pdf.php
Sure wish we could have layer groups in InDesign!
I want to be able to call one set of layers 7/2014 and another group of layers 12/2014… right now they’re all sitting right next to each other and it drives me nuts!
Kindly let me know any other (i.e inputs other than XML) input could be passed on to Adobe Indesign to read data from application.
Also if java scripts can be used to develop coding instead of passing XML as input. If any other input could be passed, kindly share me the link on working functionalities.
Thanks in advance.
Hi,
Maybe could you help me!
How can I select the active layer (for example the 2nd layer) with any shortcut?
I would like to automate a workflow with this.
Thank You