

Holiday Text FX, part 1: Candy Cane Text

Looking to add a little holiday cheer to your InDesign documents? Try one of these text effects. They’re pretty quick and easy, and the techniques used (paste into, nested styles, etc) can be used to make all kinds of cool stuff.

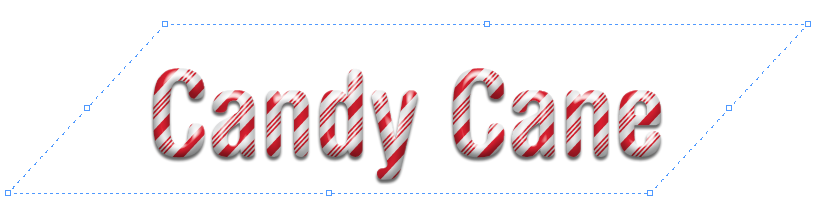
Candy Cane Text

To create text that looks like it was made out of pepperminty candy canes, start with a font of your choice. In this case, I used Helvetica Rounded.
Convert the text to outlines and fill it with about 10% Black.

Draw a vertical line with a thick red stroke (I used 7 pt) and use Step and Repeat to make copies that cover the width of the text with space between each line equal to about 3 times the width of the stroke.

Now you have the thick stripes. To make the thin stripes, select all the lines and double click the Selection tool. In the Move dialog box, offset the lines horizontally so they fit between the original lines and click Copy.

Change the stroke style on the new set of lines from solid to triple.

Select all the lines and group them.
In the Control panel, set the reference point to the center and use the Shear X Angle buttons to adjust the angle of the group to your liking. I used 43°.

Cut the group, select the text outlines, and choose Edit > Paste Into (or press Cmd+Opt+V/Ctrl+Alt+V).

From there, you can complete the effect by adding some bevel and emboss, a drop shadow (of course), and a little bit of basic feather to soften up those hard edges.


There you have it. Zero calorie eye candy.

And it’s pretty easy to adjust the angle or color of the stripes, if you want to. Just select the text outlines, then click the Select Content button in the Control Panel.
![]()
This selects the group of stripes and you can tweak the Shear Angle, color, stroke width, etc.
I’ll be back soon with Part 2, showing how to make text wrapped in Christmas Lights!

And if you like this kind of stuff, be sure to check out my InDesign FX videos series on lynda.com and LinkedIn Learning.
OMG! That is so cool! Nice use of stroke styles and shear angle. :)
Thanks Kelly!
Mike-
You’re an InDesign FX Master! Great stuff, as always. Thanks for sharing!
Nice!!
Darn! Just one hour too late for me to use one of these great effects in the newsletter I just sent to press! I’m filing this post away for next year’s holiday greeting.
Move tool? Selection Tool?
D’oh! I’ve been spending too much time in Photoshop. Just double click that pointy thing at the top of the Tools panel ;)
Thanks. I fixed it in the post.
I am using INDD CS4 and I cannot get the ‘Paste Into’ command to work after I cut the group. suggestions? What am I doing wrong? Paste Into is ghosted out.
thanks!
R Barrow-
Make sure you converted the text to outlines. Then confirm you have all the lines selected before you group, so they act as just one object. If you have anything else selected besides the group before you cut, then you won’t be able to paste into the outlines.
AWESOME TIP!!
I would like you make it candy cane text name
CONNIE .. do you where is web site free how make to candy cane color text name ..
thank you
Connie
Thanks for the idea and technique. I am not very familiar with InDesign but was able to take your idea and techniques and apply them to Illustrator. Thanks again!
Handy effect and some good techniques learned along the way. Thank you!