

How to Create the Effect of Different Strokes on the Sides of a Frame


In InDesign you can stroke text frames and rectangles in two ways: with no stroke or a uniform stroke. It’s all or nothing. You can’t set, for instance, left and right strokes only, or top and bottom strokes; and the stroke style applies to all sides.
However, with Typefi’s free AutoFit plug-in it’s possible to create the effect of customizing any stroke on a text frame, and in such a way that the strokes are resized when the frame resizes, for example, when text is added and InDesign’s Auto-Size feature resizes the frame. In this article we’ll show how this works. It’s not particularly difficult.
Install Typefi AutoFit
First of all, install the free Typefi AutoFit plug-in. You can download it from here (email address is required). That download page also contains some links to tutorials on AutoFit, though all you need to know for creating custom strokes is in this article.
After restarting InDesign you’ll see two additions in InDesign’s menus: the Typefi AutoFit panel (Window > Typefi > AutoFit), which is used to set AutoFit properties of single frames (see Fig. 1), and a tool to create relations between page items. This tool is added to InDesign’s Tools panel (Fig. 2).

Fig. 1. The Typefi AutoFit panel

Fig. 2. Typefi AutoFit in InDesign’s Tools menu
In this article we don’t need the AutoFit panel, we’ll use only the Tools item.
Creating Custom Stroke Effects
The general idea is to use two stacked frames to simulate different strokes on the same frame. We use a rectangle that provides the strokes and a text frame for the content. By adding a fill to the text frame we hide part of the rectangle, so that the bits of the rectangle that stick out from behind the text frame appear as one or more strokes.
First, place a rectangle and give it a medium gray fill. This is for clarity only, when it’s all done you can apply any color to this stroke. Then place a text frame on top of the rectangle, making sure that all sides of the rectangle are visible (see Fig. 3).

Fig. 3
It’s useful to have the Layers and the Transform panels open. And you need the Tools panel. In addition, enable Smart Guides because you need to position the frames exactly in relation to each other (View > Grids & Guides > Smart Guides).
Now, say we want a stroke at the top of the text frame. To create that stroke we will create an AutoFit relation between the text frame and the rectangle.
1. Click the AutoFit tool in InDesign’s Tools panel. The cursor changes its shape to a plus-sign with a small black triangle next to it. Then click at the center-top of the text frame. It doesn’t have to be exactly in the center, somewhere close will do. The black triangle in the cursor icon changes to white. (There’s no need to select anything, by the way.)
2. Click the center-top of the rectangle. This creates the relation as shown by AutoFit’s icons. (Fig. 4).

Fig. 4
Let’s pause and see what this relation does. When you resize and/or reposition the rectangle, the text frame is not affected. But when you move the text frame vertically, the top of the rectangle moves along, keeping the distance between the tops of the frames constant. Move the text frame horizontally and the rectangle stays put.
Which frame you click first with the AutoFit tool determines the dynamics of the relation. The first-clicked point is called the parent, the second, the child. The parent determines the behavior of the child.
To create the appearance of a single stroke at the top of the frame, first add relations to the three remaining sides (Fig. 5), then move all sides of the rectangle towards the text frame (Fig. 6).
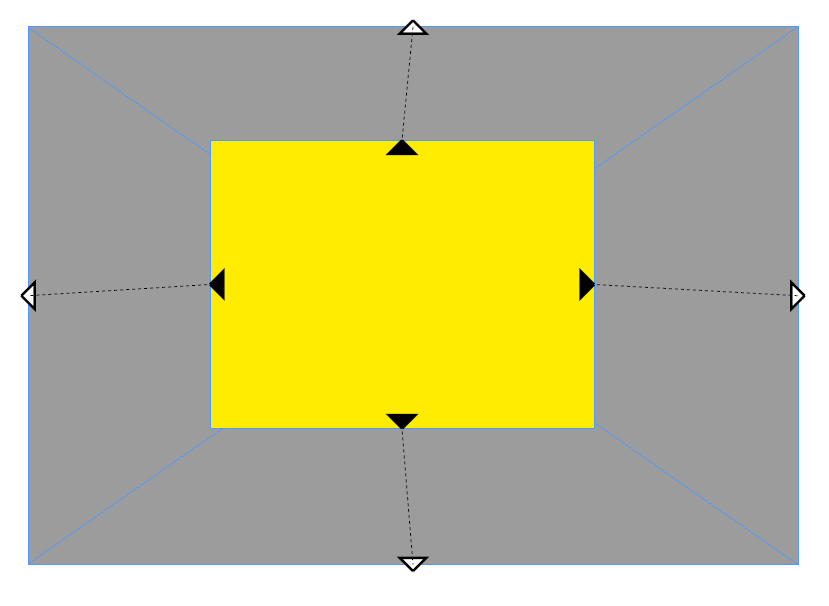
Fig. 5
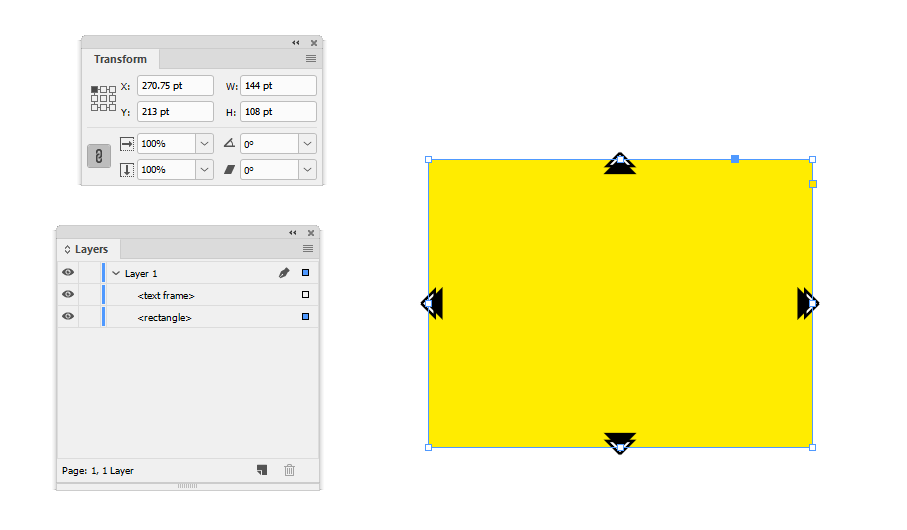
Fig. 6
Now, to create a 3-point top stroke, make sure you have the rectangle selected and move it up 3 points. The easiest way to do this: add 3 points to Transform panel’s X field (if your units are points, just enter +3 after the field’s value; in any other units system, enter +3pt).
Finally, to wrap things up, add 3 points to the rectangle’s height (add +3pt after the value in the Transform panel’s H field). The result is in Fig. 7. You can now change the color of the stroke and change the screen mode to Preview to get a good feel of how the frame behaves.
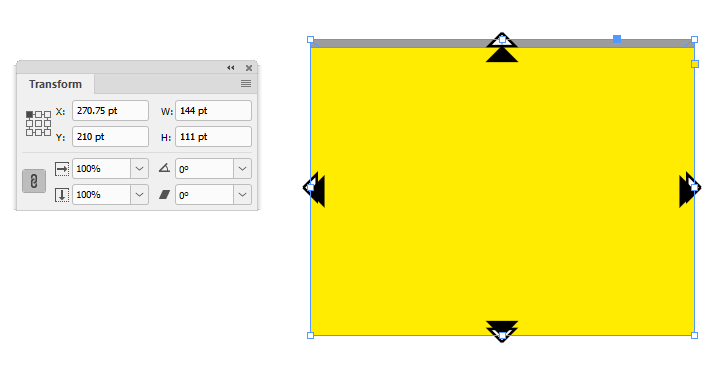
Fig. 7
Now when you select the text frame and resize and/or move it, the stroke (or in truth, what looks like the stroke) sizes and moves along with the text frame.
To add any other stroke, simply change the size of the rectangle.
An Alternative
The method outlined here lets you add selected strokes and allows you to use strokes with different weights. However, because we use a single rectangle for the strokes, the stroke styles and colors must be the same.
To use different stroke colors on two strokes, use lines for the strokes and create AutoFit relations between the text frame and the strokes. You need more relations than earlier, however, to achieve the desired result.
Place a text frame, give it a fill, and place a line at some distance (see Fig. 8).
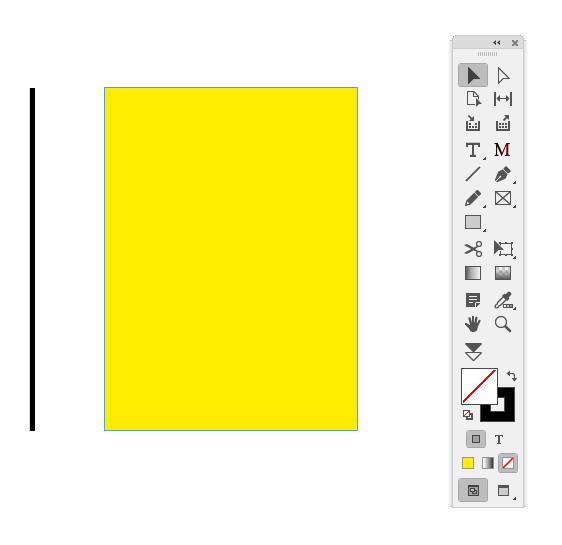
Fig. 8
Create a relation between the top-left of the frame and the top of the line, between the bottom-left of the frame and the line, and the center-left of the frame and the center of the line. See Fig. 9.

Fig. 9
Now add a second line, change its color and/or style, and create similar AutoFit relations. See Fig. 10.
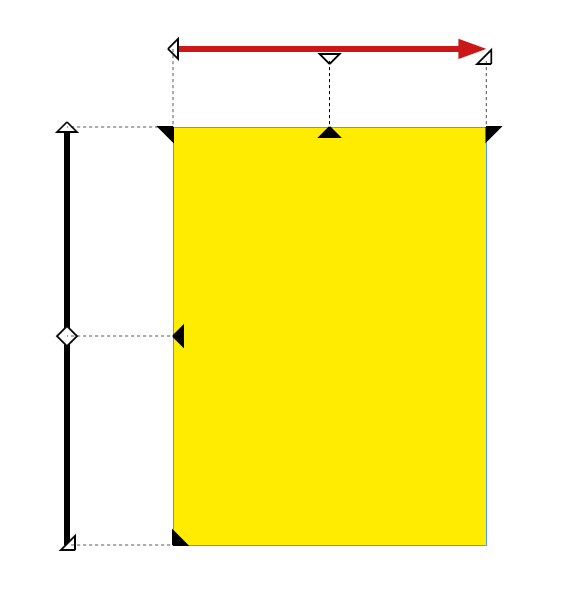
Fig. 10
Finally, move the rules into their places and select Preview screen mode to see the effect.

Now that you know how to create the effect of different strokes on a frame, use this knowledge carefully.

Enjoy your newfound design freedom, but don’t take it too far.

Ha! Amazing. Thank you. I wonder if these constructions can be added to a CC Library and survive when dragged out to a new document.
Yes, that works fine.
At the risk of raising the collective ire of all present, this does look a tad like what we could do in MacDraw in 1988.
No worries at all. In the 1980s and 1990s in WordPerfect you could do things that aren’t possible today in InDesign or very difficult.
Such as floating an anchored object to the bottom of the current page or the top of the next page. Now *that* would be a useful addition …
Floating tables, available in Framemaker 3.0, released March, 1991. Had to post; haven’t mentioned FM here for a couple of years.
Oh, don’t get me started, Theunis!
Is there a video of this process? I get to the point of moving all the sides of the Rectangle towards the text frame and I have trouble. I can get the top, bottom, and right sides to move. However, the left side resizes the text frame no matter what I do? Any help would be appreciated.
Hi Nancy. There’s no video of this. If the text frame resizes when you move the rectangle’s left side, then you added the relationship in the wrong order. Do it exactly like you did the others: first click the text frame’s side, then the rectangle’s.
P.
There is some animated gif illustration of this at the Typefi link.
I am having issues with Apple trusting this source. I get this message: “Typefi_AutoFit_Free.pkg” can’t be opened because Apple cannot check it for malicious software.This software needs to be updated. Contact the developer for more information.”
Since this is not my personal computer( belongs to my employer) I am apprehensive to override and install. Has anyone else experienced this? – BTW I am on Catalina.
Funny and I might have just the problem to fix with this. Will it work if we are several people working together om a job and only the creator of the shape has the plugin?
No, that won’t work. The plug-in should be installed on every computer that the document will be opened on.