

How to Export Basic HTML Out of CS2


Let’s say you have a magazine, annual report or newsletter you’ve done in InDesign CS2. Something longish with a number of discrete articles or sections within it. The web designers in your company need you to give them the content in a web-friendly format, one .html file with basic XHTML tags per article or section, in a format that easy to integrate into the company’s existing web site and CSS.
Guess what: With a little bit of preparation, you can give them what they want, using the CS2 features you already have. No need to cut and paste every dang text frame into text files and apply bold tags manually, no need to buy a plug-in (if there was an Export to HTML one available, which there’s not), no need to export to RTF or PDF and rely on other programs doing an unusable conversion. Yes, InDesign CS3 has an Export to XHTML feature, but here’s a solution that you can use in the meantime. [Edit: For a detailed comparison of the two methods, see my comments below this post. –AM.]
I have to say that I didn’t come up with this on my own. It was an off-hand comment from Jim Maivald that showed me the light. Jim’s the leader of Chicago’s InDesign User Group and a long-time friend, colleague and occasional freelancer of mine. We were talking XML – his speciality – and he mentioned something about how you can export HTML using InDesign’s XML tools. “Show me!” says I. Which was kind of hard, since were on the phone. But the basic procedure he explained was straightforward and do-able by most print designers, I thought.
And that’s what I’m going to write about here. I’m sure there are more tweaks and scripts and techniques you could use to get even more useful HTML out of ID CS2, but I’ll leave that up to you to explain in your comments to this post.
The Goal
We want a stand-alone .html file for each article or section in our publication. Each file needs to contain basic HTML mark-up indicating titles, subheads, body text (each paragraph surrounded by <p> tags), emboldened and italicized text, and bulleted and numbered lists. It’s possible to also include images, but they require just enough extra work that I’ll leave that for another post. [Edit: That post appears here. –AM].
Most modern web sites use CSS to customize the look of the basic text formatting tags, so we don’t have to worry about the final HTML file looking like the web site, we just need to have the proper tags in place. That way, once the web designer links the HTML file to the CSS file, our plain Jane “Header 1” (<h1>) titles take on the look the designer specified for the <h1> tag in the CSS file.
It works just like how paragraph styles in a Word file get the formatting specified in InDesign’s Paragraph Styles palette after it’s placed, if the style names are exactly the same.
Step 1: Style All Text You Want to Export
In each article you want to export to HTML, go through the text and make sure everything is linked to a paragraph or character style. Local formatting will get stripped out during the export (that’s a good thing), so if you want to hang on to your bolds and italics, create and apply Bold and Italic character styles to the text instead. You can use Find/Change Formatting to automate this; also Dave Saunders has a script called “Preserve Local Formatting” (download from our Plugins and Scripts page) that could help.
If you have paragraph styles for bulleted and numbered paragraphs, you’ll get better results in the HTML if the paragraph style calls for InDesign’s auto-bullets and auto-numbers feature (instead of you typing in the bullets or numbers yourself). If not, it just makes for a little extra clean-up by your web team. But make sure that your bulleted and numbered lists are linked to their own paragraph styles, regardless.
Step 2: Load Your Tags Palette
Open the Tags palette (Window > Tags) and add the basic HTML tags one by one: div, h1, h2, h3, h4 (h1=biggest title, h2=slightly smaller), p, img, strong (for bold), em (short for emphasis, makes web text italic), and for your lists, at least li (list item), and perhaps ol (numbered list) and ul (bulleted list) as well… more on lists below. You’ll also want to add “html,” “table,” and “td” to the list of tags.
Too much work? Download my HTML tags file, unzip it and choose Load Tags from your Tags palette menu. Point it at the file you downloaded (it’s a small, cross-platform xml file) to import the tags I listed above.
You’ll see the default Root tag in the palette. Select it and click the trashcan icon to delete it, and at the prompt replace it with the “html” tag you just added.
Step 3: Tweak InDesign Structure Defaults
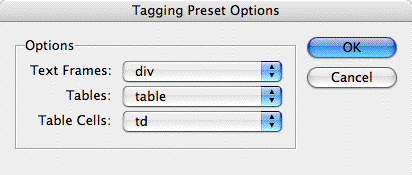
Open up the Structure panel (View > Structure > Show Structure) and choose Tagging Preset Options from the Structure panel’s fly-out menu. Choose “div” for Text Frames, “table” for Tables, and “td” for table cells. (Actually, this method doesn’t translate InDesign tables into HTML tables well at all. I’m open to suggestions, but at least you’ll have the correct tag for each cell.) Click OK to close the Options dialog box.
While you’re here in the Structure panel menu, choose Show Text Snippets toward the bottom. That’ll help you identify content in the panel later on.
At this point the Structure panel should show only one tag, “html,” at the top.
Step 4: Automatic Tagging with Map Styles to Tags
Now you need to specify which styles in your layout should become which tags in the HTML. Do this by opening the Map Styles to Tags dialog box from the Tags palette menu.
You likely have many more paragraph and character styles than you have HTML tags; so you’ll be mapping multiple styles to the same tag. For example, usually all Body style variations (Basic Paragraph, Body first, Body indented, Sidebar body, etc.) should be mapped to the same basic “p” tag, which sort of stands for a generic body text paragraph that will be styled by the CSS. Remember, we’re trying to keep things simple!
Map major headlines to h1, map subheads to h2 or perhaps h3, and so on. Map your character styles for bold and italic to “strong” and “em” respectively. Don’t map any style to the following tags, which are applied or used elsewhere: table, td, div, img, ol and ul.

Lists can be partially automated. Map all bulleted and numbered list styles to the same “li” (list item) tag. You’ll have to insert the “ol” (numbered) and “ul” (bulleted) tags manually, which I’ll get to in a bit.
Are you ready? Now that InDesign knows how to tag 90% of your content, it’ll do so, as soon as you click the OK button in the Map Styles to Tag dialog box.
Click OK and bang! Everything in the document is tagged with an HTML tag. Well, almost everything …
Step 5: A Few Manual Tags (optional)
If you want to experiment with references to your images in the HTML file, you’ll have to manually tag your images with the “img” tag. Just select an image and click the img tag, you’ll see a reference to the image appear in the Structure panel. You can shift-click multiple images and just click once on the “img” tag to apply the tag to each image in the selection.
Also, you’ll have to surround your bulleted and numbered lists with the opening and closing “ul” or “ol” tags manually, as far as I can tell (maybe someone has a suggestion?).
It’s easiest to do this in the Story Editor (Edit > Story Editor), where the XML tags are quite visible. Just drag over an entire range of bulleted or numbered paragraphs to select them, making sure the selection includes the first opening li tag and the last paragraph’s closing li tag. Then click the “ul” tag in the Tags palette to turn the selection into a bulleted list in the HTML, or click the “ol” tag for a numbered list. Here’s a before and after:


Use the same technique whenever you need to “double-tag” something, like adding em tags to some text you already tagged with strong (resulting in bold italics).
If you make a boo-boo, try Undo. Otherwise, you should know that you can’t delete the tags themselves with the backspace or delete keys once they’ve been applied; instead, select the item or block of text and click the Untag button in the Tags palette, then click on a different tag. If there’s content you don’t want included in the HTML export, Untag it and leave it untagged.
Step 6: Tweak the Structure
If you look at your Structure panel now, you’ll see that all the tagged content has been added under the “html” (nee “Root”) element. Each story – a text frame or threaded set of frames – is in its own “div” tag. Twirl open the disclosure triangle to the left of each div to reveal each paragraph of the story tagged with “p” or other tags. If you remembered to turn on Show Text Snippets from the Structure panel menu (back in Step 3), you should see the first few words of each paragraph next to their tags.

You’ll note that the order of the stories here doesn’t match their page order in the layout. You can easily re-order them by dragging the parent div tags in the Structure panel and dropping them in the correct location, if necessary. If you’re not sure which div tag refers to which story, and you can’t tell from the text snippet, select a text frame in the layout and look for which div sprouts an underline, indicating the parent frame.
Step 7: Export the HTML
To export everything you’ve tagged in the layout into one long HTML file, begin by selecting the top html tag in the Structure panel. If you want to export individual articles or sections, select the relevant div tags in the Structure panel before you export, so only those selected stories are included in the HTML file. (You could alternatively shift-click frames in the layout, which selects their divs in the Structure panel.)
Then choose Export XML from the Structure panel menu. In the Open/Save dialog box, name the file and change the .xml suffix to .html (important if you want to preview the results in your browser). Then click OK, which opens up the last dialog box we’ll have to deal with, XML Export Options.

In the General Options section, turn on the View XML check box and choose the name of your favorite browser or web authoring program. Also, if you had selected specific div’s to export, be sure to turn on the check box for “Export from Selected Element.” The other panel in XML Options is specific to images. Since I’m not dealing with images in this post, I’ll ignore it. You can too, you have my permission.
Step 8: View the Results
As soon as you click the Export button in the XML Export dialog box, your browser or web authoring program opens and shows you the results of your efforts. Even though the HTML file is not fully “legitimate” – it lacks a header section, a DOCTYPE declaration, and other niceties – most programs should be able to show you the text and formatting. Bolds and italics should be intact, and all your titles and subheads should look something like titles and subheads.

It’s plain, all right, but at least you have all the basics in place so that you or your web team can easily plonk the source code you supplied into your existing web site for some instant custom formatting, courtesy of the CSS.
Oh… THANK you! I’ve been trying to figure out how to do this for quite some time. I’m gonna test it, and if it really works, I’ll have saved at least one monthly days spent transfering text from a magazine to the web !
Anne-Marie,
I’m NOT a web person, but I’m curious how the result compares with the XHTML export out of InDesign CS3 for the same file. Have you tested?
Steve, well one of the most important differences is that the XHTML output is all CSS based, not “hard coded” with HTML tags.
Anne-Marie, this is quite amazing. A very good illustration that the “X” in XML can be anything, including “HT”.
Great question, Steve. I just tested it with the same file.
Exporting to XHTML in CS3 is definitely an easier proposition … just shift-click the text and image frames you want to export and choose the command from the File menu. You can export the entire document or just the selection.
Paragraph tags are properly inserted and the HTML file contains all the correct header code etc. It does a great job with images, using the correct “img src” tag and putting optimized images in their own folder. (Which is also possible to do with the XML-to-HTML method above, but requires extra work.)
But with CS3’s Export to XHTML, there is no opportunity to map ID styles to HTML tags, a pity. All text that’s exported is marked up with the same basic “p” tag (headlines, subheads, captions, etc.) except for bulleted and numbered lists. These are automatically marked up with the correct ol/li or ul/li as long as you used ID’s built-in bulleted or numbered lists feature to format them.
Other than lists, though, everything is a generic body paragraph. There’s no HTML markup for headers (h1, h2), and you lose your bolds and italics. If you choose one of the CSS options then each and every application of a paragraph and character style gets a “class” attribute applied, with the name of the ID style (slightly modified to comply with XHTML). So instead of surrounding italicized text with “em”, it surrounds it with “span class=my-italic”.
The only way not to get a lot of garbage code in the final HTML file from ID CS3 — by this I mean things like “<p class=body-tight>” preceding every paragraph — is if you choose the “No CSS” option in the Export Options dialog box. There is a tantalizing option to include a link to an external CSS before you export, but what we’re missing is a way to map ID styles to CSS styles.
Still, if you renamed all your ID styles to match the CSS ones, then it might get you close.
CS3 is also missing a “View with ___ browser” command. After it exports the .html file you have to hunt it down and double-click it to see the results.
But everything I explained in the article can be done in CS3 too. In fact, it’s a lot easier to add those “double tags” (like enclosing a series of li’s in an opening and closing ol), because you can shift-click the li paragraphs in the Structure panel and choose New Parent Element from the panel menu, which automatically surrounds the selection with the tag you select from the dropdown menu.
Anne-Marie,
Like Steve, I’m not an HTML expert. Can you explain why stuff like ?? is garbage that needs to be gotten rid of?
The CS3 XHTML export creates CSS declarations for divs, paragraphs, and spans which seem to me to essentially correspond to frames, paragraph styles and character styles. What’s wrong with that?
Woops!
Something ent wacky with my message. The empty quotes were meant to include this: <p class=body-tight>
Hi Peter, the reason those sorts of tags (class attributes added to every “p” tag) are unwanted is because a) The “class” tag is only used when a site is using CSS to format text; and b) If a site is using CSS — see (a) — they have already specified custom formatting for the “p” tag itself. For example, they might have specified that any text block marked up as a paragraph (a “p”) should be Verdana 10/14 and colored dark grey.
So adding a class specification to every “p” just means that the web designer has to go through the text and clean up (delete) that mark-up.
There are often times when blocks of paragraphs have different formatting on the same page. Web designers achieve this effect in CSS by including ID specs for certain sections of a page, like main content, sidebar, and footer; and also specifying what a “p” should look like in each of those IDs.
This is all set up in the CSS file, separate from the page content. In the content itself, regular “p’s” not belonging to an “ID” look one way, regular “p’s” that are inside a given ID (the text in the source is preceded by something like <div id=”Article Body”>) look another way. In neither case is a “class=”InDesignStyleName” an attribute of the “p” tag.
Occasionally, these class tags *are* applied to “p’s” but only in special cases. Web designers strive mightily to avoid having to apply them … one of the points of CSS is to separate content (“p”) from form (“class=whatever”).
Go to any good-looking web site that uses CSS (most modern ones do) and View Source on a page that’s text-heavy. Scroll down past the gobbledy-gook header stuff at the top until you get to the body text. 9 times out of 10 you’ll see plain “p” tags with no class attribute.
Thanks, Anne-Marie. I’m still not clear on this.
I do understand and appreciate the desire to separate form from content. However, it seems to me that the tags (like <p>), the class attributes, and the IDs can ALL be viewed as part of the form, with the content being the text and objects within the tags.
Given that this isn’t the way existing CSS files are set up, I understand your desire to map InDesign styles to tags, but I’m still not clear on why the way that the CS3 XHTML exporter does things is undesirable if you are starting out with a clean slate and are able to create a CSS file which uses class selectors rather than unique element tags.
Well, first of all, I’d bet that the vast majority of ID users are not working with a clean slate … they need to export ID content in a way that’s suitable for inclusion an existing site with existing CSS.
Moreover, even if they are working with a clean slate, class selectors in every “p” are considered a wrong-headed way to use CSS. There’s even a term for it (coined by Jeff Zeldman of Designing with Web Standards), “classitis.” Do a search on Google for “classitis” to see how reviled and unnecessary the practice is ;-) …
Or here’s a great treatise on web page design/mark-up, Best Practices in Web Design, written by Apple. It’s a long page, but scroll down to (or search for) the section on Classitis. It explains the issue quite well, with examples.
Does that help at all?
Thanks. Looks like a lot of interesting reading…
I have tried this several times and it always adds all these weird characters. I spend hours cleanig it up. Am I doing something wrong?
Hi Rosie. Where are the weird characters coming from … I mean, can you identify certain glyphs or whatever used in the doc that always export to a “weird character”?
It might help if you could post an example HTML file and link to it here.
Great article. Quick question. Is there any way to carry over hyperlinked text (external links) in the ID CS3 document to the html page so that they will still function in the browser?
If you use CS3’s Export to XHTML function, the hyperlinks are preserved and work fine in a browser. I haven’t tried this with the export to XMLish technique described in the post.
I just tried that but had no luck. I check the help file and it said it won’t export hyperlinks (except to text). Do you know of a workaround?
Well that’s the weirdest thing! I tested it before I wrote my response and it worked fine. Then I read your reply and looked at the help file, indeed, it says
“What doesn?t get exported InDesign does not export objects you draw (such as rectangles, ovals, and polygons), movie files (except for SWF), hyperlinks (except for those that jump to text)…”
So I tried again, and it still works. You can view the resulting HTML page here (opens in a new window).
See if you can recreate my steps:
1. Create a new doc in CS3, drag out a text frame and fill it with placeholder text.
2. Select a couple words, open the Hyperlinks panel and click the Create New Hyperlink button.
3. In Hyperlink Options, change the Type to “URL” and enter a URL in the field, then click OK. You should see a gray rectangle around the linked text.
4. Select the frame and choose File > Export to XHTML. After you name the HTML file, just accept the defaults and click OK.
5. Look at the HTML file in the browser.
I just repeated the above a third time and it still works. I’d call it a bug in the documentation but you’re saying it’s not working for you, so I’m at a loss for now. Maybe I have a magical copy. ;-) (just kidding, it’s the regular retail version.)
Your steps worked! I was creating the link by selecting text, right clicking, choosing Interactive and New Hyperlink Destination. When I made a PDF it worked fine as a link but exporting to XHTML didn’t. Anyway, I’m all set. You have no idea how helpful this has been. Many thanks.
Thanks for the steps, worked perfectly except I have problems with exporting footnotes with CS2. I can’t label them. What I need is the footnotes and it’s link to be exported in XML is there a solution? Cause Tagging of footnote text is not supported in CS2. :S
if i could hug you through a post I would
I have been trying to figure out a way to do this for years.
you have just saved me so much time it is unbelievable
i feel like it’s Christmas
I just tried this conversion, and I got a message that said, “Not all of the characters could be encoded.” When I opened the HTML file, the paragraph marks, apostrophes and quotation marks came through as ' and ".
Is there a quick way to get around this, or is it better just to do xml and use xsl/xslt to convert to HTML?
Thanks so much!
Thanks Emily. We recently stumbled on this technique ourselves, but you’ve added a couple of nice nuances that we missed.
Did you ever write the added blog entry related to images. We’re getting a bit hung up on how to do that easily.
Thanks
I’m also getting “Not all of the characters could be encoded” then it adds characters all over. Do you know why?
Wil, (and others), “part 2” of this post, exporting images to HTML, is here.
I don’t know the answer to the “not all characters could be encoded” as I haven’t encountered that error yet. You might want to post a link to the .indd file or .html file or something so we could take a look.
(I don’t know whether you received my other post, but I’d like to try again.) Thank you so much for posting this method. I’m not sure what I would have done without it. Re the weird characters and encoding problems: I also saw the weird characters when I viewed the final html files either with a text editor or with a browser on a Windows pc. Problem seems to be related to the encoding–I didn’t see anything wrong when I viewed the html files with a browser on the mac. I found that if I opened the exported html files in BBEdit Lite, and chose “zap gremlins” , all the “weird characters” were removed, and the files were much improved. However, html encoding of apostrophes, em-dashes, some characters with diacritical marks, and some quotation marks is sometimes scrambled or incorrect and if you do “zap gremlins”, the characters sometimes get eliminated. I have been told that I should try re-saving the files with a different encoding system. Hope this helps. Thank you.
I am working on a website project for a local newspaper. The original plan did not include using InDesign to export any of their information. After reading several articles about this (especially this one) it would be foolish not to. I do believe I have one major hurdle. The newspaper is forced to make their Pages in separate files. So a story on the first page (page1.indd) may be completed on the last page (page10.indd). Since I do not work with InDesign I wonder if there is an easy work around to this problem.
Any thoughts on this would be appreciated.
Thanks!
Angie, at some point you’ll need to join the story jumps. So you can either do so in InDesign or in the final HTML files. I don’t think one way is faster or easier than another. If you do it in InDesign you’d have to merge the pages with story jumps into one document via drag-dropping from the Pages palette. Then link the two pieces of the jump story, and export it to HTML.
If you do it in the HTML files, you’d name one exported story “feature part 1.html” and the other doc’s exported HTML story “feature part 2.html” and then cut/paste one into another in your web design program.
I tried using this technique to produce a html version of an annual report. Everything has worked as expected, except any paragraph returns inside a tag gets exported as an unrecognised character. When I view the results in a browser I get a “?” at the end of EVERY paragraph!
I tried all of the encoding options in the XML but they all produce the same result.
Any suggestions would be appreciated!
Sorry just read all the other posts and my problem has been raised.
I’ll look into some of the suggestions, and check back for further suggestions.
Thank you for this. I am upgrading to CS3 first to see how the built-in html export works, but if it’s not satisfactory I will just use this method.
the only problem im still having is with the photos and text layout. all the words show up in my browser, but there arent any photos, and the layout isnt horizontal, which is the way i have it in CS3
Hi,
I’ve tried doing this in CS3 (the mapping and such) to no luck. My main problem seems to be the export function won’t let me change the .xml to .html. As a result when I view the results in my browser I see all of the code surrounding my text….Any suggestions?
Eager to get my newsletter on the web…..
Sue T.
Susan, when you choose Export XML, you should get a standard Open/Save dialog box where you can hand-edit the filename and extension before clicking the Save button. You’d change “Untitled.xml” to “Article.html” for example.
Maybe you’re on Windows and it won’t let you do this? (I haven’t tried it on that platform yet.) If so, just leave it as .xml, and change the extension to .html outside of InDesign, in your OS (in Explorer, i.e., a My Documents window).
Hope that helps…
I am on Windows and I wondered the same thing–but you know, I just tried again for the thousandth time and it WORKED. I MUST have been doing something wrong. Thanks so much for this wonderful article. I think I just may look like a genius with a client….
Sue T.
A tip for those of you getting strange characters in the HTML files. Try opening the file in a text editor like NotePad or TextEdit, make sure it’s in “plain text” mode, then save it with the same file name. I tried it over here with some samples users sent me and it fixed it right up … clears out some hidden weirdness that ID sometimes adds.
Text Wrangler (free from barebones.com is my favorite text editor on the Mac, and it has a great feature called Zap Gremlins that really helps clean stuff up like that, Anne-Marie! (Sometimes just saving over it doesn’t entirely get rid of that high-bit garbage.)
Hi Anne-Marie,
That’s brilliant, thanks for sharing this. It fits exactly in the workflow of a project that I’m currently working on. The final result still needs a bit of tweaking but this method saves me loads of time. Thanks a mill!
Hi – I tried to run Dave’s preserve formatting script in ID CS3 but I keep getting a Javascript error #55. Is there any update for CS3? I think preserving the formatting then exporting from CS3 to XHTML would be the simplest way to get magazine articles from Indesign to the web …
Thanks for any help!
Shelly
When taking a high resolution into in design it seems to be distorting/blurring the image. I had the same issue when I was trying to send out a flyer via e-mail I created in InDesign. CS2
Thank you so much!
I just started an internship at a publishing company and this is helping me streamline the print-to-web process in ways they never imagined!!!
Thank you for the clear and concise article!
p.s. The link to the plug-ins and scripts page on indesignsecrets.com is out of date (missing /resources/ i think…)
Cheers!
Oops, forgot to ask a question!
When InDesign exports the xml file and it is opened in a regular text-editor (or at least in TextEdit on a mac), the code output is relatively neat and organized…
However as soon as I open the document in an HTML editor (like TextMate or Dreamweaver) all the code is mashed together rrrreal tight!
Is there any configuration or trick to get it to export perceptually clean XML/HTML? My current method is to perform a find & replace for all p elements and replace it with a carriage return before the p element. This spaces everything out in a neat manner, but it would be nice if it wasn’t a necessary step in the workflow.
I know its not that big of a deal, the content still renders just fine and complies to standards. Its just that I do try to code my work so it is easier (and more efficient) for other programmers/designers to debug, edit or add to the document.
Thank you for any ideas!
In Dreamweaver, select the code and then go to “Commands”, then “Apply Source Formatting”.
This should help get the code looking better rather than scruntched up in a paragraph.
Wow did that ever work well…. thank you so much Brad!
I have come to another roadblock however: InDesign does not allow custom tag names using spaces or other weird characters. I am trying to apply html elements with classes (i.e.
p class="indent"orh3 class="bio") but I guess since XML doesn’t allow for this ID’s export feature can’t quite override it.The only other thing I think might help is a stylesheet for the XML, but I only see that being favorable if the workflow doesn’t begin from the actual InDesign files.
If anyone knows an alternate solution, it would be greatly appreciated!!
The only thing I can think of is that it might be possible for someone to write a script to allow ID to override that restriction.
Hello hello people!
Ended up solving the problem. I guess I wasn’t familiar enough with XML to know that a properly formed XSL Transformation document would accomplish exactly what I needed.
I was trying to use the XML tags to apply HTML tags…. this is not the purpose of InDesigns tags! I finally know that I should have been tagging my content as XML (only!) and then use an XSL sheet on export to transform the tags into whatever the H-E-Double-hockey-sticks I wanted!!
For others encountering my dilemma, take my word for it: If you know xHTML, learning to use XML with an XML Stylesheet (XSL or XSLT) is really not too hard.
It would still be really cool to be able to apply class names to tags through InDesign. This would make the Export to XHTML feature soooo much more useful!
Fahim, thanks for that! I agree, using an XSLT on export is the proper way to go to keep the XML output as flexible as possible. (That way you could apply an XSLT for just about any output media you’d like from the same source ID file … an XSLT that transforms it to HTML/CSS markup would be just one option.)
Keep in mind this tip is for exporting BASIC HTML … p’s and em’s etc. … not for applying CSS at the same time, not for producing an XML file. The idea is that on top of the basic HTML structure, you’d apply any special class-type CSS in a web authoring program.
I’m curious though why you’d ever need to apply a tag like “h3 class=”bio”” … wouldn’t the entire bio be in a div (which you’d apply in a web authoring program), and thus the h3 automatically take on the formatting for that div as defined in the CSS?
1. First, thank you VERY VERY much for posting this. It helped me move a very large book from InDesign to online. I produced cleaned code and someone else styled it.
2. Comment about adding list tags: I found it a lot easier to edit in html using Find and Replace than adding OL and UL tags. Just takes a little bit of creative find and replace requests. It was fun seeing Dreamweaver run through thousands of line of code! Hahahaha!
3. Response to another post: “However as soon as I open the document in an HTML editor (like TextMate or Dreamweaver) all the code is mashed together rrrreal tight!”
An easy I found to unmash is following find and replace:
find:
><
replace:
>
<
You have to use Control Enter to create a line break in betwen the two angled brackets. Works like a charm for me.
file:///Users/Mike/Desktop/HTMLpractice/HTMLpractice.xml
this is what i came up with :( since im following your very basic instructions and hanging on by my fingertips to understanding what is going on, i have no idea where to start to try and correct this problem.
im sorry im such a novice in this field, im doing what i can to try and learn about the web! i appreciate your help!
sorry, ive just noticed that when i am editing the extension in the export step, its automatically changing it back to .xml
could this be part of the problem?
@Andrea: I think the steps above say that you need to change the file extension to .html.
you are right. it does say that you need to change the file extension, as i mentioned, after the change is made it is automatically changing back to .xml
is there a way to prohibit this from happening?
Hiya Andrea!
What version of InDesign are you using, and is it on a Windows or Mac machine? Also, does the extension only change back to
.xmlwhen you click away from the text field or only after exporting?p.s. You could always just make the change to the actual file itself!
@ Anne-Marie:
Again, thank you so much for your help. I apologize for not getting back to your question regarding CSS classes: I think I meant to write
h3 class="byline". A whole paragraph of biographical info definitely merits its own div! Even then, if the h3 is only for bylines, and the entire article is in a div, we can always style the element with#divName h3 { }. This would be a better use of the CSS cascade than trying to style the byline through a mess of classes.I still feel the ability to export tags with class names (which is not the same as using inline styles) is very valuable to web designers. I look forward to seeing the advancements the folks at Adobe make with this feature. Thanks for helping me figure it out!
Is it possible to have the styling exported as well?
i.e., export the indesign page/s and see it displayed in the browser as it is in inDesign.
Is this possible in either CS3 or CS4?
Hi there,
Than you very much for sharing this. Still timely and useful even after a few years old.
My question is, what is a good document size to work on from scratch in InDesign that will be exported to bleed images on a browser (e.g. the banner, for instance)?
Thank you for your comment in advance.
Hi Anne-Marie,
Just wondered if these exported HTML pages would be searchable?
Thanks.
Laura, yes, the exported HTML pages would be searchable; that is, if you put them on a web server then the search engines would crawl and index them.
Thanks a lot!!! I mean it. This posting just saved my day. I was trying to figure out how to do something like this and this totally explained it for me!!!
Is there any option by which, i can export to HTML in form of multiple pages, not only a single HTML file?
Regards,
Neeraj
Hi, I need help with a export from Indesign CS4 to Entourage 2008. I have 2 macs , IMAc and macbook pro. In macbook pro I don’t have the problem when copy the page document from Indesign and paste in a new mail message in entourage. The problem is: when I paste the whole page in the text field of the new message it appear at the end of the image a nav bar like a video player. In the macbook doesn’t appear this problem. What could be?
The document have text in the top and a picture buttom and under the picture there is a navigation bar that I don’t know why it is there.
thank u
Such intelligent work and reporting!
So, you ended up doing the job of the web designers in your company!
May as well take their job!