How to Incorporate Chapter Thumbnail Images into an Auto-Generating Table of Contents
[This piece was presented during PEPCON ’11 at the Ignite InDesign evening.]
In the process of creating and using technical manuals, I have discovered that Table of Contents are a necessary evil. As a graphic designer, I avoided them for years. I was intimidated by the process of creating them and unaware of the power that they held in streamlining my long-document production. Once I learned how I could automatically update them whenever my text text changed or reflowed, I was hooked. Besides automatically updating text and creating links to the corresponding pages, you can also set them up to automatically generate bookmarks in your PDF file.
Tables of Contents (TOCs) are a handy tool to have your designer’s toolbox of tricks. But let’s face it, many TOCs are unattractive… or at the very least, neglected. TOCs give readers a way to quickly find the information they’re looking for. But the TOC is not a destination; it is a quick stop long the way to get to the part of the document that you’re really interested in reading. But TOCs don’t have to be visually boring! If the goal is to make the Table of Contents are useful as possible, I thought, “Why not include thumbnail images for each chapter?” That way, the readers wouldn’t even have to read the chapter titles. They can simply look for the picture corresponding to their topic of interest.
This is a step-by-step instruction on how to incorporate chapter thumbnail images into your Table of Contents. There are some specific ways to set up your anchored thumbnail images and corresponding object styles.
Step 1: Set up your Chapter file, TOC file and book file.
Create a book file, and add your INDD chapter file. Create a separate InDesign file for your TOC, and add that TOC file to your book. For instructions on using the Book Panel, check out this video by Michael Murphy.
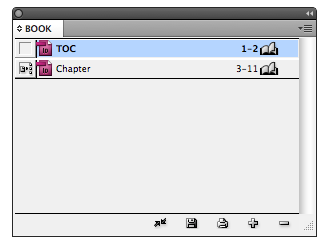
Step 2: Make a TOC
Before you can customize your auto-generating TOC with thumbnails, You’ll need to set up your TOC. If you’re not familiar with creating a Table of Contents, check out Michael Murphy’s instructions here.
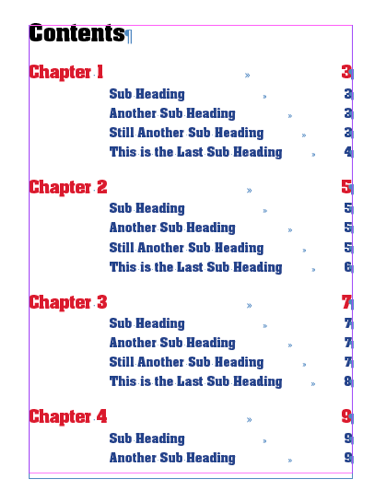
Here is what my formatted TOC looks like. I’ve left extra room the left hand side for small thumbnail images.
Step 3: Add your thumbnail images to the headings in your chapter file.
With your text insertion point at the end of an H1, place your thumbnail image. It will automatically place Inline with a Y-offset of 0.
Now here’s the interesting part, I tried changing the settings from “Inline or Above Line” to “Custom” in order to have the thumbnail image located off the page, or at least outside the text frame edges, but all my attempts failed. This is because when the anchored object position is set to “Custom,” the anchored object will not pull into your TOC. Setting the graphic to “Inline or Above Line” is the ONLY way to get the thumbnail to pull into the auto-generating TOC.

Step 4: Format one of the thumbnail images so that it is invisible and doesn’t push the text down from the top of the frame.
My thumbnail is .5″ x 5.”, and I found that adjusting the Y offset to -.375″ pushes it down far enough. Next, I adjust the opacity to 0%.
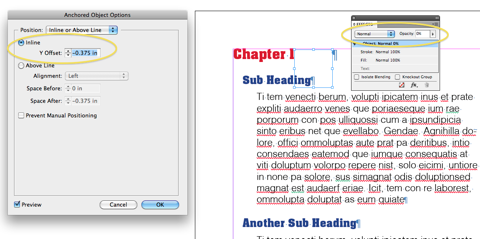
Now I know there are some prepress people out there who have rightly have concerns about the transparent anchored object interacting with text below it. But since the thumbnail is completely transparent, there is no interaction with the text frame which contains it. See below. No rasterized text. The text frame is not even affected.

Step 5: Create an Object style for your invisible thumbnail.
For the sake of simplicity, I named my object style “Invisible.” There only two things you need to have checked here: Anchored Object Options and Transparency.
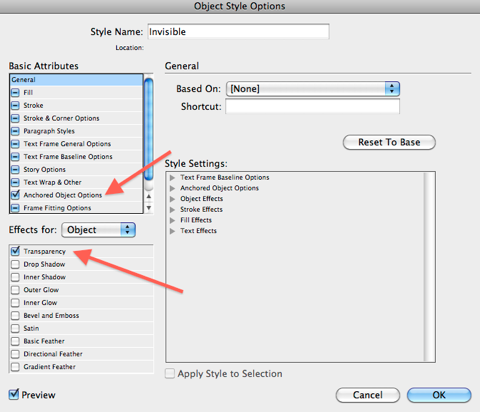
Step 6: Apply this new object style to all of the thumbnail images in your chapter.
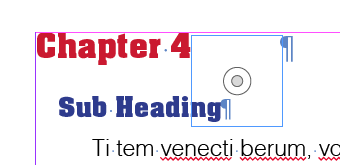
All the thumbnails should all now be invisible. Interestingly, because the thumbnail images are invisible, even their frame edges are invisible. You can tell that they’re still there because the paragraph symbol is moved over by 1/2″, and when you mouse over the thumbnail, the content grabber and frame edges appear.
Step 7: In your TOC file, update your Table of Contents.
Layout > Update Table of Contents. A couple of things just happened.
- The TOC got updated.
- The inline graphics pulled in along with the text.
- The TOC file imported the “Invisible” object style you created in your chapter file.
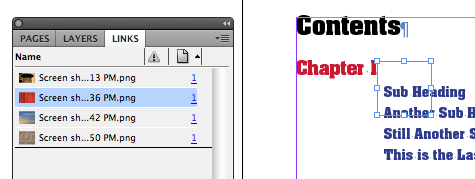
To verify that your inline graphics did indeed pull in, take a look at the Links panel. You should have thumbnails in the Links panel.
Step 8: Format one of the thumbnails to the transparency and position that you want all the final thumbnails to have.
While the “Invisible” object style had to be inline, the new Visible style does not. So change your settings to something similar to what I have below. Adjust your settings based on your design. It’s helpful to show Text Threads while adjusting the setting, to get a better idea of how the anchored object sits in relation to the anchor marker.
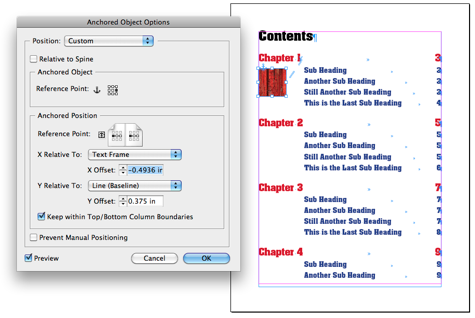
Step 9: Create an object style with these new settings. Name it “Visible.”
This step is very important. You may ask, “Why not just use the same Object Style name for the chapter document and the TOC document, and give them different Object Style” Because, there is a bug in InDesign, that,
- when you update your TOC,
- and it pulls in inline graphics from the chapters,
- if the object style it pulls in has the same name as an existing object style in the TOC document,
InDesign will crash.
It is at this point that I got stalled for about two years, trying to solve the problem. But then I finally figured it out. There must be two different Object Styles: one for the Invisible thumbnail, and one for the Visible thumbnail.
Step 10: Drag your “Invisible” style into the Trash.
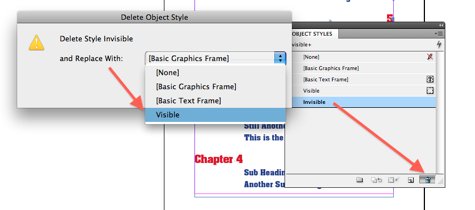
When you trash the Invisible Style, replace it with the Visible style. All of your thumbnails should now pop into their correct position.
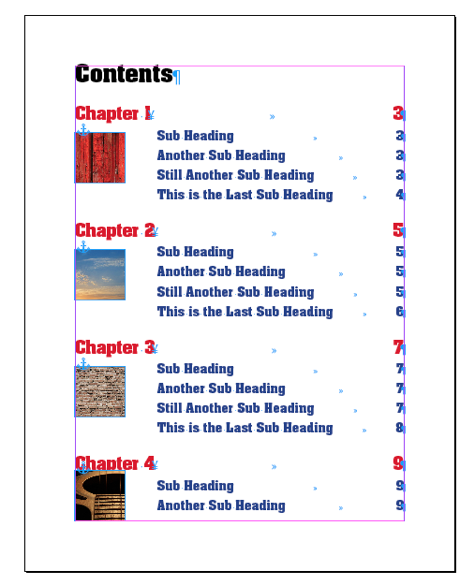
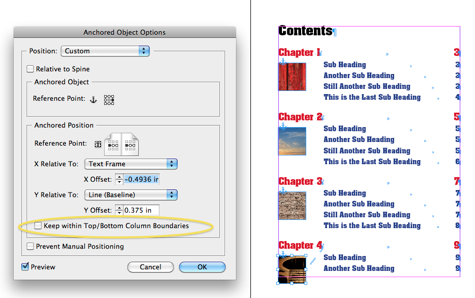
But do you notice how the thumbnail at the bottom is a little too close to the Chapter 4 heading? That’s because I had accidentally checked “Keep within Top and Bottom Boundaries” in the Anchored Object Options dialog box. So go back to your Anchored Object Options and uncheck that. Then redefine the Visible style. You may or may not experience the same problem in your TOC layout. But it’s something to keep in mind if your thumbnail is too close to your H1.
Now that I’ve unchecked “Keep within Top and Bottom Boundaries,” the thumbnail will not get too close to the H1.
IMPORTANT:
Every time you are ready to update the Table of Contents, you MUST throw away the Invisible object style in the TOC file before updating the TOC. Otherwise, InDesign will crash.
May all your Table of Contents be useful and beautiful!


Has this reproducible crashing bug been reported? What’s the bug number?
Hi John,
I just reproduced the crash and have an Apple crash report to send. I didn’t get the Adobe crash reporting box (with most other crashes I do, but this crash is unusual in that I don’t).
So I have a text file with all my crash details. I’m guessing you work for Adobe, so where should I send this crash report? It it still applecrashlog [at] adobe.com? Thanks.
I forgot to mention that I’m not sure if I have ever officially reported this reproducible crashing. I have filled out the crash report dialog box so many times over the years that I have kind of lost track. And since with this crash, I never get the dialog box, I honestly don’t know if I’d ever found a way to tell Adobe about it.
I don’t work for Adobe. But my understanding of these things is that if you don’t report the crash via Adobe support, it is pretty unlikely to be fixed. So sometimes my mission in life is prodding people to actually report them. If you have Adobe Support, the best place to report is adobe.com/go/supportportal.
I don’t have Adobe Support, but after I posted my comment earlier (about not getting the Adobe crash dialog box), the Adobe crash dialog box showed up. So there’s a good chance I’ve submitted the crash report before. But I did it again today, just for good measure. :)