How to Inset a Stroke Partially Inside a Frame
I love visiting new countries because there is always some design I see that catches my eye and I wonder, “How would I do that in InDesign?” Regular listeners know that I’m visiting Dubai at the moment, doing some InDesign training for Chillout Productions. While eating a wonderful buffet breakfast with labneh, fool madamas, olives, and a host of other foods that I enjoyed trying, I glanced over an English-language newspaper and saw an ad that included a series of photos that had an inset stroke, like this:

(No, that’s not a photo of Dubai… it’s Tokyo. But hey, we’re nothing if not multi-cultural around here.) ;)
Okay, so it’s a white line around the image… but inset slightly from the edge. Here’s how I would do it:
Choose Stroke Styles from the Stroke panel menu and create a new Stripe like this:

When I opened the dialog box, there were two stripes; I just dragged one of the little black triangles on the left out of the dialog box, deleting it. Then I dragged the other triangle down. Notice how the stripe is only a small percentage of the width of the stroke.
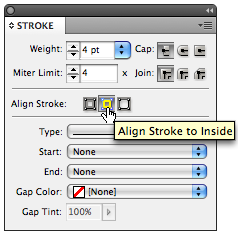
Now I can apply this new stripe to my image frame and set the stroke alignment to “inside”:

Adjust the thickness of the stroke to get the effect you want. You can also go back and edit the stroke style definition to make it thicker or adjust its position in the frame. To get the rounded corners, I used Object > Corner Options with a 1p radius.
When you get it just right, save this as an object style!
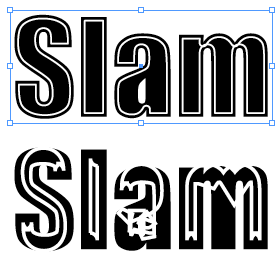
By the way, you can apply this effect to other objects, too, with some very interesting effects. For example, this lets you put a stripe on one side of a path but not the other. Or, here’s what happens when applying it to text that has been converted to outlines (you have to create outlines because InDesign can’t apply a custom stroke style to editable text yet):

The text on the top has a stroke thickness of something like 3 pt… but when I increased the thickness to 8 or 9, it completely wigged out (bottom)… cool!
By the way, as Iran is just across the gulf as I type, I figured I’d play Niyaz here in my hotel room. If you don’t know this group, and you like electronica (e.g., Delerium, etc.), you must check it out.


Nice tip and it can be taken a bit further by using a gap color to give you a two color stroke.
That’s a great tipp!
I love this tip. I’m just imagining the jobs I will drop it into. I haven’t tried it yet but I’m thinking patterns too (dashes, dots, etc.)
Update: I just tried dashes and dots but they don’t have the inset that the stripe gives you. However, try different corner effects!!! I am gonna be lovin this one!
Thanks David
I?ve been trying to find a way to add multiple strokes, to make images look like matted prints. This tip plus Bob Levine?s note on the gap color helped me figure this out.
To make an image look like a matted print, make a new stroke style with a thin inner stroke as above. Then, in the stroke panel, set the stroke color to pick out one color in the image (for a thin inner matte), and set the gap color to pick out a second color (for the wide outer matte). White could also be used as a typical color for the outer matte.
Still in the stroke panel, set the stroke weight according to the width you want the matte to be, and set the alignment to outside, so you don?t crop into the image.
Thanks for a very useful tip!
@Mariella: I just posted an example which (I think) shows what you’re describing.
Coolest tip I’ve learned lately, thanks!!!!
Is is possible to do this with a dotted stroke? Thanks.
Joe: no, as custom strokes can only be either stroked OR dotted (or striped).
really great! just used it for a project – is there a way, however, to make an inside stroke with dashes?
@Rebecca: I don’t like to say “no,” but I’m going to say “probably not.” :)
so disappointed since this is exactly what i need!
I just tried this using Indesign CC v 17.3 and it’s not working. Do we know if this functionality was lost with newer versions?
As far as I know, everything in this post should still work in newer versions of InDesign. What part is not working for you?