

How to Make Multiple Graphics Flow with Text

InDesign makes it easy to insert a single graphic so it flows with text. But what about several graphics that need to be placed together as one object? And what about inserting two (or more) graphics evenly across a text frame? Let’s see how that’s done.
How a Graphic Is Placed in Text
A single graphic can be placed at a text insertion point as either Inline, Above Line, or Custom. To place a graphic anchored within a text frame, do the following:
- At the text insertion point, select File > Place, choose a graphic object.
- Click on the graphic object.
- Right-click and chose the Anchored Object > Options command. In the dialog, specify how you want to place the graphic.

There are all sorts of placement options available in InDesign. Adobe provides superb guidance on these options here. For the purposes of this article, we’ll assume inline placement.
Combining Multiple Graphics for Anchored Placement
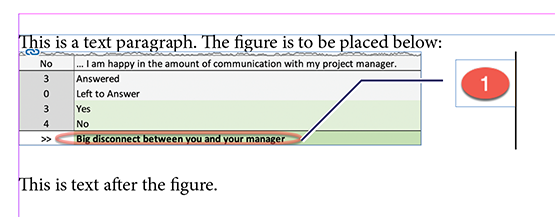
There are times when you may want to combine multiple graphics to be placed together as one anchored object. This is fairly typical with screen captures that you want to annotate with other graphics. This takes several simple steps:
- Outside of a text frame, temporarily place the objects on the page. In this example, there are three graphic objects (screen capture, caption number, and caption line):

- Group them all together with Object > Group.
- Cut to the clipboard with Edit > Cut.
- Place cursor in the text frame as an insertion point (between the two paragraphs).
- Paste with Edit > Paste.
The grouped graphic flows with the text preceding it:
And if you need to replace any of those objects, do the opposite steps: cut the object out of the text frame, place it on the page, and ungroup the objects.
Placing Graphics Evenly Across the Page
There are certainly times where you may want to have multiple objects equally spaced horizontally on a line at an insertion point. An unusual yet easy way that I’ve found to horizontally space graphics is by using a table.
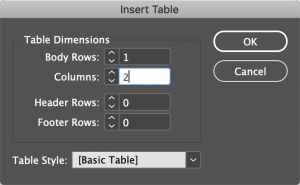
Let’s horizontally place two graphics on one line with these simple steps:
- At the insertion point, create a one row, two-column table with the Table > Insert Table command:
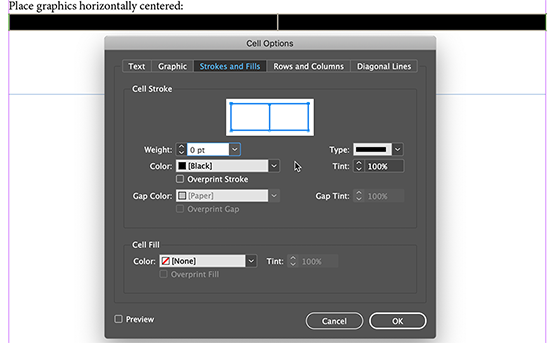
- Select the entire table and remove the default cell stroke by right-clicking and choosing Stroke Options > Strokes and Fills. A table will be created with columns that are evenly spaced across the entire width of the text frame. Set the cell stroke’s weight to 0:
With both cells still selected, click the Align center text symbol on the toolbar. This ensures that placed anchored graphics will be centered in each cell.
- Press Esc to exit the Text tool and click somewhere on the page outside of any text frame. Import the graphic file into its own frame on the page with File > Place:
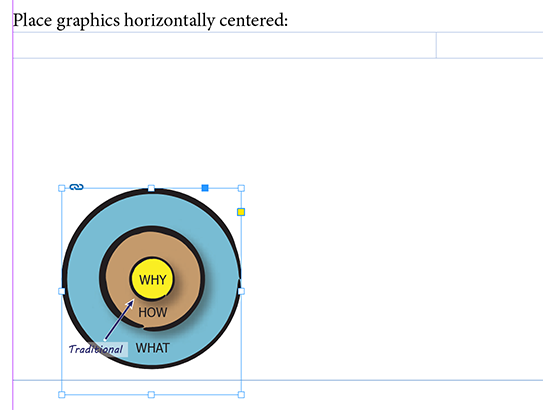
Pasting onto the page (instead of at the cell’s insertion point) ensures that the graphic is scaled to its original size.
- To insert it into a table cell, cut the graphic frame (Edit > Cut), click in the cell at the centered insertion point, and Edit > Paste:

Repeat step 4 and paste in the second graphic in the second column’s cell:
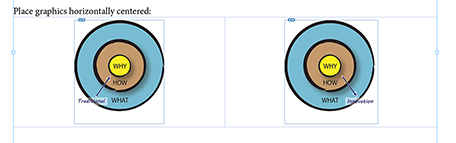
By changing the cell’s text alignment (left, center, or right), you can modify the horizontal placement in the table. Since tables are anchored in text, your graphics move when preceding text adjusts. For placing multiple graphics together into a cell, follow the same instructions in “Combining Multiple Graphics for Anchored Placement.”
Wow, and I thought I was the only one using both of these tricks, though I’ve always thought of them as “workarounds”… ;-)
As someone who formats a lot of long product manuals, learning to keep ALL elements inline has been a great timesaver. This article might finally help convince my coworkers that “Ken’s way” is best. While I arrived at both of these secrets myself by trial and error a few years ago, it always seemed like an inelegant solution to the problem. Thanks for confirming that there presently ISN’T a better way to do this… or IS there?
So far, I don’t know of a better way to embed inline multiple objects as one grouped object. Thanks for your comment. This is especially helpful when you combine graphics with annotations/captions in instructional material.
Ken