

InDesign Basics: Making a Photo Grid

You can use two of InDesign’s lesser-known tools to create a quick and easy grid of photos or other images. Well, one is a tool and the other isn’t so much a tool, but more of a hidden function. Semantics aside, use these two helpers to create a photo grid either as empty frames on master pages, or create them on-the-fly as you place images in your document.
Setting Frame Fitting Options
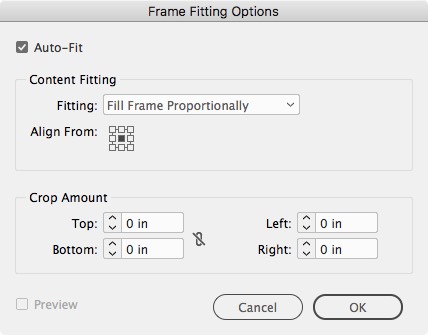
First, let’s set a preference or two to make our work easier down the road. Let’s set the image fitting preferences before even creating a frame or placing any images. This way you won’t have to adjust each image’s frame after placing.
- With nothing selected—or with no document open to set this behavior for all new docs—choose Object > Fitting > Frame Fitting Options.
- Choose Fill Frame Proportionally (or another option that works better for you) from the Fitting drop-down menu.
- If you’d like to have the image continually fill the frame as you re-size it, check the Auto-Fit checkbox.
- Set any universal crop amount, if desired.
Set Grid Spacing
Next, set the amount of spacing you’d like to automatically create between your images in the grid. It’s nearly impossible to do this numerically after the fact, so now is a good time to set the value.
- If you already have your document created, choose Layout > Margins and Columns.
- Under Columns, set the Gutter amount to the desired amount of spacing.
- You can also set this amount in the New Document dialog box when first starting a document.
Place the Images
Now, let’s place some images. Remember, you can create a grid with empty graphics frames, as well. But having some images already populating the frames makes it easier to see the results.
- Choose File > Place and navigate to your images. Select as many as you need (we will use 12 in this example). Click Open.
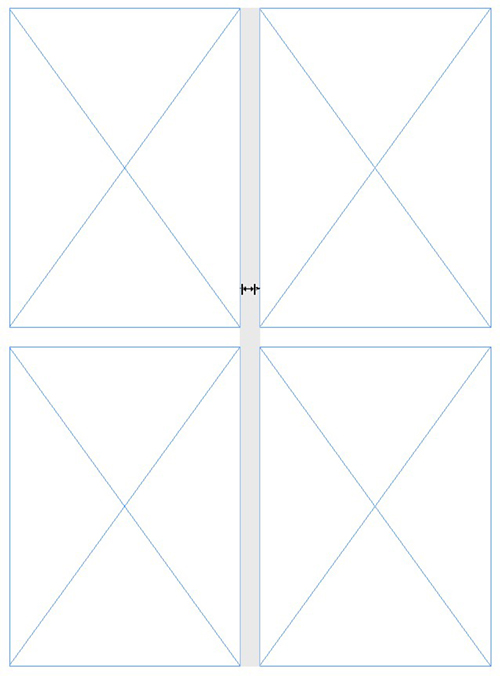
- With your loaded cursor, click and drag out your first frame, but don’t release the mouse, yet.
- With the mouse button still held down, click the right arrow key twice to add two columns (you should see a grid of rectangles on your page). Click the up arrow key three times to add three rows.
- Increase or decrease spacing between the frames by holding down the Command/Ctrl button while clicking the arrow keys (and while still holding down the mouse button…I call this a “bring a friend” shortcut).
- Still holding the mouse key, drag the lower right edge to set the overall size of the grid. Finally, release the mouse button (and there was much rejoicing!). Each photo will be placed into a frame in the grid.

Drag out a shape while using the Up and Right Arrow keys to add rows and columns.
Adjusting the Grid
Lastly, we’ll use the Gap tool to add some variety to our rigid grid.
- Choose the Gap tool from the Tools panel (it’s the 4th tool along)
- Roll over any gap—between two objects or objects and a page edge—to highlight it.
- Click within the gap and drag to re-size objects while maintaining the gap between them.
- Shift-click to move and re-size only the objects immediately opposite the gap. By moving individual gaps, you can create variety and break up the monotony of the grid a little bit.

Get the Most Out of the Grid
Note that the frames aren’t linked or connected to each other in any way. Once created, the individual frames in the grid are independent, normal graphic frames. Move, size, split, or combine them manually to add even more variety. Save the layout as a master page by dragging the document page up into the master page section or save the document as a template for re-use.
Thank you for this guide! I’ve been meaning to set up a collage template and was dragging my feet because I thought it would be really tedious.
AWESOME!! I had never noticed the Gap tool before!!
I’ve been using InDesign for years and never knew we could do this. This is so cool! THANK YOU!
Hi Erica, Looking forward to seeing you at the Creative Pro Week conference in NOLA this June.
Best,
Jeff Witchel
Same, Jeff! See you soon!
WOW!! Never knew how easy collaging could be. Thanks a lot!!
Hello Erica, your tutorial wasvvery helpful and to the point! Loved it, thank you so much!
I’m glad this has been helpful…I love the Gap tool when I’m setting up collages. I used to have a great plug-in, but I”m not sure they still make it…the Gap tool has helped fill in the, um, gaps, left by its absence.
Great tutorial, thank you very much.
Is there a way to change the spacing after importing the photos?
I mean, if I don’t like the spacing, is there a way to change it afterward?
You would use the Gap tool to change the spacing. Unfortunately, it’s not possible to do it numerically, just visually. But it does respond well to guides. There used to be a plug-in called Albums InDesign that let you re-calculate the spacing all at once…I’m not sure if the plug-in still exists or not, though.
just wow! thanks!
Hello Erica,
Thank you this is very helpful. Now that I placed the grid and have 12 frames I noticed they’re all linked together even though your article suggests they shouldn’t be, is there a way to unlink them so I can start manipulating the grid into different sizes?
Thank you, really appreciate your help.
Lily
It sounds like you may be using text frames, which DO get linked. If you are placing images (or setting up image frames), they aren’t connected or linked in any way. Hope that helps.
Hello,
Thank you for getting back to me so quickly, I appreciate your response. It was actually that shift wasn’t working so I restarted the computer and it worked. Thanks again!
Saved my bacon. Thanks a mill!
Save the bacon! Glad it was helpful.