

InDesign Basics: Working With Layers

InDesign Basics is a series of articles for new InDesign users, highlighting basic information and techniques. We all had to start somewhere, so why not start right here!
One of the InDesign features that provides users with the level of design control that they need to create visually rich layouts is layering. Often when the topic of layers is brought up to InDesign users, they’ll say that they don’t use layers. Well, they’re lying! Not intentionally of course, but whether they realize it or not, they’re always working with at least one layer in every InDesign document that they create.
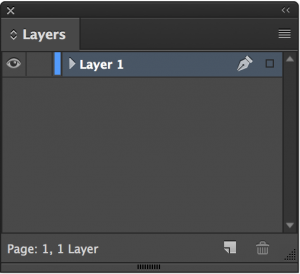
Open up the Layers panel in any InDesign document and you’ll see at the very least one layer, which is most likely called Layer 1. This layer is created by default in every InDesign document.
Many InDesign users understand layering in InDesign to the extent that they can use the Object > Arrange > Bring to Front command, which moves an object in front of everything else on that layer and the Object > Arrange > Send to Back command, which moves an object behind everything else on that layer. You may also have used the Bring Forward and Send Backwards commands in that same Arrange submenu, to move selected objects in front of or behind the next closest object on that layer.
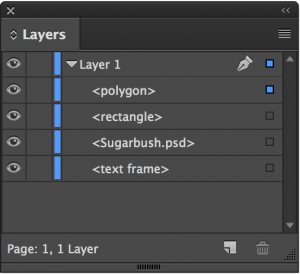
The term I stress here is on that layer. Those four commands to adjust the stacking order of objects only occur within a layer, and will never traverse to other layers. The other thing you’ll notice when you open the Layers panel is that if you click the disclosure triangle to the left of a layer name, it will reveal every single object on the page or spread that is contained on that layer.
Why Use Layers in InDesign?
Layers provide an enhanced level of control over the objects in a document by allowing you to subdivide a number of objects into logical or functional pieces. Simply put, the more complex a layout is, the more difficult and time-consuming it is to work with. This complexity can be reduced when you organize objects onto layers because you can hide or lock objects to avoid accidentally selecting or moving them while working in a document.
There’s no right or wrong way to use layers, nor is there any limitation to how you can take advantage of layers. One common configuration is to put all of the graphics on a layer and all of the text on a different layer. I’ve created projects that had two versions of text for different customers but with common graphics. In a case such as this, I had two different text layers and one common graphics layer. This allowed me to hide different layers to quickly produce a new version of my design. Another powerful configuration is to create a Master Items layer and put all of the objects on a master page on its own layer above all other layers in a document. This ensures that the master page items always appear on top of objects on each page of a document.
How To Take Advantage of Layers
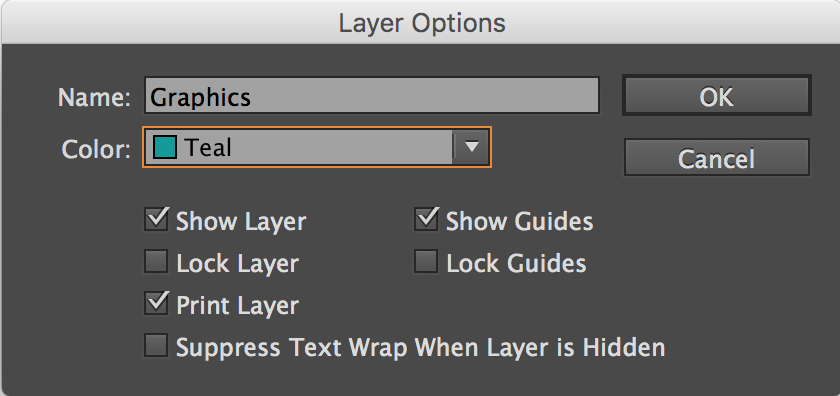
To create a new layer, click on the Create New Layer button located at the bottom of the Layers panel. This adds a new layer to the Layers panel, named Layer 2 by default. You can double-click on a layer to display the Layer Options dialog box where you can give the layer a more appropriate name, hide or show the layer, lock the layer, determine whether the layer will print, as well as several other options. You can even change the color of the layer, which is the color of the bounding box of selected artwork. To save time, you can hold down the Option (Mac) or Alt (Windows) key when clicking the Create New Layer button to automatically display the Layer Options dialog box so you can give each layer an appropriate name straight away.
When you click on a layer to make it the active layer (indicated by a pen icon to the right of the layer name), anything you place, draw, or create, will go on the active layer. That doesn’t mean that you can’t move objects from one layer to another. Doing so is actually quite easy. When you select an object in an InDesign document and open the Layers panel, you’ll notice a small square icon to the far right of the layer name. This icon indicates that the selected object(s) are located on that layer.

If you drag that square to another layer in the Layers panel, you’ll move the selected object(s) to that layer, while keeping the artwork at the same page location. Add the Option (Mac) or Alt (Windows) key while you drag and you’ll make a copy of the selected object(s) to that layer. You can also click on that icon on any layer to select that object in your document providing an easy way to locate where an item in the Layers panel is located in your document. Are you seeing how powerful Layers are yet?
Visual Stacking Order
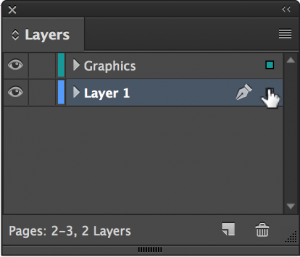
Just as objects within a layer have a stacking order, so too do the layers themselves. Anything that’s on a layer located at the top of the Layers panel will appear above everything else that is on any layer below it. To rearrange the stacking order of the layers, simply drag one layer above, below or in between other layers to change how layer content is displayed.
Object stacking order within a layer also becomes easier to visualize and manipulate when you open the disclosure triangle for a layer. You can see how objects are stacked in relation to one another because every object on that layer is represented from the top down. When trying to fine tune stacking order, you can simply drag objects up or down within a layer to precisely adjust the stacking order of objects in your design.
Naming Objects in the Layers Panel
You’ve already seen how you can provide appropriate names to the top-level layers in your document. Although objects that you draw, place, or create in InDesign are automatically named by default with appropriate names like polygon, rectangle, and text frame, you can easily rename the individual objects within a layer to identify them when trying to manipulate objects. Select the object, then click its name in the panel to change it.
Wrapping Up
Although it’s possible to work in InDesign without ever opening the Layers panel, hopefully you are able to see the power and flexibility that using Layers in InDesign has to offer. Give them a try and I think you’ll agree that they are worth taking advantage of.
Hello,
An issue that I have is that when I’am working that de Layer dots at the end of the panel aren’t showing there. I have to reset InDesign, because I don’t get them back. Is there an other solution to get them back. Because it’s very annoying that I have to walk through my Preferences to put everything back, what isn’t stored by the standard Menu savings.
Greetings, Henri from Holland
Henri: What dots are you talking about? Does this happen often?
Perhaps the effect of the larger panels in CC 2015.4?
I wil put a .png on our server. I have this very often. When I have an item selected, there has to be a dot or square at the end of the layer where you can move between the layers. But it isn’t there…
https://www.dhddrukkerij.nl/dhd3/DotsSquares.png
I have to reset Indesign, to get them back, but then I have to set all my preferences again, so that is not the way I want to do it….
@crych Larger panel isn’t the thing, because it happened in the previous version also…
That’s definitely not right Henri. I haven’t encountered this in any versions of InDesign that I use. What localization are you using?
I have it at my work and at home. The same issues.
Both on a iMac 10.11.5 (now x.6). As I told it was also in previous versions.
Henri & co.,
I’ve noted this also in the American English version on Windows 10, but only in the most recent update from June 2016 (2015.4).
Henri: could you explain what you mean by “reset InDesign”? Does the process you follow change what version of InDesign you’re using? I’d like to have the proxy squares without losing the benefits of the recent update.
Thank you!
Steve
I had contact with Adobe about this before, but they want you to delete some preferences in your Library. And that worked to. And I had to remove InDesign and Install it again.
Second time I use the CMD-Alt-Ctrl-Shift combination and startup InDesign and then is asked if you want to Reset the preferences. I said Yes and I could go on, but had to set my personal preferences back again.
Layers work universally on an entire document, every page of a document, right? Can they be set up to work on say only 3 pages in a document and have the layer configuration (e.g. number of layers, layer names) on these pages be different among the 3 pages? I want to use multiple layers only on certain pages and not have those particular layers be the ones I must use on other pages. Hope I’ve explained myself clearly. I’m using CD 6 Mac.
Thank you.
That’s correct Robin. When you add a layer to a document, that layer appears on every page of the document. There is no way to create a layer that appears on only certain pages. The only way you might be able to achieve that would be to save those 3 pages as a separate InDesign document with the layers that you want to use. Then place those pages as a graphic in the main InDesign document. Then when you go to edit those pages, the layers would only appear on those pages. I don’t know that I’m a fan of this though. Honestly, create the layers that you want to use and only use them for those 3 pages. They’ll appear on all pages, but you don’t have to use them. Does that make sense?
A belated thank you to Chad and Henri.
So why don’t you make more layers and use the ‘3 layers’ only for those 3 pages and the others for the other pages. Is more efficient I think.
And it is already back again in my layers pallet. The squares (I called them first ‘dots’) are gone again [blown mind face]
I LOVE working with layers, but would love it even more if there were a feature allowing me to quickly turn off and on the “printability” of a layer. I know there is the check box in the layer panel options, but wondered if there is a way of customizing the panel itself to have a clickable icon (like there is for showing the layer or locking it). Any tips?
You can ask this on your Adobe account, but it is not available to put it like a clickable icon, I agree, it would be helpful ;-)
One of the weaknesses of using layers in indesign (vs photoshop) is you cannot drag an existing grouped layer under another layer i.e. nest layers. This affects the full ability to hierarchy order elements in an elegant manner.
Is there a way to see all the objects on a layer not just for the current page but for the entire document? I work on a 32- page bi-monthly magazine. I usually use 6 layers. Occasionally I set up additional layers for special purposes. Like to keep the document clean, so would like to delete the unneeded layers, but am always worried I will have inadvertently moved something I don’t want to delete onto those layers. Other than clicking the layer arrow open on each page, is there a way to see all the objects on a layer throughout the document?