

InDesign Eye Candy, part 3: Punch-Outs, Stickers, and Rips

Punch-Out Text
Variations on this first one have been shown here before, but it’s a fun trick that bears repeating.

To make text that you can see through (and edit as real, live text) do the following:
Type some [Paper] colored text in a frame, then select the frame and set the text to the Multiply blend mode.
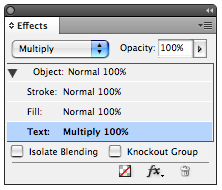
Then in the Effects panel, click on Object, and Knockout Group.
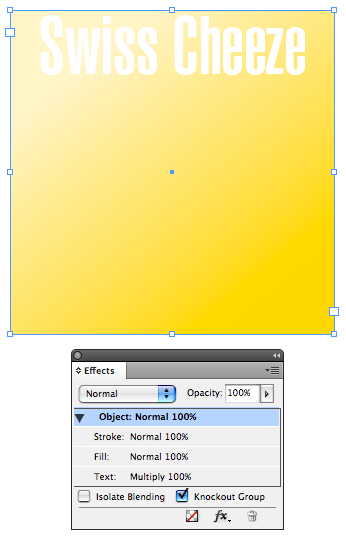
For extra credit, give the frame a drop shadow and the text an inner shadow.
Stickers

I’ve seen the sticker or decal look used in some magazines. It works best with simple shapes. Be warned, stickers are addictive. Once you start making them, it’s hard to stop.
Take an object or some text, and give it a big [Paper] stroke. Then add a tiny drop shadow directly behind.
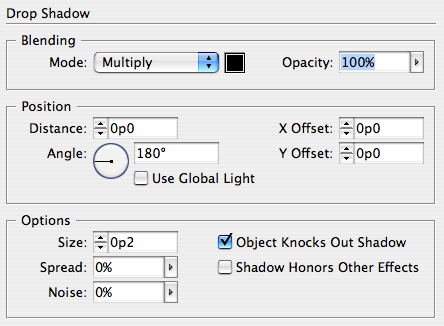
If the shadow gets lost on a colored background or photo, beef it up by increasing the Spread.

For extra credit, make an object style that applies the stroke and shadow to automate your sticker production.
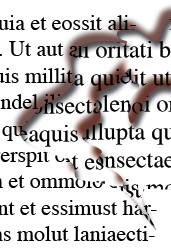
Rips
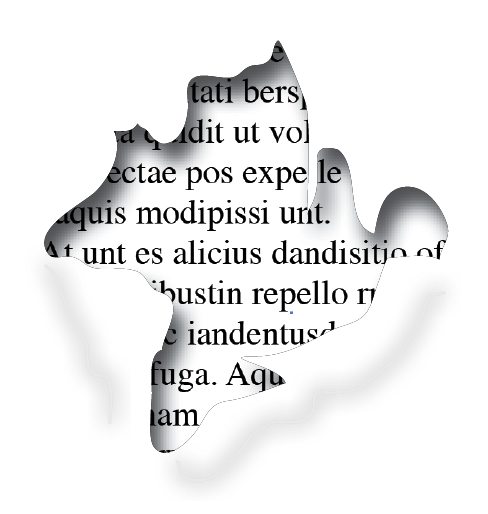
Want to make a document really “pop”?
Use the Pencil tool to draw a jagged shape. Apply an inner shadow. Then fill the shape with a photo, color, etc. You can sell the effect even more by adding a couple lines below and give them a big fuzzy drop shadow.
Variations
Bullet Holes: just a circle with an inner shadow and some jagged shapes with shadows.
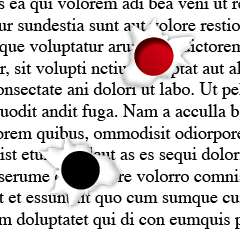
Layers/Burns: Pile the shapes on top of each other. Add a brownish drop shadow to “singe” the edges.
Breakthrough: If you want something to poke through the hole, you need two copies.

The part poking through has a clipping path and a drop shadow. The other part sits inside a jagged frame with an inner shadow.
Stand back, those horns are sharp!
Lots of fun techniques here. These are great. Thanks, Mike!
Nice tricks! Used to do that sticker thing in Ai (expand, offset path, unite, colour)
Definitely gona rip a page -showing the page below- in the next project.
You never fail to amaze me while making me laugh at the same time. Thanks Mike!
Thanks folks :)
After all this eye candy, I’m going to have to go on a strict diet of prepress and XML posts. ;)
I just tried the stickers. This is why I bought a computer!!!
locks great. but how do i get the cheese-holes within the textbox. any ideas?
Wow…these are some great ideas. Thanks for sharing your info!
Marc-
Draw some circles for the holes, select them and the text frame and choose Object > Pathfinder > Subtract.
Fantastic effects Mike – I come to your site to learn cool new things. Billy.
Told you I was gonna use the ‘ripped’ thing. Coincidence Big Time. One article was about a hole in a Paper-snippet (collectors collect the strangest things. A comic stripin this story) so I digitally ripped a hole in the page, showing the page below. Everyone loved the idea an I enjoyed the compliments.
Well Mike all those I pass on now. Thank you!
Mike-
Thanks for help with this fantastic effect. So simply if knowing how, but essential to get told.
Mike-
Thanks for help with this fantastic effect. So simple if knowing how, but essential to get told.
chubbyn’ s me
very well explained…..I love it.
Very nice tricks it seems you are a photoshop genius. Hopefully I will get that good with more tricks from you.
Very cool techniques nicely explained
I would like to download indesign.
BLL: The place to do that from would be https://www.adobe.com/downloads/
Another co-worker and myself tried to do this
technique and we were unable to do it. We both have MACs, system tiger and cs3- indesign.
what are we doing wrong!
Ron-
Which technique were you trying?
the punched out text. it just never worked. we tried a few variations and nothing. We have photoshop cs4
anyone know why this is not working for us!
Ron-
You mean InDesign CS4 not Photoshop, right? You don’t have to use anything but InDesign for the punched out text.
Make sure the text frame has a fill of some kind or you won’t be able to see the text.
A few other things to check:
text is filled with [Paper]
text is set to multiply
text frame (called Object in the Effect panel) is set to Knockout Group
That’s all there is to the technique. Good luck!
Hey Mike, using this technique with an added effect of an inner shadow on the text, is there anyway to export to a pdf without loosing the see through AND the effect? I’m working in CC.
Hi Mykie- It should export OK in any kind of PDF, print or interactive. I just confirmed it still works in CC 2015. Are you saying that when you add the inner shadow the text becomes opaque?
@Ron, did you ever get it working. It didn’t work for me. Is that cos I’m on CS3?
New to graphic designing, but am actually picking up your tips and tricks! If anyone has trouble with the stickers who is also a “newb”, you should try changing from “inches” to “picas” and make sure the distance is set to 0. Makes all the difference!!! Thanks for putting this out there! I’ll definitely look for your other updates!