

InDesign Makes The World Go Round (Sort of)

A long time ago, in a galaxy far, far away… oh wait, that’s a different story.
Here’s another fun animation trick you can pull off with InDesign CS5, and a little Photoshop. You can take an image of the Earth (or any other heavenly body, real or imagined) and simulate it rotating on its axis in space.
Click the image below to play the animation of Earth and Mars.

Now I know there aren’t too many people with a burning need to create planets in InDesign. As is often the case, the point here is in the method, if not the specific application. And to show that by combining looping animations with masks, you can bring new things to life.
Of course, InDesign’s not really wrapping images around spherical surfaces to create a 3D effect. If you look closely you’ll notice the lack of perspective. But used at a small scale, I think this is a fun and effective piece. So how is it done?
Start with a rectangular image of your planet’s surface. If you’re using a map, a Miller projection works well.

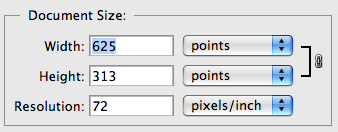
Open it in Photoshop. Adjust the image size as desired so you do not have to scale the map in InDesign. Note the width, in this example, 625 pts. Write it down if necessary; you’ll need that number later.
Next, double the width of the canvas by choosing Image > Canvas Size: Width: 200% and setting the anchor on the left side.


Duplicate the layer containing the planet image by Option/Alt-dragging to the right till it makes a seamless pattern.
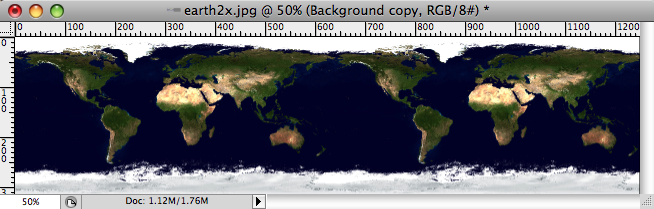
Why do you have to duplicate the image? Because the rotating effect uses a looping animation. The first frame needs to exactly match the last frame in order for the looping to be seamless. Thus you need two copies of whatever part of the planet is visible at the start of the animation.
Place the planet image in InDesign.

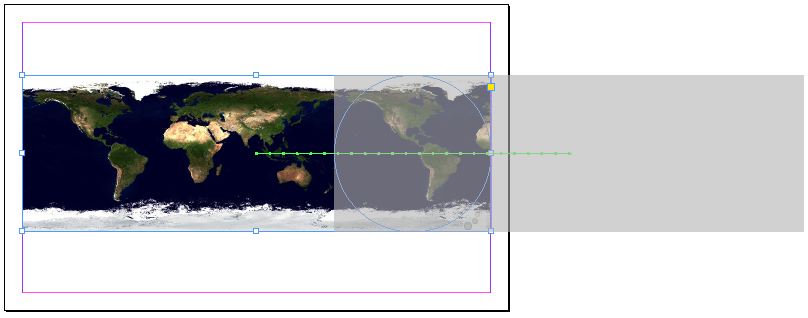
With the line tool, draw a horizontal line. It doesn’t matter where you draw the line, or how long it is, but drag from left to right and hold the shift key to make it perfectly horizontal. Next, use the Control panel or the Transform panel to make the line length exactly match the original width of the image before you added to the canvas size in Photoshop.


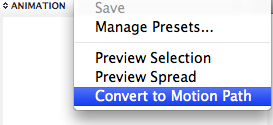
Select the line and the image. In the Animation panel menu, choose Convert to Motion Path.
Your horizontal line is now the motion path that the animated image will follow.

With the Ellipse tool, hold the shift key and drag to draw a circle that is exactly as tall as your image. Align the circle so it contains the part of the image you want to show at the start of your animation. Make sure that part of the image is also fully visible to the left of the circle or the effect won’t work.

Click on your animation to select it, then click on the Show Animation Proxy button at the bottom of the Animation panel.

Now you can see the full area the image will cover as it slides from left to right.
With the Rectangle tool, draw a rectangle that will cover the entire animation.

Select the rectangle and the circle and make them into a compound path by pressing Command/Ctrl-8.
You can now fill that path with a color or photo to hide the image sliding, so you only see it through the circle. I used an image of stars.

Note that if you export a page to SWF, it’s not actually necessary to hide parts of the animation that extend into the pasteboard, since they won’t be visible in the exported file. However, if you export a selection to SWF, you’ll get everything, including stuff on the pasteboard.
Select the animation and in the Animation panel, set it to Loop. Set the duration to taste. I like a very slow moving rotation. Sixty seconds is the maximum.

Finally, I selected the animation and the mask and exported the selection to SWF.
Click the image below to play the animation.

If you want extra credit, tilt the planet on its axis (you’ll also need to rotate the motion path to match the tilt), add shading for night and day, etc. Or go all out, and create a solar system with other planets, and maybe a harbinger of doom, like a killer asteroid or the Death Star.
Just don’t try to reverse the Earth’s rotation to make time go backwards. Only Superman can do that.
All I can say is, wow!
As much as I know about InDesign, it always amazes me when someone can think this deeply about what it’s really capable of.
Thats no moon… It’s CS5.
Sick. Sick and twisted. Sick, twisted, brilliant.
I mean… Obvious, of course; I mean, any child could have figured that out. ;)
Fritz-
This software is now the ultimate power in the Universe. I suggest we use it.
If I convert the JPEG to CMYK, does that mean it will print correctly?
Hi Jongware-
I don’t see why it wouldn’t, assuming you started with decent-looking images at adequate resolution. The mask is vector, so it’ll be fine. But then InDesign’s going to downsample and color convert images to RGB for the SWF. You can experiment in the Image Handling part of the Export SWF dialog box and see what you get.
An alternative is to leave the images as RGB and just set InDesign to convert to your destination color space when you make your print PDF. That way you wouldn’t sacrifice any vibrant RGB colors in the SWF.
Mike – Hokey religions and ancient weapons are no substitute for a good SWF file at your side kid.
Sorry, Mike — I think I should have added a ;-) somewhere :-)
(But what does happen with interactive multi-state stuff if you try to print it?)
Is there a way to have the sliding map warp/bulge in the middle so it looks like the map is going around the “sphere” rather than just sliding across it in 2D? It would really add to the effect.
@Jongware: Actually, this is one of the coolest parts about how the interactive feature set was integrated into InDesign so that it would be seamless with its Print “core”.
Meaning, even when you’ve created interactive content within a document, InDesign is still a WYSIWYP (a.k.a. What You See Is What You Print) application. ID CS5 always shows your document in the Layout view as the version of the document that prints.
A bonus feature of the new Object States panel is that you can use it to manage multiple images, but treat them as a single page item without having to Group them first. Whatever State clicked on in the Object States panel becomes the initially visible image, and thereby also defining which gets printed as well.
It this context, it’s almost like a mini version of Conditional Images, like the Conditional Text feature added in CS4 for those of you know what that is. I’ve also heard it is kind of like a “Layer Comp” feature, (in AI and PS, but not ID) but at the object level.
One last bit… A State in a Multi-State Object can contain anything you can place into or create directly in InDesign. If you have a selection of multiple selected page items, when you click on the New button in the Object State panel, each page item gets distributed into their own State, retaining their X,Y position on the page. If you want multiple page items to end up in the same state instead of getting distributed, simply Group those page items first.
Whew!
Jongware-
I should’ve known. There seemed to be something a little ;)ish about your comment.
Michael-
Thanks for jumping in. Couldn’t have said it better myself. Heck, who could?
David-
Something like that would do the trick, but I don’t think there’s any way to do it.
I recently created some if SWF files in InDesign that has music that plays while you to follow the written musical score (with the ultra cool page turns):
https://tinyurl.com/2fh5ewd
https://tinyurl.com/33cgdwj
https://tinyurl.com/34py9c6
https://tinyurl.com/33cgdwj
https://tinyurl.com/36yqztf
https://tinyurl.com/366cusd
https://tinyurl.com/2bnmhmr
I wanted to have the pages automatically turn when the the music reaches the end of the page but couldn’t figure out a way to set that up in InDesign. I know it can be done in Flash Professional. Adobe Sound Booth even gives you a way to include ActionScript cue points and use them to trigger actions like a page turn.
Is there a way to do this in InDesign?
Jay
Hi Jaytrumpet.
How did you put the musical score in indesign?
Have some plugin or script?
Thanks
Valderramas,
The music notation was done using Finale software. I then exported pages of the score as TIFF files. No plugins or scripts were needed.
I have used Finale since 1997. In 2001 I created a website to post my arrangements and transcriptions:
https://uhaweb.hartford.edu/LICHTMANN/
is not make me clear because when i applicated in indesign it doest’n work.