Linking Images So They Change Together
Sometimes you want to have the same image in a number of different places in your document… and update them all at the same time. That is, if you scale and rotate one, you want them all to scale and rotate. If you replace one with a different image, you want them all to change.
Sync Images. It’s easy to swap out all the identical images with another with the Links panel. When you place the same image multiple times, they all get “grouped” together in the Links panel with a little twirly triangle next to them. To change them all, just select the image that has the triangle next to it (the “group leader” or whatever you want to call it) and click the Relink button.
Sync Formatting. If you want to keep the fill or stroke synced up across all the images (or text wrap, or various other attributes you), you could use object styles. That way, when you change the object style definition, each object tagged with that style would change.
But neither the Links panel nor object styles will help when it comes to keeping the graphic’s size or rotation in sync.
Place and Link
Fortunately, there is a solution: the Edit > Place and Link feature. This feature (first introduced in CS6) lets you keep two or more objects in sync. And, even cooler, you can tell InDesign what attributes it should sync up and which it should leave alone.
When you select an object (say, a graphic frame with an image in it) and choose Place and Link, InDesign loads the frame up into the Conveyor and the Tool panel switches to the Content Placer tool. (If you want to learn more about the Content Conveyor, read and watch this.) You can now use the Content Placer tool (which acts like the normal Place gun) to place the duplicate object anywhere you want in your document.

Tip: If you want to place the same graphic multiple times, click the middle cryptic button at the bottom of the Conveyor (the one that looks like blocks falling out of a box). When you choose this, you can click (or click and drag) and the place cursor stays loaded, ready for you to click again.
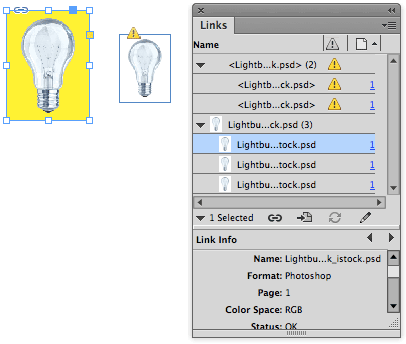
After you place the linked duplicate, the Links panel updates in kind of a weird way:

In the above image, you’ll see that the image shows up twice, but it is also listed a third time in angle brackets. That bracketed one is the duplicate — the clone that is linked to the original. In this case, note that I had dragged the Content Placer tool (rather than clicking), so my duplicate has been scaled down smaller than the original.
If you place more than one linked duplicate, the Links panel looked even more odd:

Again, the ones with the brackets are the linked objects, and the ones without the brackets are the images themselves. Glancing at the panel, we can see that there are 2 linked objects and 3 total images in the document.
Updating the Image
So now the question is: How do we update the linked images when the original image changes? Actually, even before that: How do we know which image is the original and which are the clones? You can always find the original object by selecting one of them and choosing Edit > Go to Source. If it’s grayed out, then the one you selected probably is the original.
(I really wish Adobe had made it more obvious which is the original… it should have a different icon attached to it or something.)
When you make a change to the original, InDesign might inform you that the linked duplicates are out of sync and need to be modified. For example, in the image below, when I change the fill color, the duplicates get a “modified” icon next to them.

You can update the linked duplicates by clicking once on the Modified icon in the upper left-corner of the object, or double-clicking on the icon in the Links panel. Or, to update all of them, click the top-most “parent” link (the one with the twirl-down-triangle next to it) and click the Update button in the panel.
However, there’s a catch to the “update” process: If you have made any change to the duplicate — changed its size (as in the image above), or its fill or stroke or placed a new image in it, or whatever — then InDesign alerts you that your local changes will be lost:

Fortunately, it’s not always as dire as it sounds. For example, when I updated the linked duplicates, the scaling remained. Why? It all has to do with Link Options.
Link Options
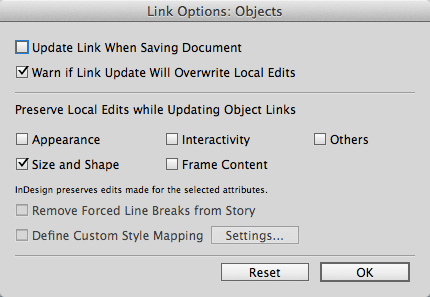
You can control what will and won’t get updated by selecting a linked duplicate and choosing Link Options from the Links panel menu:

The default setting (above) tells InDesign to ignore any differences in the Size and Shape of the object. That is, if the duplicate is a different size or shape when you click Update, that size or shape will be maintained. (Shape means the shape of the frame. For example, if you changed the duplicate’s frame into an oval, it would stay an oval.) If you turn that checkbox off, then the next time you choose Update in the Links panel, InDesign will make it the same size and shape as the original.
Here’s another example: Let’s say you want 10 duplicates, but each one will have a different fill and stoke color. If you change the image (the “frame content”) you want the new image to sync to all the other frames, but you want each of those other frames to retain their special fill and stroke colors. To do that, you would select the duplicates, choose Link Options from the Links panel menu, and turn on the Appearance checkbox. (“Appearance” means fill color, stroke color, corner options, effects, and so on.)
If you turn off all the checkboxes in the “Preserve Local Edits while Updating Object Links” section, it means that all the duplicates will be updated to look exactly like the original — same text wrap, color, rotation, size, hyperlinks, and so on. You can find more on each one of these checkboxes in Adobe’s help files.
Linking From One Document to Another
Now here’s the wacky part: You can use Place and Link to link an object from one document to another. I’m not saying you should; just that you can. When you select an object (such as a graphic frame) and choose Edit > Place and Link, you can then switch to another open document and click (or click and drag) to create a linked duplicate there.
Note that you have to keep the original document open when you’re doing this. (You can’t choose Place and Link, then close the document, then try to place it.)
You can, however, have the original document closed when you update the duplicate. That is, you can make a change, save the document, close it, open the second document, and update the duplicate. But if you throw away the original document or move it to another location, the InDesign can’t find the original object in it (of course) and the linked duplicate has a Missing icon next to it. You can relink to the original file (if you haven’t thrown it out) by clicking Relink in the Links panel.
Unlinking the Child from the Parent
If you want to break the link from a child to a parent (or the slave from the master, or the duplicate from the original, or whatever you want to call it), you can, but it’s not immediately obvious how. If you select the frame on the page, the Links panel highlights both the image and the link (remember they’re two different things in the Links panel). That won’t work. Instead, you need to deselect the image (you can Command/Ctrl-click on the image) and leave the link (the one with the angle brackets) selected. Now you can choose Unlink from the Links panel menu!
Interesting Workflows
Here’s an intriguing example of a workflow: What if you have several different logos in a one-page InDesign file. You could place-and-link from that one document to many other documents. Now, if the logos all need to change to a blue background, you could change them in that one document. Then they’d change to a blue background whenever you open those other documents and update the links.
Ultimately, Place and Link isn’t nearly as powerful as something like a Symbols feature, but with some attention and work you can make it act in a sort of similar way!


I meant to mention there’s a good video on the content conveyor here: https://creativepro.com/article/indesign-how-using-new-content-conveyer-cs6
and more here:
https://creativepro.com/free-video-on-the-useful-but-slightly-mysterious-content-collector-tools.php
Thanks, David. Great summary of a very useful feature.
Wow, that’s great! I never even knew there was a Link Options dialog box. Good to know! I think the more we understand the various applications of Place and Link, the less annoyed we’ll be by the gigantic gray bar that eats up so much screen real-estate.
I used place and link awhile back to make a self-imposing business card template, so that I could keep my 1-up and 10-up layout in the same document. https://creativepro.com/use-place-and-link-to-impose-documents-in-a-printing-workflow.php
I suggest you also give a look at this post, “Cloning and Syncing Objects in ID CS5.5”: https://www.indiscripts.com/post/2012/02/cloning-and-syncing-objects-in-indesign-cs55
@+
Marc
Sync Images. It’s easy to swap out all the identical images with another with the Links panel. When you place the same image multiple times, they all get “grouped” together in the Links panel with a little twirly triangle next to them. To change them all, just select the image that has the triangle next to it (the “group leader” or whatever you want to call it) and click the Relink button.
Can this be done with a single click rather than for every relink? I want to update 20 up business cards with a different image 20 times…
Great article, but what about doing the same thing with text changes? Say your parent page has ‘WORD’ as 24pt, and you want to make ‘WORD’ 12pt on the child page. Any update takes ‘WORD’ back to 24pt!
Is there a way to use linked text on a ‘child’ page and scale it down?
David id there a way in InDesign to link an image box’s together. I would like to be able to take a single PDF with multiple pages say 10. I have my master page setup to auto size the imported page. Currently I will zoom way out and then load the courser up with the 10 pages. Then click each page into position on each page.
I would be cool if we could link the image box’s together and then click the fisrt page into position 1 and have the rest of the pages follow it into the linked image box’s on each page.
That way I we could have 100 pages and 100page PDF. With 1 click on page1 the rest of the 99 pages would flow automatically into the 99 page of InDesign.
Kinda like the link text box’s will do when stories jump from page to page..
Any Thoughts??
Thanks Lynn C