

Making Dynamic Text Wrap Permanent


A friend of mine who manages a printing company’s prepress department told me that his company strongly discourages their InDesign clients from using either the Detect Edges or the Alpha Channel options in the Text Wrap panel:

That was the first time I’ve heard of the warning. The reason, he said, was that if anyone in prepress needed to adjust an image’s colorspace or make a color correction, minute changes in opacity could occur at the edges of the image, changes that InDesign may decide are significant enough to redraw the wrap and change the linebreaks. (I deal with the issue of handing over native InDesign files to printers at the end of this post — for now, bear with me.)
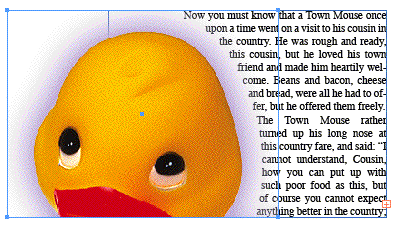
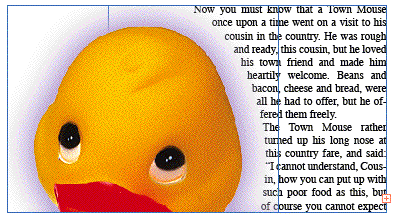
Here’s an example. I’ve placed our friend the Ducky on top of a text frame and set the Text Wrap to Alpha Channel. (I modified the Ducky.tif from Photoshop’s Samples folder — removed the white background and added a Photoshop layer effect, the glow, and saved and placed it as a .psd file.)

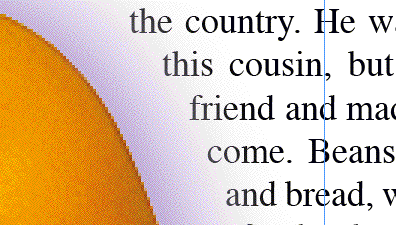
Close up, starting from the third line of text:
Normally, making color adjustments to text-wrapped raster images is not a problem, because InDesign is only paying attention to an image’s frame (Bounding Box or Object Shape) or clipping path. But if Text Wrap is set to Detect Edges or Alpha Channel, then it’s a dynamic wrap — the wrap is defined by the raster image’s contents (or, lack of contents, actually). In that situation, updating the InDesign file with the modified image sometimes makes the text re-wrap, because InDesign is detecting a “new” edge to the contents.
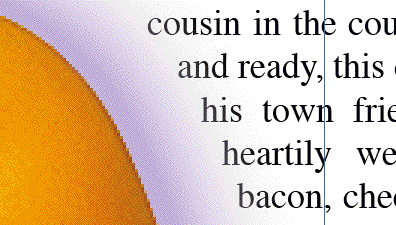
In the Ducky example, I tweaked the glow effect in Photoshop, saved it and updated the image in InDesign. It’s a more obvious change than what the prepress guys might do, but even a small color adjustment that affects the edge pixels could force an adjacent character(s) to skootch over a micron, causing a ripple effect. Note how after I updated the link, the text immediately rewrapped to the modified Alpha Channel:
Again, a close-up view starting from the third line of text — completely new line breaks:
The fix, my prepress buddy went on to say, is to turn those wraps into User-Modified Paths first. That’s what his people do as standard operating procedure, before they Edit Original any image with a Text Wrap: Detect Edges or Alpha Channel applied. Custom wraps don’t adjust, even if you completely change the image contents.
To turn a dynamic wrap (Detect Edges or Alpha Channel) into a User-Modified Path, click on the image with the Direct Selection Tool so you can see the wrap’s path, then adjust the path. Work on a part of the path that’s not interacting with text to avoid problems. Even just one tiny drag on a point or curve handle is enough to turn it into a custom wrap.

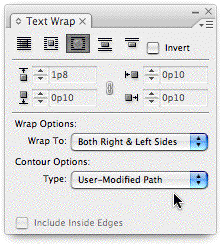
After you make an adjustment, look at your Text Wrap panel. It should say User-Modified Path, like this:
Now you can Edit Original, change the image as much as you want, and when you update the link in InDesign, your wrap doesn’t update, and your line breaks remain the same.
Here’s a before-and-after. On top, the original wrap (using Alpha Channel), below, the updated image in the User-Modified Path wrap:
I suppose this is all another reason to only send press-ready PDFs to a printer. If necessary, prepress can make color adjustments to images in a PDF (as long as the images haven’t been broken into multiple pieces from transparency flattening) and when they update the PDF, the line breaks will always remain the same. Nonetheless, I know all of my studio’s commercial printers request that no matter what sort of PDF I send them, I include the packaged InDesign file as well, “just in case we need it.”
Even if your printer never edits your native InDesign documents, you yourself might need to “lock down” the line breaks in dynamically-wrapping text as you’re laying out a publication. That’s why I love this tip!
Nice tips… Thank you!
Oh, very interesting — thanks! I knew I could edit an auto-made text-wrap path, but not that doing so creates such a User-Modified Path, which then becomes “frozen” and not “live” anymore. Good stuff!
As a 12-year prepress vet, I can tell you that editing images in a PDF is a major PITA. In some versions of Acrobat, it will even change the stacking order of the image if you edit it. We only do it as a last resort.
Sending along the native files is always a good idea, especially if the design is transparency-happy and no attention has been paid to stacking order with regard to flattening. Many of the designers I deal with have no clue how to analyze their file to look for possible flattening issues (I Love You, Flattener Preview!)
I never knew that you could edit a path made from detect edges and it becomes independent of the original file changing, so this is very useful to me. In order to get the ultimate level of control some designers I know just draw an empty path independent of the image and make a text wrap around that, but this is much more efficient. I still like using that method though since the auto generated paths, even from alpha channels or Photoshop paths, tend to be way too complicated and not as smooth on the text.
Note that in CS2 it’s slightly different. It doesn’t say that the path is user modified, but it is. Also you can’t modify the distance from the path to the text and if you click “Include Inside Edges” then the path reverts back to its edge detected form. Very interesting.
“…but even a small color adjustment that effects the edge pixels could force an adjacent character…”
Forgive my being anal, but shouldn’t that be “affects”?
Jeff, you’re right … I’ll fix it. The effects/affects thing is weak spot in my writing, I’ve learned. Thanks for the eagle eye!
Great tip!
“as long as the images haven?t been broken into multiple pieces from transparency flattening”
On another note, how do you prevent images being broken into multiple pieces? This is something I run into all the time at work.
Great Tip Anne-Marie!
Regarding the Flattening comments: We are using the Adobe PDF Print Engine (PDF/X-4) which does not require Flattening, although I agree with Dan Curry above that editing a PDF is a PITA.
Anne-Marie, drop that attitude! It’s just a silly effectation on your part, and it has no affect on anyone!
Great tip, Anne-Marie. It’s nice that these older posts are here for posterity; a confused InDesign user is just a simple search away from clarity.