

Making the First Page a Left Page in InDesign

E.C. wrote:
I am making a document that needs to have two spreads only (it’s a booklet cover: front and back). I can see how to set up facing pages, but there’s that pesky single page 1 floating there before the two spreads. How can I make that page 1 go away?
The problem with page 1 is that it’s a odd number, and (at least in the English version of InDesign), odd numbered pages are almost always right-hand (recto) pages.
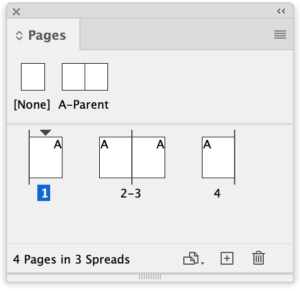
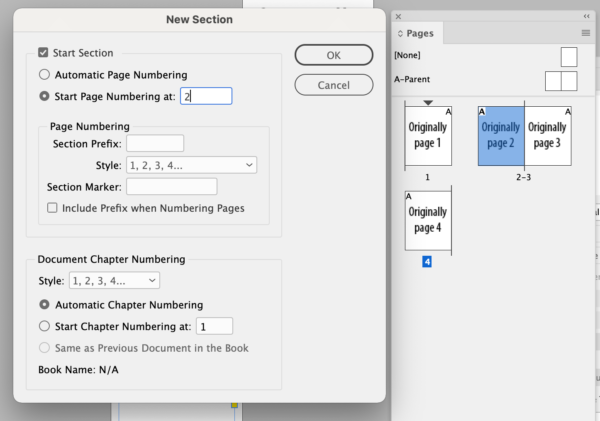
To make the first page a left-hand (verso) page, select it in the Pages panel and choose Numbering and Section Options from the Pages panel flyout menu.
Change the odd page number to any even-numbered page, and it will magically become a left-hand page. If Allow Document Pages to Shuffle is turned on (it usually is), then the other pages will arrange themselves properly in spreads (see below).
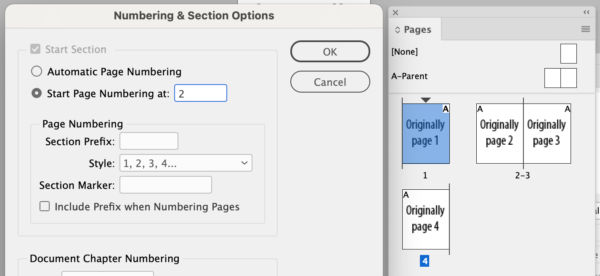
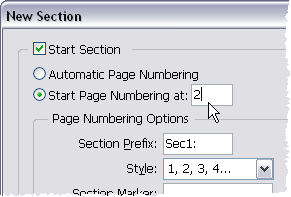
Change any odd page to an even page with Numbering & Section Options…
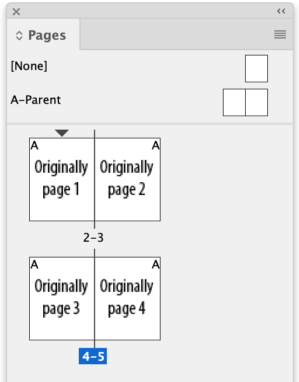
… and as long as Allow Document Pages to Shuffle is selected, the pages in the document will move from left to right and right to left.
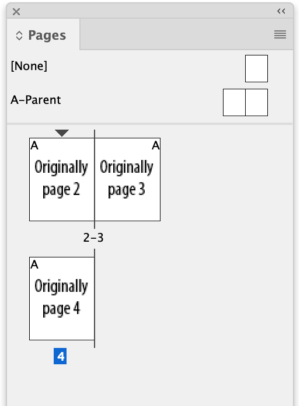
And, of course, if you have already designed a spread starting on page 2 and have a blank page 1 hanging around, you can do the above to define the existing page 2 as the section start. Now you can go and delete that unused page 1—and nothing will reflow.
If you start a new section on a left page and make the page number the same even number…
… and you can delete an unused right-hand page without disturbing the spreads that follow.
How do you get page 1 as a left page?
There is another way to do this, too, which might come in handy if you actually need page 1 to be the left-hand page.
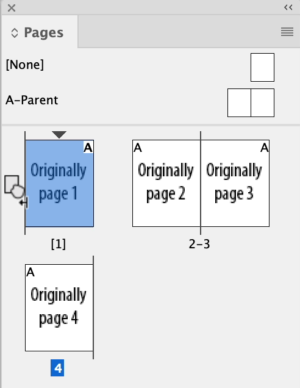
- Highlight page 1.
- Turn off Allow Selected Spread to Shuffle. (It will be on by default.) The numbering “1” will appear in brackets (“[1]”) in the panel.
- Select Page 1 and move it from the right to the left. A blank space will appear in the space that page 1 originally occupied.
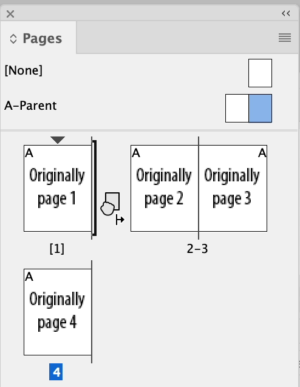
- Now select a right-hand page from a facing pages spread in Parent Pages. Drag it over to the right of page 1, dragging until you see a thick dark vertical line appear to the right of page 1 and to the left of your page. That indicates that the page you’re dragging will become the right-hand facing page to page 1.
Nice little tutorial and now I have something to point people to when they ask how to do this in the user to user forums.
One little point. It’s “keep spread together.” I’d hate to think that someone would go nuts trying to find the keep pages together command.
I guess that’s the kind of thing they try to catch you on with the ACE exam. :)
Saved my life. Thank you. Been trying to figure out how to keep the spread together for hours!
Thanks for the edit, Bob. Everyone needs a good editor! I’ve fixed it in the article.
How do I keep the numbering system with page 1 being on the left and starting with one. I have a large document that has different sections and I need the next round of numbers to start with 1 not 2 on the page.
@eileen: See my response to this other comment here
With the first method, when I completed the instructions I had a single page 1 and then spreads 2-3 and 4-5. I selected page one and then selected Remove Spread from the Pages pullout menu. It took selected page 1, and then “Delete Spread” from the pullout menu, leaving only 2-3 and 4-5 in lovely spreads.
Using the second “duct-tape kludge” method, I didn’t have the option “Keep Pages Together” on my Pages palette menu; however, I did have “Keep Spread Together, which I selected. I then physically dragged page 2 beside page 1 and did see the thick, dark, vertical line. I then dragged page 4 beside page 3. Now my pages palette shows pages 1 and 2 docked together, and pages 3 and 4 docked together; however, the pages 1-2 spread has brackets around the 1-2. I doubt this is a problem for the printer, and it looks pleasing in my Pages palette. Visually, I like seeing 1-2 and 3-4 rather than 2-3 and 4-5, but I guess it really doesn’t make any difference when having my cover printed. This was VERY helpful!
My only concern about this is when exporting a PDF. I had a few articles that began on an even page, so I exported them and then I set up the PDF to open as facing pages. If the PDF had just two pages, it would be ok. If it had more, it would put the even pages to the right of the screen and the odd pages to the left, which obviously ruined the design. The only solution I could figure was inserting a blank page 1 and setting up the PDF so that it would open on the second page.
But it seems that Acorbat 8 has changed this configuration. I still have to check it to learn if it’s for the good or for the bad (actually, worse).
You should really treat this as a 4 page document.
So leave the pages as they are (1-4) and when you have placed your text and artwork, select inbooklet SE from the file menu and create a new document, 2up saddle stitched.
You will then have a new document with 2 spreads, spread (1) with pages 1 & 4 on it and spread (2) with pages 2 & 3 on it and your printer will be happy!!!!
Hope this helps
Cari Jansen posted the same sort of tip for ID CS1 (works the same in CS2) that combines both of David’s methods. You get the same end result, but alternative explanations always help ;-)
Facing Pages with left page number as ‘1’
Thank you for your consideration, Damian, but the PDF I cited was just for on-screen viewing, to work like a “digital magazine”.
Why don’t you just make the document 2 single pages twice as wide as the finished size, put a guide down the middle and BAM, you’re done.
Great tips, but you don’t have to select Keep Spread Together for this to work. You can do as you said, turn off Allow Pages to Shuffle then add another page to your doc (if it’s not already there). Now simply drag Page 2 up to the left side of Page 1 and you will have your spread.
But be careful, you have to have the hands of a surgeon to get your page in the perfect position so that you see a small arrow pointing to the left.
When I have this problem, which I have had a lot, I simply go to the Document set up dialog and turn OFF “Facing Pages.”
Afterwards, you can move page around to your delight.
Thanks for this solution. I used the first approach you suggested and it worked just fine. I have a graphic that is spanning my front and back cover that I needed to line up and wasn’t sure how to get pages 1 and 4 side by side. Glad I found your blog!
Here’s the right way to do it:
First, create a new InDesign document with at least three pages. If the Pages palette isn’t visible in the open document, choose Windows > Pages, or press [F12] to display it. Next, make sure the first page is selected in the Pages palette. Then choose Numbering & Section Options from the Pages palette’s pop-up menu. In the resulting dialog box, select the Start Page Numbering At option button and then enter 2 in the adjacent text box. Click OK. Page 2, a left page, is also now the first page. To label it appropriately in the Pages palette, choose Preferences > General and, in the Page Numbering section of the Preferences dialog box, choose Absolute Numbering from the View pop-up menu. Click OK. Now page 2 is numbered page 1, and the other pages in the section are numbered consecutively.
you saved my life, thanks. This is also helpful for laying out single 8.5×11 pages on 11×17 double sided flyers, I have to swap the pages around and instead of creating 11×17 pages I can do it this way, bueno!
thanks! both options are helpful to know about. you saved me from looking like a dumbo at work!
Great article – thanks! I, like Alexandre, need the PDF to be numbered correctly, so I learned from all you guys’ comments and tried something even simpler, and it worked! Most of us who looked for this web page probably already have a blank page 1 in our document. (If you don’t, just make one.) With that page present, turn off “Allow Pages to Shuffle”, and after that, delete page 1. Voila!
Yes, this is what I figured out, works like a charm (wish I had read this comment sooner!)!
LOVE all you InDesign Secrets guru’s… Thank you for having the answers I need when I’m up against a deadline (like right NOW!!!!)
I learn a lot from this website and love it that I not only get paid to use InDesign and to work with a fabulous graphic designer and a fun boss, but that this website & community is here.
XOXOXO,
I’m using CS4. I didn’t see “Keep spread together” but when I viewed options for a selected a spread, I saw “Allow selected spread to shuffle” right below “Allow document pages to shuffle.”
It did seem to work — I chose that for my 2-3 pages, then deleted page 1, and it worked!
I’m making chapters for a book where I want each chapter to start on the left. (It’s a manual and I want it to lay open for the whole lesson whenever possible. Would also apply to books where you want a picture or quote or other content across from your chapter start page.)
Note also, that to keep everything together properly, I opened the “Book Page Numbering Options…” and selected “Continue on next even page” and also “Insert blank page.” I can also manually make sure all my chapter files start on even pages, but this forces me to be diligent. :)
(Also, I was worried because I noticed that when I kept that first spread together, the book had repaginated that spread to an odd left page — I wasn’t entirely sure that the spread would still be kept together when printed, or alternately, that the page numbers would start going odd-left on me!)
Thanx for posting! You came up near the top for my search for left-hand start pages, so I hope my comments help others too!
Kiki
How do you know where the page numbering is being inserted into the actual document? If I autonumber from the book palette how can I see what the document numbered pages look like?
Thanks
~Rob
@Rob: InDesign doesn’t insert page numbers unless you manually put them on a document page using type > insert special characters > markers > current page number. Normally people put those in a text frame on a master page.
Thanks,
That makes sense.
Mike’s post from June 9, 2007 is the easiest/best way to do this that I’ve found.
BRILLIANT! I have been struggling with this for about an hour, and never would have thought to do this work-around. VERY HELPFUL!
Thank you! =)
This solved my problem! I needed to force “page 1” to be on the left and it worked like a charm. Thank you!
Thanks for the help! You saved from extended frustration.
The tips have been great. I have a 41 page document, which really needs to be facing pages, as I have differing margins etc.
However I need the first page to start on the left. I tried going to Document Numbering Options and then starting the page with a 2 and then changing the option under Preferences-General to Absolute Numbering. In my book the numbers then show from Number 1.
However in my footers the first page still shows from Number 2.
How can I force the page to the left, and keep the footer numbers from number 1?
I can’t seem to find the ‘keep spread toegether’ option either.
Many thanks for any help liz
@liz: Instead of using automatic page numbering, create your page numbers with paragraph numbering: https://creativepro.com/use-numbered-lists-instead-of-auto-page-numbering.php
Awesome! it worked! this tut has saved me from being over frustrated. Thank you David!
How to Make an Odd-right Page Be an Odd-left page
(and have all the succeeding pages in nice properly-numbered spreads).
First, if it?s one document in a book, you have to have automatic page numbering on. And facing pages. There?s no need to mess with setup or preferences otherwise.
1. Click to select page that?s odd-right and you want it odd-left.
2. In Pages palette menu, be sure both of these are ON (checked)
a. A. Allow Document Pages to Shuffle
b. Allow Selected Spread to Shuffle
3. In Pages palette menu, click Insert pages. The Insert Pages window appears.
a. Select 1 page
b. Select BEFORE page ___ (the number will be whatever number your selected page was)
c. OK
4. A blank page bearing whatever number your selected page had shows up. Your actual precious pages are grouped exactly as you want them.
5. Now get rid of the blank page
a. Be sure it is selected
b. In the Pages palette menu
i. Turn OFF (uncheck) Allow Document Pages to Shuffle
ii. Leave ON (checked) Allow Selected Spread to Shuffle
iii. Click Delete Spread
6. Your original odd-right page should now be an odd-left page.
But, hey, you guys who are changing InDesign for the better, why not just do this:
To the Document Setup Panel, add, next to the Start Page Box,(which automatically adjusts itself if you are doing a book and automatic numbering is on) a choice for Left or Right. Would that be so hard????
How to Make an Odd-right Page Be an Odd-left page
(and have all the succeeding pages in nice properly-numbered spreads).
I have revised this slightly in view of more experience.
First, if it?s one document in a book, you have to have automatic page numbering on. And facing pages. There?s no need to mess with setup or preferences otherwise. Actually, it is SO simple, I can?t believe it took me so many tries to figure it out.
1. For each spread in the document. In Pages palette menu, be sure both of these are ON (checked). On is the default, but perhaps you changed it?
a. Allow Document Pages to Shuffle
b. Allow Selected Spread to Shuffle
2. Click to select page that?s odd-right and you want it odd-left (first page of document).
3. In Pages palette menu, click Insert pages. The Insert Pages window appears.
a. Set for 1 page
b. Select BEFORE page ___ (the number will be whatever number your selected page was)
c. OK
4. A blank page bearing whatever number your selected page had shows up. Your actual precious pages are grouped exactly as you want them.
5. Now get rid of the blank page
a. Be sure it is selected
b. In the Pages palette menu
i. Turn OFF (uncheck) Allow Document Pages to Shuffle
ii. Leave ON (checked) Allow Selected Spread to Shuffle
iii. Click Delete Spread
6. Your original odd-right page should now be an odd-left page.
But, hey, you guys who are changing InDesign for the better, why not just do this:
To the Document Setup Panel, add, next to the Start Page Box,(which automatically adjusts itself if you are doing a book and automatic numbering is on) a choice for Left or Right. Would that be so hard????
Amazing! I have been trying to figure this out, you just saved me. Thanks a million!!
I have been trying to format document in Indesign cs6. I don’t want the cover page to have a page number. However, I need the second page to start as page #1 and so on and so forth to the end of the document. Been trying this for 3 days…I’ve got a headache. Please help.
Beverli: You should be able to set the second page to be a Section Start. (Any page can be the beginning of a section.) Whether or not a page has a page number on it depends on what’s on the master page. If the page has a master page that has a page number on it, then command-shift-click (or ctrl-shift-click) on it to override the master page item, then delete it. Or create or assign a master page that has no page number on it.
I have to learn indesign for my job. Again, master pages, section starts, etc. is greek to me. Step by step would be easiest. I’ve read tutorials, utube, and it’s not clicking. What i’ve done thus far: 1. I created an 8 page faux document, double clicked on where I want the page to start (I’m in pages…am I clicking to the right of where it says A-master or am I clicking in below A page 1? Nothing is clear. After that, I click palette menu to uncheck allow document pages to shuffle and then click it again to choose numbering & sections options and tell it start on page 1. Hit warning to say OK. Page number is off the first page but it doesn’t continue throughout the document.
I’m still lost.
Beverli: I strongly encourage you to watch my InDesign Essential Training title at lynda.com. If you don’t have a membership, you can get a free week here: https://www.lynda.com/trial/indesignsecrets
Very helpful, thanks!
This was super helpful, thanks!
I think the above may be outdated. in CC2017, I turned off “Allow Document Pages to shuffle” and then dragged page two up to the right of page one, waiting for the long line to appear between the pages. I then did the same for the others. There was no “Keep Spread Together Option” that I could find. This works in a small set of pages but would be tedious for a long set. Is there any other drawback to this method? It preserves proper page numbering.
The only thing different in my facing pages were inside and outside margins. I simply reversed the values and they now print the way I want with simple page numbering.
I had a 100 page document … I deleted the first 9 pages, and decided to begin the document with page 10 … I would import the first nine pages from a separate document.
BUT …
Now the pages are numbered correctly … 10, 11, 12, etc … but the pages palate shows 1, 2, 3 … how can I get the pages in the palate to reflect the numbers at the bottom of my indesign page? Otherwise, when I send proofs to someone, we’ll referring to different page numbers.