Merging Separations into Composite CMYK plus Spot
Kristina wrote:
I have made a separated PDF which includes 9 colors (9 pages), and I want to check it before I send it to the printing house. Can I somehow view all 9 pages as one page with all the colors?
Because most people use composite color PDF files (either CMYK, CMYK plus spot, just spot, RGB, etc.) this issue doesn’t come up very often. In the old days, it was a big issue because many people created pre-separated PDF files (where each color is a single page of the PDF). It’s not pretty, and I tend to recommend against this workflow. However, if you find yourself with a preseparated PDF and you need to merge it, the best way I can think of is to merge the pages together in Photoshop. Note that the result will be rasterized (turned into pixels), so you’ll lose your vector art. But this is a reasonable choice for proofing.
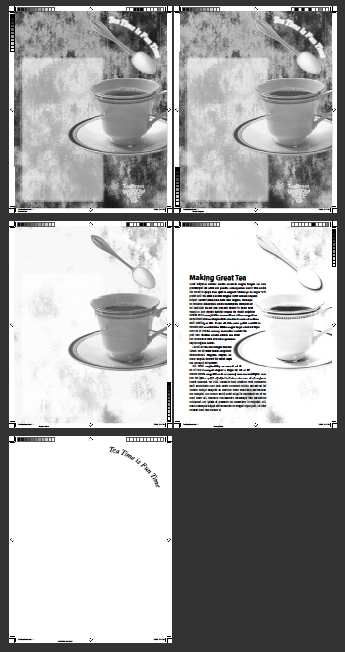
1. Here’s an original PDF file set up in separations (it’s CMYK plus one spot color):

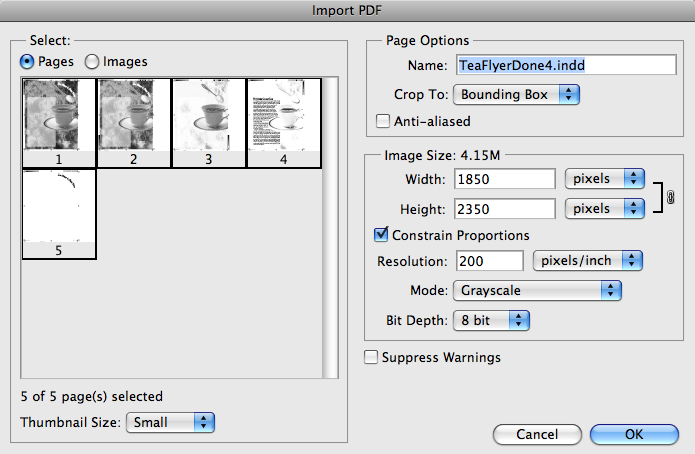
2. Now open this PDF in Photoshop and choose to open all the pages as Grayscale images:
3. Photoshop opens each page as a separate file. Cycle through each one and choose Layer > Flatten Image.
4. Now, with any of the images open, choose Merge Channels from the Channels panel. (If this feature is grayed out, you probably either forgot to flatten or didn’t open them in Grayscale mode.) If you are just opening a CMYK file, then choose CMYK from the Merge Channels dialog box; if there are spot colors involved, choose Multichannel.

5.Pick which of the current grayscale images you want for each channel. This is easier if it’s CMYK, of course, but even multichannel isn’t that hard — you just have to do it one at a time (clicking Next between each one):

6. If you chose CMYK, you’re done; you should have a CMYK image with each channel in the right place. If you chose Multichannel, you’ll end up with a single file with a bunch of “Alpha” channels. If the file is supposed to be CMYK-plus-spot, then choose Image > Mode > CMYK. You may get a color conversion error; if so, just click OK. The first four alpha channels are assigned to cyan, yellow, magenta, and black. Additional channels are left over:

7. To turn the other alpha channels into spot color channels, double-click the thumbnail (or select them and choose Channel Options from the panel menu). You can tell Photoshop to make the channel a spot color:

8. To pick the proper spot color, click the color swatch, then click the Color Libraries button in the color picker:

9. When you click OK, then click OK to leave the Channel Options dialog box, then make all the channels visible in the Channels panel… you’ll be done:

If someone chimes in with a “hey, there’s a simple, one step button you can press to do this,” I’m not sure whether I’ll be happy or infuriated that I didn’t know it all these years. :)


I was doing this just last week. Except I placed the C M Y K separations into InDesign.
I lined them up using the align tools.
Then I set their blend mode to multiply.
It looked like the finished image.
I’m not sure if it was the best way to do it though.
Aren’t you losing the angles if you send a separated pdf to the printer? I had a request from one printer and they couldn’t assure me that all the plates will have their angles, and not all at 45…
Oh I did that with a tiff where i could colourise the image with CMYK. I didn’t realise this was for a PDF.
Hmm… would you not be able to do this in Illustrator?
Place the seps down and change the blending mode?
At least it wouldn’t be rasterised and you could save as a PDF again?
Hmmm… you’d have to colour each channel though.
Long time ago… I was using a product by Creo (PDF Seps2Comp) to combine pre-separated PDF into a composite one directly in Acrobat. This product is not available anymore. Some high-end workflow Rip system can do the same task, but for the common user what David suggest is the best and also “cheapest” way of doing it.
200 DPI (refering to the first screenshot) ? How does all small type print after it? I would suggest 600
@liviu: It is unlikely that there are any screen angles in the separated PDF — those come later, when the grayscale separations are printed.
@Weller: I would strongly urge people not to use this technique for prepress — as I noted above, this is a proofing technique. All your text and vector images will be turned to pixels. Even if you use a high resolution in Photoshop, they’re still pixels, and therefore will get halftoned when you print.
(This is a common mistake. People think that if they create a 1000+ ppi CMYK Photoshop image and print it, they’ll get sharp edges. It doesn’t work that way. You can only get sharp “vector-like” edges in 1000+ ppi Bitmap mode images. If it’s CMYK or RGB (or grayscale), it gets halftoned, which leaves you with “blurry/fuzzy” halftoned edges.)
Good info there David – perhaps you should add that to the Post, for those that don’t read the comments.
@David: I took a document I made in InDesign, made a PDF of Separations.
I then opened it in Illustrator, applied the correct percentage of CMYK to each sep. And then blended them together.
It worked out ok. And I saved it as a PDF.
It was very time consuming. And if it’s just for proofing then your method is far superior.
If only you could colour grayscale PDFs in InDesign?
Hi David !
I find it excellent that you post this here today since i might get really concerned by the issue soon !
We’ll be working on a sustainable development book where “positive” figures are green, and “negative” figures are red. The rest of the text is set in black.
This is the author’s idea. The publisher first thought about duotone : half printing costs, and we already did that… for a 2 colors book (black and brown)…
My answer would be : green + red = brown if everything is perfectly aligned. And that would look nice !
inD would only have 2 spot colors, and a mixed ink, and i would pre-process the watercolor illustration in photoshop to achieve my goal.
Now i know how to do all this theorically, but i need to find the best (and cheapest) printer, cause if ever it isn’t aligned, then everything vibrates and send the book directly to the trash !
files to try here :
https://fr32c.free.fr/Print/TestCouleursDD-0307.zip
Where there’s inx, pdf, psd “work file” and another psd made with your technique to get frightened :
https://fr32c.free.fr/Print/TestCouleursDDCS3Repere.psd.zip
>Now i know how to do all this theorically, but i need to find the best (and cheapest) printer, cause if ever it isn?t aligned, then everything vibrates and send the book directly to the trash !
Finding the best and the cheapest printer at the same time is surely a contradiction!
You could export the PDF ‘pages’ to greyscale TIFF files, place them in Illustrator (simply center them on the page), drag the necessary colours from the swatches panel onto each of the separations’ images and set the blend mode of them all to multiply. Voila, you’ve just checked your file.
You can also place them as grayscale TIFFs in InDesign (which I was doing in the past). Not sure which way is the better.
Illustrator way is better – but too time consuming to do properly as embeded pdfs and shading each item with the exact shade it already has in cmyk and overlay them.
I’m sure someone could write a script to do this???
David, what a marvellously geeky posting — thanks for oiling my geek-gears!
But . . .
@David: “If it?s CMYK or RGB (or grayscale), it gets halftoned, which leaves you with ?blurry/fuzzy? halftoned edges.”
That’s not exactly spot-on (pun intended or not? You decide!). It’s only if a layer or channel in the CMYK file (I’ll concentrate on this color mode now) is continous-tone, i.e. 8-bit or 16-bit/channel that the RIP will halftone the data. But you can have bitmap-like data in a CMYK file and get non-halftoned line-output in the RIP . . . if the channel or layer’s data is 1-bit-like, i.e., only white-and-black, with no other values than 0 and 255. That’s how the line art in most comic books are now handled: it’s a standard CMYK file of around 400-600 ppi with normal color layers — and the K channel is 1-bit-only-like. That will halftone the CMY data but not the K data. (Now 400-600 ppi is too low in my judgment for really crisp line art, but that’s the compromise the comics publishers settled on years ago, when we had punier PCs.)
Hello,
This may not be the exact topic of this post but I have a rookie question. I have merged a dataset with an InDesign template. Now, I want to export the merged document as a PDF file. Is it possible to export the whole document into different PDF documents not only one? For example, I want pages 1 and 2 to be PDF file #1; pages 3 and 4 to be PDF file #2. Is there a way to do this?
Thanks!
Robert
@robert: Yeah, that question pretty much has nothing to do with this blog post! ;) But that’s okay… I think the answer to your question is here.
Thanks, this was helpful.
Thanks its very Helpful
This was great for working with legacy files from printers who separated final art for their workflow back in the day. Photoshop from CS figured out what I was doing, and had the channels in the right place. Sweet!
The fastest and best solution is on this problem a plugin called “PDF seps2comp” which is used by Adobe Acrobat Pro.
All the text will stay in vector format and really fast plugin to merge separated PDFs back to composite.
I do not know, for me it took hours to find this little useful plugin…Really happy with that
Hi all,
is there a (free) way to automatically merge 1-bit separated TIFs – typically made by RIPs – and then export in a composite med-res image or PDF?
Something like this software: tinyurl.com/nvdmltr
Thanks a lot!