

Mystery of the Missing Image Contest Answer and Winner!

Last week I posted a challenge for folks to explain this strange looking screenshot:

You can see evidence of an image placed in a frame, but the image itself is not visible. Once again, I was overwhelmed by the fantastic responses folks sent me, which demonstrated more ways to explain the screenshot than I had imagined possible. So in this case, there was not just one correct answer, there were many!
Out of all the correct answers, I chose one at random as the winner of the contest—and the awesome prize: a license to Extensis Suitcase Fusion 6 (for Mac or Windows). And the winner is…Ravi Kiran! Congratulations Ravi!
OK, now on to the explanations. As I said, there were many. Here are my favorites:
Correct Solutions
1. The image has been moved outside the boundaries of the frame. This is the simplest and most common explanation. And as many of you pointed out, it is very easy to do by accident. All you have to do is accidentally click and drag the Content Grabber.
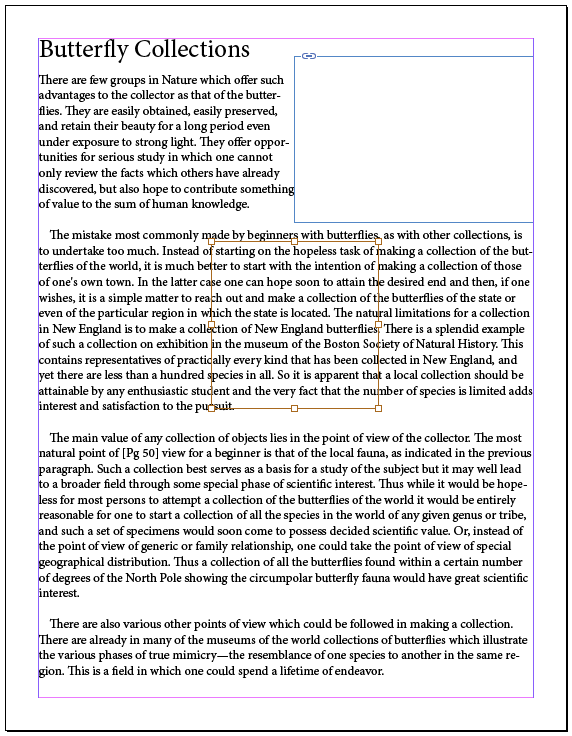
This can also happen if you flip an image horizontally or vertically, and you’re not careful to first check the reference point in the Control panel. Frame fitting options can also be the culprit by pushing an image outside the frame boundaries with a large Crop Amount value.
2. The image (not the frame) was hidden. Just select the image and choose Object > Hide.

3. A stroke is obscuring the image. Apply a thick white stroke to the frame (thick enough to obscure the image) and align it to the inside of the frame edges.

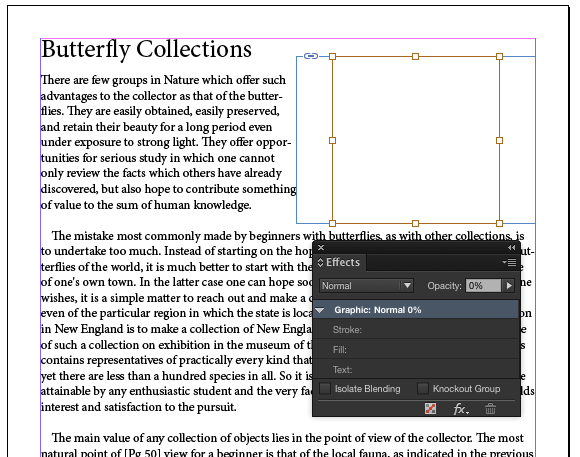
4. Reduced opacity. Select the image (not the frame) and reduce the opacity to zero.
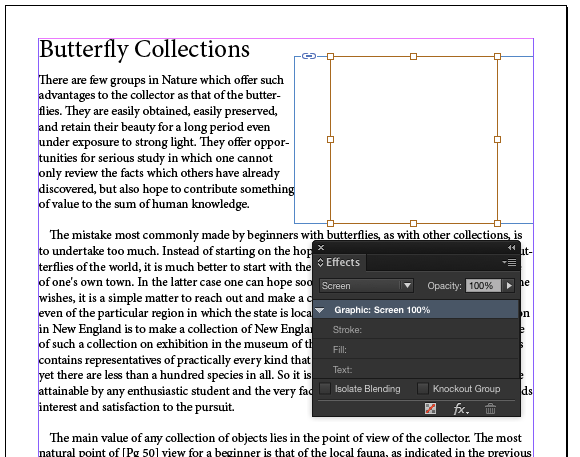
5. A blend mode trick. If the frame has a white fill, you can select the image and apply several different blend modes that will make it disappear (Screen, Lighten, Overlay, Hue, Saturation, etc).
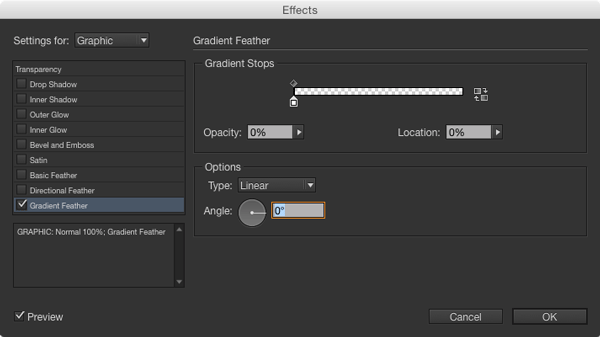
6. An Effects trick. A large enough Feather (Basic, Directional, or Gradient) applied to the image will make it disappear.
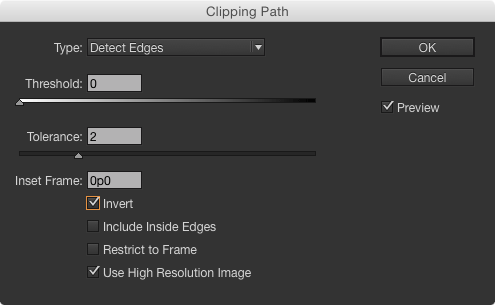
7. A crazy clipping path. Apply an inverted clipping path (either created in Photoshop or InDesign). Poof! No more butterflies.
Close But Not Quite Right
Then there were several near explanations that didn’t quite fit the screenshot, but were interesting and close enough to merit honorable mentions:
8. The image is really huge/tiny (or scaled really huge/tiny). If only a small part of the image is visible in the frame, you might only see white pixels. But you can see in the screenshot the size and scaling of the butterfly image aren’t huge/tiny, so this doesn’t quite work in this case.
9. The image is non-printing (and being viewed in Preview mode). If the image, frame, or layer was set to be non-printing, and you switch to Preview mode, you can see the frame edges when you select the frame, but not the image itself. This is a good point and worth knowing, but it doesn’t match with the screenshot, which is in Normal mode, not Preview mode.
And my personal favorite…
10. The image is visible! It’s either just a white picture or it’s a screen shot of a two concentric circles that look just like the Content Grabber. If not for the small image thumbnail in the Links panel, this would’ve worked. But we can see this is a picture of butterflies.
Thanks again to all who entered. And thank to the kind folks at Extensis for offering a great prize.
Another contest is coming soon, so keep those detective skills sharp!
Congratulations Ravi.
Am I the only one who wants to know want the correct answer is/Was? I’ll assume it’s the first explanation, but you never say so explicitly … :)
It could have been any of the first 7
That’s right. Any of the first seven are correct. Number 9 is close, but since you have to be in Preview mode for the image to disappear, and the initial screenshot was in Normal mode, it doesn’t quite fit.
I’ll add a heading to make it clearer.
jmk, the first correct solution above, that the image was moved entirely outside the boundaries of the frame, definitely was the inspiration for this post. ;-)
Aha! I’m upset! I had suggested only 7 solutions !!
Congratulations, Ravi! ;-)
I found the 2. option. Unfortunately in this time also my luck missed. Anyway I’m waiting for next quiz!
We have the “eye of the tiger”!! ;-)