

New Eyedropper Tool Options in InDesign CC 2018

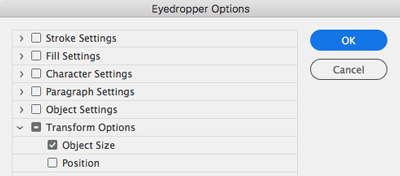
When you double-click on the Eyedropper tool (keyboard shortcut: I) in InDesign CC 2018, you’ll see new Object Size and Position options under the heading Transform Options. These options were added to the Eyedropper tool in CC 2018 because the ability to “memorize” an object’s size and position was added to object styles in this version of InDesign.

These two options are pretty self-explanatory. If the Object Size option is selected, the eyedropper will copy an object’s size and apply the size to other objects. If the Position option is selected, the eyedropper will copy the position of an object’s upper-left corner and apply that position to other objects. These options work exactly as you’d expect when you use the eyedropper on text frames or image frames that have no content.
However, when you use the eyedropper on frames that contain images, you very likely will find yourself scratching your head and saying “huh?”
To wrap your head around this, you’ll need to remember that an image frame is really two separate things, the frame itself, and the contents of the frame (the image). In short, you need to pay attention to which of these (the frame or the contents) are selected when you use the Eyedropper. Furthermore, you need to be prepared for unexpected results if you have the Fill Settings: Color and Tint option selected in Eyedropper Options.
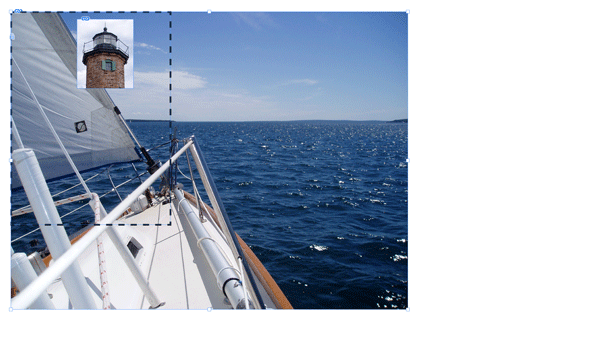
In the screenshot below I’ve selected the contents of the frame on the left to show that the image has been cropped by the frame.

In the examples that follow, I’ve drawn a dashed line on the page to indicate the outer bounds of this cropped lighthouse image.

Position example 1 (Source: frame, Click the eyedropper on frame edge)
1. Select the sailboat frame (not the contents of the frame).
2. Double-click the Eyedropper tool, and select only the Position option under Transform Options, then click OK.

3. Click on the edge of the lighthouse frame with the Eyedropper.
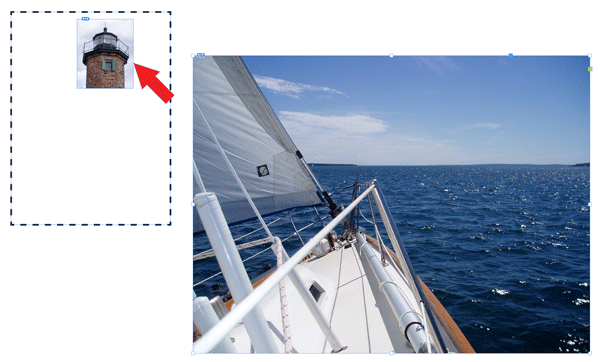
4. The sailboat frame (and its contents) moves to align with the upper-left corner of the lighthouse frame, since we clicked on the frame edge, not the frame contents.

5. But, if you repeat the exact same steps, but with the Color and Tint option selected in Eyedropper Options, inexplicably the contents of the sailboat frame scale and move by unpredictable amounts within the frame. I can’t determine any rhyme or reason for this.


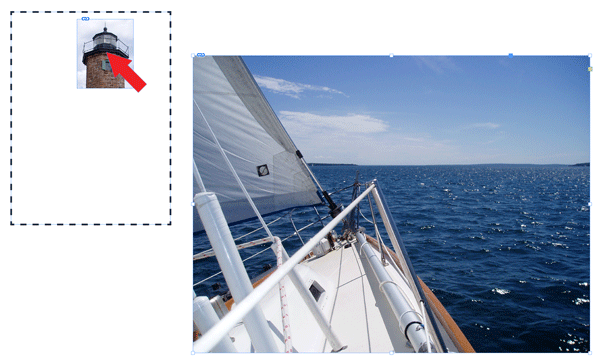
Position example 2 (Source: frame, Click the eyedropper on frame contents)
1. Select the sailboat frame (not the contents of the frame).
2. Double-click the Eyedropper tool, and select only the Position option under Transform Options, then click OK.
3. Click inside the lighthouse frame with the Eyedropper.

4. The position of the sailboat frame moves to align with the upper-left corner of the contents of the lighthouse frame, since we clicked on the contents of the lighthouse frame, not the frame itself. In this case, the contents of the sailboat frame move with the frame, as expected, and don’t scale.
Position example 3 (Source: frame contents, Click the eyedropper on frame edge)
1. Select the contents of the sailboat frame.
2. Double-click the Eyedropper tool, and select only the Position option under Transform Options, then click OK.
3. Click on the edge of the lighthouse frame with the Eyedropper.

4. The contents of the sailboat frame move to align with the upper-left corner of the lighthouse frame, since we clicked on the lighthouse frame edge, not the frame contents. The sailboat frame remains in its original location and size.

Position example 4 (Source: frame contents, Click the eyedropper on frame contents)
1. Select the contents of the sailboat frame.
2. Double-click the Eyedropper tool, and select only the Position option under Transform Options, then click OK.
3. Click inside the lighthouse frame with the Eyedropper.

4. The contents of the sailboat frame move to align with the upper-left corner of the contents of the lighthouse frame, since we clicked on the contents of the lighthouse frame, not the frame itself. The sailboat frame remains in its original location and size.

Size example 1 (Source: frame, Click the eyedropper on frame edge)
1. Select the sailboat frame (not the contents of the frame).
2. Double-click the Eyedropper tool, and select only the Object Size option under Transform Options, then click OK.
3. Click on the edge of the lighthouse frame with the Eyedropper.

4. The sailboat frame (but not the contents) resizes to the same dimensions as the lighthouse frame, since we clicked on the frame edge, not the frame contents.

5. But, if you repeat the exact same steps, but with the Color and Tint option selected in Eyedropper Options, inexplicably the contents of the sailboat frame scale and move by unpredictable amounts within the frame. Again, I can’t determine any rhyme or reason for this.
Size example 2 (Source: frame, Click the eyedropper on frame contents)
1. Select the sailboat frame (not the contents of the frame).
2. Double-click the Eyedropper tool, and select only the Size option under Transform Options, then click OK.
3. Click inside the lighthouse frame with the Eyedropper.
4. The sailboat frame (but not the contents) resizes to the same dimensions as the contents of the lighthouse frame, since we clicked on the contents of the lighthouse frame, not the frame itself.

Size example 3 (Source: frame contents, Click the eyedropper on frame edge)
1. Select the contents of the sailboat frame.
2. Double-click the Eyedropper tool, and select only the Size option under Transform Options, then click OK.
3. Click on the edge of the lighthouse frame with the Eyedropper.

4. The contents of the sailboat frame resize to the same dimensions as the lighthouse frame, since we clicked on the lighthouse frame edge, not the frame contents. The sailboat frame remains in its original location and size.

Size example 4 (Source: frame contents, Click the eyedropper on frame contents)
1. Select the contents of the sailboat frame.
2. Double-click the Eyedropper tool, and select only the Size option under Transform Options, then click OK.
3. Click inside the lighthouse frame with the Eyedropper.

4. The contents of the sailboat frame resize to the same dimensions as the contents of the lighthouse frame, since we clicked on the contents of the lighthouse frame, not the frame itself. Note that the sailboat image becomes distorted, since the sailboat image and the lighthouse image have different aspect ratios (the lighthouse is portrait orientation, the sailboat is landscape orientation). The sailboat frame remains in its original location and size.

See, I told you this was convoluted! When using the new Size and Position Eyedropper Options with image frames, here are 3 takeaways:
- Pay attention to whether the source image frame is selected, or the contents of the frame
- Pay attention to whether you are clicking on the frame edge, or the contents of the frame with the eyedropper tool
- Be prepared for unexpected results if you have the Fill Settings: Color and Tint option selected in Eyedropper Options.
Many thanks Keith for the detailed explanation and saving my time trying to find it out, if ever.
Guess the unexpected results with some Fill Settings is a bug solved in a future version.
Using the Eyedropper tool for (equal) resizing of several graphics is not as simple as for text (+styles) formatting. Frame/content selection complicate it, thus using shortcuts (V and I) is faster than having to use Ctrl/Cmd+Eyedropper tool and clicking twice on a frame everytime the content needs to be selected and then with the Eyedropper click inside the reference frame. For several Graphics on the same spread the contents can be added (+Shift) and thus, one stroke in the reference graphic makes all the graphics the same size of that one.