

New Folding Tricks in CS5

As I’ve written about before, creating folds for printing is sometimes a challenging process. If you’re creating a trifold brochure, for example, in previous versions of InDesign, you’d need to manually calculate the widths of the inner and outer panels, and create the layouts for each side of the brochure by creating guides and fold marks precisely to the correct dimensions of the inner and outer panels. As any printer will tell you, designers often create folding layouts incorrectly, and they have to get fixed before they go on press.
Manually Creating Folds in InDesign CS5
InDesign CS5 has some new folding tricks up its sleeve to make the process a bit easier. I’ll make use of the Multiple Page Size feature I wrote about earlier (here and here), plus I’ll make use of a couple of other features that haven’t gotten much attention?Color Labels for the Pages panel, and InDesign CS5’s new ability to create fold marks on output. However, if your folding needs are more demanding, you may still want a more professional and efficient solution.
1. You’ll still need to calculate the exact dimensions of each panel for the outside and inside of the printed piece. I chose these dimensions for my trifold brochure on a letter-size page:
Inner Panel – 3 – 10/16″ or 3.625″
Outer Panel – 3 – 11/16″ or 3.6875″
The width of the panels depends on the thickness of the paper; check with your commercial printer for their recommendation.
2. Create a new document. I created six pages (one for each panel), and I set the page size to be the dimensions of the outer panel. I also turned Facing Pages off so I’d have more control over moving the pages.

New Document
3. This creates six pages, each on their own spread. In the Pages panel menu, deselect Allow Document Pages to Shuffle. Then drag the pages to create three pages for each side of the brochure?one for each panel.

Drag Pages to Spreads
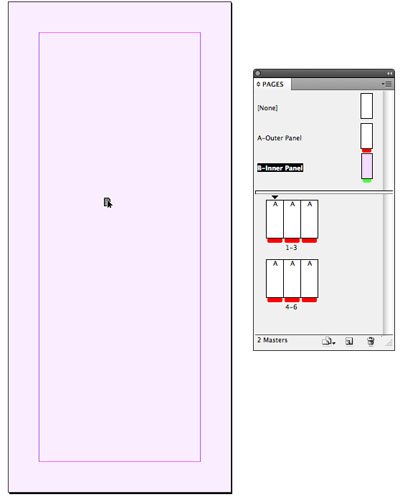
4. You’ll need two master pages. The one for the Outer (wider) panel is already created, but is named “Master A”. Select that master, and, using the Master Options command in the Pages panel menu, rename the master “A-Outer Panel”. So that it will be easier to see which panels (pages) are outer or inner, also choose Color Label from the Pages panel menu and give the master (and its child pages) a color.
5. Create the second master by choosing New Master from the Pages panel menu. Give it the name “B-Inner Panel”, and also assign it a different color.
6. View “B-Inner Panel” master. Select the Page tool and click the master page. Using the Control panel settings, make this Inner Panel 3.625″ wide.
Make Inner Panel Master
7. Drag the “B-Inner Panel” master over the left-most page on the brochure outside spread, and the right-most page on the brochure inside spread. Using the color labels makes this more visible. Because these two pages now have different sizes, observe each spread, and make sure the pages just touch, and don’t overlap.
If you haven’t already done so, add a bleed area to your document by choosing File > Document Setup. Also, use this dialog to create a slug at the bottom of the spread. You can use the slug area to label the panels to make them easier to remember when you reopen the template at some future date. Your spreads should now look similar to those below.

Brochure Inside
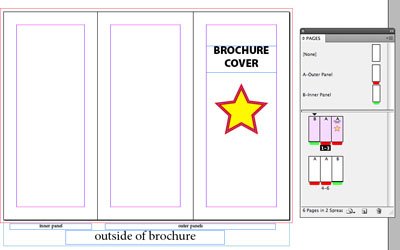
Brochure Outside
8. Finally, save the document as as an InDesign CS5 Template in the Save As dialog box so you can reuse the template as it’s needed.
When you print or export a PDF of the brochure, if you turn on Spreads and check the Crop Marks option in the Marks & Bleeds panel, solid fold marks will appear automatically as part of the output. (No, there’s no option to make them dashed!)
PDF with Fold Marks
But your printer will be happy because you will have correctly laid out your brochure.
An Update for the FOLDRite Template Master Is Coming
As I wrote earlier, the FOLDRITE Template Master plug-in for InDesign CS3 and CS4 can make the process much easier. It contains templates for all the standard (and many non-standard) folds, provide Flash previews of all its options, and totally creates a template for you.
I checked in with Trish Witkowski of foldfactory.com about support for InDesign CS5. She wrote that a new version is coming. She also said, “We’re also offering that anyone who buys the CS4 version from now (let’s say May) until the release of the new CS5 version will receive a free upgrade to the CS5 version when it releases.”
Nice article Steve! You’re right, your printer will be happy you laid out your brochure correctly.
Yes – it’s pretty neat the way that works. Very handy and that means no more single page with guides marking the cut, which makes it easier to break those trifolds into single pages for distribution in pdf as single pages.
By the looks of it the New Document panel needs an update.
You should be able to add in more pages and specify the size of these pages in the New Document.
Then you should be given the option to link the first 3 pages as a spread, and then next 3 pages as a spread.
That would be nice, well I think it would.
I enjoyed following along. This new feature makes InDesign much more suitable for specialized types of projects.
Am I missing something or are the underside pages actually placed incorrectly here? If the 4,5,6 spread is the outer face then that puts the cover on the under-sized leaf. But the under-sized leaf is supposed to be the one that folds inside. Something has gotten reversed here.
Colin,
It is confusing because the screen shot of the page layout has 4, 5, 6 above and 1, 2, 3 below. If you look at the pages panel (the final one), the cover is on the correct spread and panel. It took me a while to figure it out.
And, btw, this is a kick-ass tip. I work in a print shop and do the layouts for most of our stuff. This is going to be such a huge help. What makes it even better is the ease of repurposing!
Awesome tip! Using multiple page sizes will allow the margins to be adjusted so much easier. I used to create the margins by hand (using guides) and if I needed to change the margins, it was a real pain. This is a much better way of doing brochure templates.
Colin,
It is confusing because the screen shot of the page layout has 4, 5, 6 above and 1, 2, 3 below. If you look at the pages panel (the final one), the cover is on the correct spread and panel. It took me a while to figure it out.
Or another way for trifolds. Figure your outer panels’ widths, in this example 1/16″ more than the inner panels. Add this to width gives 11.0625″, divide by 3 and round to 3.69″ for panels 1, 2, 3, & 6. Panels 4 & 5 are 3.62″. Not exactly 1/16″ anymore but close enough. Manually place fold marks, dashed or not, in the slug and manually set gutters. Save as a template, and you’re good to go. (Remember to print with corner marks and slug!)
I followed the instructions, using the same measurements, to create this brochure. When I printed a proof to my laser printer (directly from InDesign CS5), all text and graphics shifted down and to the right about 1/2 inch on both pages (cutting off text and graphics on the right side and bottom). I saved the file as a PDF and printed that and found that it created 1/2 inch margins all around (shifting the text and graphics in by 1/2 inch).
What have I done wrong?
@ Marianne
Late I know but I stumbled on this post when searching for fold marks in CS5..
It’s probable that you have the ‘Scale To Fit’ option turned on.
Most home/cheaper office printers are not able to print on the whole page but leave a blank area at the sides. If your printer is not able to print on the whole sheet, the side parts of what you’re printing would not show up in the print.
That’s why when you turn on the ‘Scale To Fit’ option, it scales everything down to fit into that printable area.
You can test if your printer can print the full sheet by creating a document at the maximum page size possible for your printer, creating a stroked rectangle at pagesize and chosing the Scale Width & Heigth to both 100% then print it. If the whole rectangle shows up, it’s capable of printing at the whole sheet.
Besides that, if you try to make something similar to what’s shown above, remember that everything (including crop marks, bleed, slug) has to fit into the printable area of your printer..
I get a gap between pages 1&2 and 5&6 that is very distracting. Are they supposed be there because they don’t show up on these examples above.
Paulina, I realize it has been 4 years since your post on a 2-fold 3-panel indesign layout, but you asked about the “gap between pages 1&2 and 5&6 (I get the same gap)…..did you ever get an answer to this? Does it represent a die-score? Where does the fold line appear when the final plate/output is produced.
Thanks!
Use the page tool to move pages in your spread if they overlap.
I can’t wait for the CS5 version of Foldrite! Jeanious
This Rocks! Does anybody know how to get the pdf to print in the right page order?
Really good tutorial. But is the brochure A4?
A4 is 11,7 (long side) and divided by 3 I get 3,9 inches.
Also, I prefer brochures folded with page 2-3 as outer pages and the rest folded in. So by default I would need the 3rd page (1), while p 4-6 would be 3,9 inch.
Using the example above, how would you print or PDF only SPECIFIC pages in the spread (but not the whole spread), such as pages 1-2?
I’ve run into this problem with a 7 panel (so 7 pages) accordian brochure with the pages all put together (uncheck Allow Spread to Shuffle).
I’m trying to output only certain pages together, but when I specify in the print dialog box (or PDF Export) to only print pages 1-3 as a Spread, it consistently prints ALL 7 pages together. The same thing happens when exporting to PDF. It gives me all the pages, rather just the select pages I want to be in the spread.
I’ve tried inputting “+1-+3” as a page range and that didn’t work.
I seem to recall being able to do this a while ago. Has something changed or is it operator error? :-S
Great tutorial – but when I export the spreads does not stick together – i get (i my case 2) individual pages that i can flip between – instead of 2 pages that stick together with a fold mark at the top? What can I be doing wrong?
My problem, as well, except mine is a tri-fold brochure printing separate pages rather than 3-columnms on the front and back of page.
You saved my day!
Nice Trick indeed!
How do I set up a 5 panel brochure in InDesign. Four pages are different sizes to fold in properly.
THanks.
Six pages are printing out separately, rather than in a tri-fold brochure format. Am I supposed to group them? Further, it seems you should have set this up in landscape? All this work…. now what?
Melony, assuming you’ve set up the pages so they’re next to each other in the Pages panel, when you print/export to PDF, turn on the Spreads checkbox.