

Preventing 4-color Blacks in PDFs


An old student of mine named Mark e-mailed me yesterday, worried that the 2-color newsletter he just sent off to his commercial printer as a PDF would have the same problem as the prior issue he sent them: The 100% black elements, including all the text, had separated out to a mix of the four process colors.
Mark guessed that the cause was that he “had somehow changed the Preference setting for ‘Appearance of Black:'”

But actually, these settings only apply to on-screen previews (the first dropdown menu) or when you print or export to grayscale or RGB devices (the second dropdown menu) like black-only laser printers or inkjet printers. They have no effect on black-colored objects when you print to CMYK printers or export a layout to PDF.
After looking at the INDD (CS3) and PDF files Mark attached to the e-mail, Dr. Concepción diagnosed the culprit: The “Smallest File Size” PDF preset.
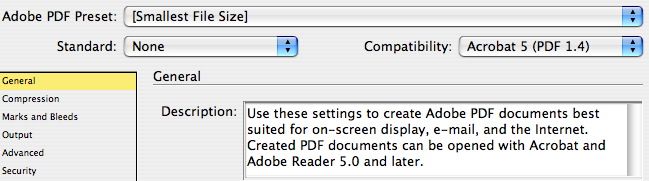
It turns out that Mark had wanted to reduce the size of the PDFs he was uploading to the printer’s FTP site, so he created a custom PDF Export Preset that was based on the Smallest File Size one that comes with InDesign. He tweaked it for commercial printing by including crop marks, bleed allowance, and changing the compression settings so images wouldn’t be downsampled so much.
What he forgot–and it would be nice if the Description field included this factoid–was that the Smallest File Size preset also converts all CMYK colors (and sometimes, spot colors in placed EPS files) to sRGB:
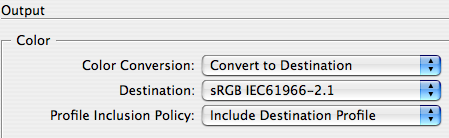
That means that 100% Black gets converted to an RGB mix in the PDF, and when the RGB black is sent to a CMYK device, it gets re-converted to something like C75 M68 Y67 K90.
I didn’t figure this out right off the bat, of course. But when I saw in Acrobat Pro that my export of his INDD file to PDF came out fine (a 2-color job, black and a spot color), while his PDF of the same INDD file was a 5-color job, I had to conclude there was something glitchy in his PDF Export settings.
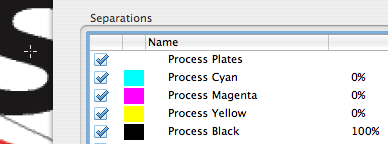
If you want to check your own PDFs for the same problem, open them up in Acrobat Pro 8 and choose Advanced > Print Production > Output Preview. Hover your cursor over something that should be 100% black (like where my cross-hair cursor is below, over the capital S) and look at the ink percentages next to the process plate names.
This PDF (exported using the Press-Ready or any PDF/X preset) is fine?Process Black is 100% and the other process colors are 0%:
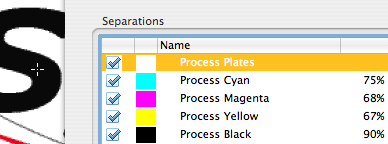
Here’s the same file, exported with the Smallest File Size PDF preset:
Another “tell” that a PDF was exported with the Smallest File Size PDF preset is to click on the Show dropdown menu in this same Output Preview dialog box and change it from “All” to “RGB:”

If the INDD file was exported to PDF using the Press-Ready or PDF/X1-a PDF presets (and assuming everything else was set to default CMYK print settings in InDesign), all page elements should disappear as soon as you choose Show: RGB. If you still see text or images, then it’s likely the Smallest File Size preset, or one based upon it, was used instead.
I’m sure this is not the only cause for unwanted 4-color blacks in PDFs, but it feels like a little patch of quicksand in InDesign that you should know about!
That’s very well said Anne-Marie and a lot of people fall into that trap when making PDFs.
It could be more convenient in a CMYK workflow that on exporting to PDF that you choose “Convert to Destination (preserve numbers)” so that any colour that you’ve created in InDesign isn’t converted to the Destination, i.e., only placed images are affected by the Destination.
I export to Euroscale Coated when exporting PDFs and if “Convert to Destination” is selected then the black text ends up 4/4. I have to select preserve numbers to keep the InDesign Swatches from being converted to the destination.
I work in prepress, and you wouldn’t believe how many PDFs we receive that are in RGB colorspace. “Smallest File Size” PDFs are great for e-mailing proofs, for onscreen proofing, or outputting to desktop printers for quick proofs, but never use that setting for sending to a print shop. Something like a 2-color newsletter wouldn’t benefit much from the file space savings anyway, I’d bet.
I think part of the issue is the name of that preset. First off, it’s very deceptive since it certainly isn’t the smallest file size. It only downsamples to 100 ppi. I usually change it to 72 and save a new preset.
Since the only real use for these PDFs is screen and very low end printing, perhaps that preset should be renamed “screen/collaboration” since they’re great for emailing amongst workgroups for commenting.
This would be a throwback to CS and earlier when that preset was indeed called screen and the downsampling set to 72 ppi.
I would think about finding a new printer. One of the preflight steps a reputable printer should be doing is to look for RGB colors and images as well as 4/c blacks in supplied PDFs. Most (if not all) of today’s RIP systems in use by printers have preflight modules that would catch these problems. Of course if you are going to Kinkos or a similar “quick printer” place, then all bets are off and you’ll get what you give them.
Well Scott I never found out “the rest of the story” … what the printer did with the previous bad boy. Best case scenario was that he called Mark and said “BTW, you know your file was in RGB and all the blacks were 4-color so we fixed it” (or maybe they re-exported it from INDD correctly).
Mark’s concern was that he not repeat the same mistake.
Best thing would be to get a .joboptions from the printer, imo. Though I can tell you I can’t remember the last time I got one, and I’ve asked. “Just use the defaults” is what I often hear.
A related error which also causes black to become 4-color is when the Transparency Blend Space is set to RGB instead of CMYK. Yes, ID gives a warning when exporting the PDF — but who looks at those annoying message windows when we’re in a hurry?! Hence, I have in years past goofed up that a few times.
Ahhh. Thank you for that Klaus. Just solved my dilemma. :)
Thank you so much for suggesting this – it is what I have been looking for. It’s an annoying option not kept with colour settings. Why does Indesign have to split everything up so that you can miss things? Colour management would be so much easier if there weren’t several different places you could adjust things! It’s at times like these that you get the impression that the program has just been bolted together over the years without much thought to the end user. Rant over.
That is a great warning, Anne-Marie, but I think Eugene’s comment about “Preserve Numbers” is really important for users to keep in mind. This was a new feature back in CS2, but didn’t get enough notice.
Whenever you output to a Destination other than the default document profile (for example, if your document is set to US SWOP, but you set the Destination to US Sheetfed), InDesign is tempted to convert all your CMYK colors to the new space — including converting 100% black to some four-color black. Using “Convert Colors (Preserve Numbers)” stops it from doing that — it just sends all CMYK numbers through untouched, which is generally what you want.
David, the Preserve Numbers feature definitely preserves sanity. ;-) But it wouldn’t have helped in this case, when CMYK was being converted to RGB.
Preserve Numbers keeps 100% blacks as 100% black when you choose a different destination CMYK profile than the current CMYK document profile, as in your example.
I’m sure you know that but just wanted to gently insert that qualifier for other readers, who might think you and Eugene are describing a way to maintain 100% CMYK blacks even while using the Smallest File Size preset, as discussed in the post.
Even if the document is set to the same colour profile you use for the PDF setting, is there any harm in using the “preserve numbers”?
Although, I did not realise that about the Preserve Numbers, in that if the document cmyk is set to say Euroscale and you choose Document CMYK – Euroscale from the PDF output dialog box that you don’t need to choose “preserve numbers”.
That’s very interesting and I’m glad I get that now.
Thanks
WRT the smallest file size and ‘rich black’ settings: I always export my sample PDFs using the smallest file size setting and then run a file size decrease thing in Acrobat. That, along with the lack of bleed and marks has kept folks from running to their own printers to save a buck or two. (cheap b*****s)
I didn’t know about the rich black/RGB setting, but I’ll be sure to change that so colors have that tiny conversion too.
As for the joboptions file: I’ve had an offset printer send me one years ago, and I’ve sent PDFs using that ‘profile’ to various other printers who’ve all said it’s fine that way. Never had any problems printing with those settings, so I’ll keep using it until I hear otherwise.
i always use pdfx1a unless told otherwise by the printer. seems to be the safest way to go.
i think your former student’s biggest problem is that they were so concerned with compressing the file to make the FTP upload easier. sometimes you have to bite the bullet when your files are large. getting carried away with file compression, especially if you’re not completely certain what changing some of the settings will do, puts you in position to fail.
not to sound harsh, but really, compression isn’t the right thing to do when sending files for final output.
I have been working in offset printing for over 30 years.
I believe this is the greatest problem printers have today.
For a digital press (fancy copier) one can get away with not knowing what their file really represents.
However, for 4 color offset with spot or 2 color spot it is a different story.
My advice is this – always take your exported pdf to Acrobat and view the separation preview to see if the spot colors have been retained.
I have many friends in pre press and we defiantly talk about how over the years, 2 color spot has become a lost art.
We all respond back to our customers that the file has separated into 4 color or rgb and many respond back and do not know how to fix the problem.
My last note is this – a rgb or converted cymk color file is unusable for 2 color spot.
I do not know any printer that would run such a file without telling the customer, or fixing it. However to fix it, one would need the original art work files and export it themselves.
Based on the information above, I’d like to revisit some of my jobs where the results weren’t what I expected. Is there any way to reconstruct what PDF output settings were used when exporting a job?
how about converting a pdf that is already saved in 4 color process and converting it to 2 spot colors???
i need help with that!
from 4 color to pms 185 & k=100
@ Mellisa:
You can map colours using the ink manager.
Tools>Print Production>Ink Manager
Then select what inks you want to change, and select the colour you want it to be.
I always do a Save As after I’ve done that.
Don’t remember why I do it, old habit maybe?
I’ve just had the same problem. What I thought was a high res set of pdf’s managed to get printed with 4 colour blacks by St Ives and I now find myself in a dispute with them over a 40k reprint. We signed off high res digitals and it didn’t show on that. They say they forgot to flight check it yet want us to contribute to the reprint. Noone knows where the error crept in..
Anyone any thoughts on this?
@Jacqui: The printer “forgot” to flightcheck? That’s not good. Well, did they print what you sent them? If you sent them a PDF with 4-color black, then it seems like you have a pretty big responsibility in it. If you sent them good files and they messed them up somehow, then they should fix it.
CS4’s live Preflight feature could really save us from a lot of problems, but unfortunately, it can’t save anyone from a poorly-made PDF.
This post may be alittle late to help Jacque and his 40k print job, but here is my take on it. If I where the print buyer(you Jacque), I would pay for the job to be re-plated and nothing more. This job should of been caught when plating by the pre-press and for sure by the pressman.
While one cannot see all problems on the proof , one can clearly see it on the plates before it goes to press. Even then the pressman should have called the Production Manager.This I can say for certain – someone saw it and made the decision to let it go. This I know for a fact – any pressman would have a fit running it.
I cannot even count the number of times I have called the CSR’s and told them that this job can’t go to press. It is common knowledge ,as well as common sense that customers don’t want cmyk for their type – unless it is big type and undercolor is used. After the customer is notified; it is the customers descision whether to fix it – re-plate it or take it off the press. We had a sign hanging in our room – It said this –
Thank you Randy, great words of advice from someone on the front lines.
I have a question for you all that kind of relates to this discussion. Do any of you now of an Adobe Acrobat preflight check up that converts 4/c text to black text only?
@Garth Koppen,
To convert CMYK rich black elements to CMYK black only (0cmy100k), a variation of the following Acrobat Pro Preflight Fixup could be used:
https://prepression.blogspot.com.au/2014/06/acrobat-pro-preflight-fixup-to-convert.html
The key changes to make from the example presented in the blog post are:
* Source Color Value: 1, 1, 1, 1
* Tolerance: 100
* Apply only to objects identified by a check: Text objects
NOTE: Acrobat Preflight Fixups will only change text and vectors, images and gradients will not be altered (this is where one would use Enfocus PitStop Pro 12).
I should clarify my previous post.
The source values of 1c 1m 1y 1k with a (wide open) tolerance of 100 will likely select any object with CMYK values, not just the rich black text. This is most likely NOT what most people wish to do on a production file.
To target only the rich black text and not other text, one should find out the exact CMYK build of the text. The source color value would then be set to match the known rich black text value such as 80/70/70/90, with a (tight) tolerance value of 1.
Always work on a copy of the original PDF for safety.
Garth, I’m in the same boat! Have some heinously rich black text from linked PDFs that I want converted to 100% black — otherwise I’m afraid it will be a mess on press.
Anyone?
We receive pdf files for offset printing. If they have been saved in smallest file size, is there any way to change from RGB to spot color?
Anyone?
I believe those kinds of PDF edits are possible in Acrobat Pro, or in a program like Enfocus Pitstop Pro.
I need to output an ad created in InDesign CS4 to PDF. Spec say “DMAX: 280% max Density”
I have areas that are exceeding 320%
Is there a way to control max density right from InDesign when exporting? I don’t have a Job Options preset file from the publication. If not from InDesign, is there a way to knock down high densities right in Acrobat Pro?
Thanks!
I am having the same problem but all setting are correct for print, oddly enough one page shows a 100 black type and the second page. All type is just regular black. Also I had to specfically tell indesign to overprint in 11 pt type.
This is driving me nuts.
THANK YOU!!!
I’ve been totally baffled by this issue for the past two days, and this Finally the exact answer I was looking for.
Such a nice feeling of relief.
For some reason all my placed Illustrator (CS6) .ai files have black separating as CMYK in InDesign (CS6). I have checked all color settings on both programs and am at a loss as to why this happens! Saving the AI file as PDF solves the problem, but that’s a pain when one wants to ‘edit original’ from InDesign, as it opens into Acrobat rather than AI.
Anyone know a fix for this?
This question is for Anne-Marie or David… I am working on a job with several different ads that have been supplied to me as PDFs. The PDFs appear to be one-color (K), but when I check them in Acrobat > Output Preview > Separations, the one-color (K) PDF is really made up of CMYK. I need all the PDFs to be black only. I know you can convert pdfs to grey scale in Preflight, but it seems to make the images darker. Is there a better way to convert the PDFs to make them truly one-color without changing the intensity/saturation of the image?
Peg: Unfortunately Acrobat’s separations feature can lie to you, and even regular 100% black can appear to be 4-color black. If the PDF is made with a PDF/X standard, then I believe Acrobat is more accurate. Before I tried to strong-arm the PDF, I would try to really confirm that they’re not just in a different color profile. As for editing the PDF, there are other PDF editing tools on the market (such Pitstop) that are often more powerful.
Thank you David.
Peg, in the Output Preview window, select the Object Inspector option, not Separations Preview.
Next, click on text, rasters and vectors with the Object Inspector cursor. Note the reported colour space and colour value. Also note if there is an ICC profile associated with the object.
If there is an ICC profile associated with the object that the Object Inspector reports as being K only but the Separations Preview reports as being more than one colour – then the profile selected in the Separations Preview is likely different than the object level ICC profile. If this is the case, the Separations Preview window is showing you the *potential* for colour conversion – not the current *actual object colour*, which is what the Object Inspector is for.
Of course, if Adobe had simply defaulted Separations Preview to use a profile of NONE or had a checkbox to turn off colour conversion or colour management in the preview, then a whole lot of time would have been saved over the years as many many people have been caught by such issues and tried to fix a problem that was not really there.
This was extremely helpful. Thank you for posting.
I am not able to find objective Inspector in Acrobat 8 professional. why?
The object inspector option was added to Acrobat Pro’s separations preview in v9.0.
Had a problem. You solved it lickety split. Thank you!
This help me very much althought I need this very much.Thanks
I’ve got a long book document (~350 pages long) that I want to convert to grayscale. I’ve got a number of vector images that do not convert to grayscale when I run the “convert to grayscale” preflight script in Acrobat DC, but I get no message that indicates it failed. Oddly enough, if I export specific pages and run them one at a time, it works perfectly. Has anyone run into this problem?
David: You might want to ask this on the indesignsecrets.com/forums so that it gets more visibility. Also, this article has more information about converting to grayscale with InDesign: https://creativepro.com/finding-export-pdf-to-grayscale-in-indesign-cs6.php
I work at a newspaper. Our black and white pages look great. But pages with a color ad or color pictures and black type, well….We convert it to pdf, Indesign shows type as black, once it uploads to the press, the black ink is separating. While this may be the case on some pages, not all pages will do this. Even when they are all uploaded from the same computer with same settings. Can anyone tell me what I should check on first to help solve this problem.
There are many reasons you might be getting 4-color black instead of just 100% black. I would start with being careful about the original InDesign document. Is the text really just black or is it a 4-color black, or perhaps an RGB black. (I’ve seen some text pasted from other programs turn into RGB black instead of real black. Or perhaps the ads that are given to you are created incorrectly and are set to RGB. (For example, some people make PDFs using the “Smallest Size” pdf preset, which converts everything, including text, to RGB. If they send that pdf to you, you’re going to get 4-color CMYK when you print.)
I did a title at lynda.com on “creating print pdfs” which might help you and your customers.
Also, you may need to use Adobe Acrobat (or some other PDF fix tool) to inspect and fix those PDFs before you place them in InDesign.
Is there a way of preflighting in InDesign to check if text has been made RGB?
The problem about which you have discussed here is common problem in students while printing documents. you have told perfect solution in very understandably manner. I also always face this problem but you have solved my problem easily. really very thanks for this.
Just a heads up because I just ran into this: There is another possible cause for black getting separated. If your document’s transparency blend space is set to RGB instead of the default CMYK, black on any spread that has any transparency effects will be separated out. It does not matter even if it is text on a separate layer on top of everything else and has no transparency, blend mode or effects applied to it whatsoever. Spreads without transparency are fine.
I’m not sure if this is a bug (though I think it must be), but it can be easily observed using InDesign’s Separations Preview.
Here’s the thing: Apparently any page item with transparency triggers this, *even if it is hidden in the Layers panel*.
It gets even more confusing when you are placing InDesign files in other documents since the Transparency Blend Space settings can ripple through.
I print a lot of brochures created long ago in PageMaker and updated in InDesign. They often have a color cover with all black inside – for lower printing cost. We use a Canon imagePRESS C6010 and most of black and white spreads are counting as color “clicks”. Looking for a quick fix…
Liz, I believe that the fix will either be in Acrobat Pro Preflight/Single Corrections or another PDF tool such as Enfocus PitStop Pro or PitStop Server – or to change the input/hot folders at your RIP/DFE to force process certain pages as mono.
This is the best article I could find out there around this issue. I tried to change the appearance of black and of course, nothing changed. Apparently, there was nothing wrong with my pdf, after I checked the: Advanced > Print Production > Output Preview, my pure black was 100% with 0 CMY. But when I print using an office laser printer, it still came out as “rich”. I could see that there was extra CMY in it.
I used the same printer, a duplicate file of ‘last-year-report’ and same fonts. Last-year-report came out fine, the thin fonts look tiny and true black. But This-year-report looks ‘bleeding’.
Then I use a different printer, the ‘bleeding’ gone.
In conclusion, it is the printer problem, at least I know now and don’t blame Indesign/ pdf conversion for the issue.