Publishing With Sound
How to add all the bells and whistles to ePubs, PDFs, and DPS apps with audio files.
In 1984, when Steve Jobs showed the images and word processors on the first Macintosh, the crowd was politely enthusiastic. But when he revealed how the computer could speak, the place went wild. They jumped up and down in their seats—cheering and screaming. It was pandemonium. That’s the power of sound. It’s one thing to write words or show pictures, but add speech, music, effects, or just plain noise, and you will captivate and excite your audience.
For many of us coming from the print world, it’s surprising how enjoyable—and how easy—it is to work with sounds and movies in digital document formats like ePub, PDF, and DPS.
Audio Formats
The easiest way to get sound into InDesign documents is to use audio files with the H.264 encoding. And while there are other sound formats with the H.264 encoding, most people use MP3 files.
Converting files to MP3
If all your sound files are in the MP3 format, you’re good to go. However, it is very likely that you will have files in other formats than MP3 that you will want to use—especially if you have older audio files in WAV or AVI formats. In that case, you can use the Adobe Media Encoder. The application will automatically be installed when you install Premiere, After Effects, or Prelude. Or you can download and install it from the Creative Cloud desktop application.
Open the Media Encoder. Don’t let the size and complexity of the window overwhelm you. All you need to focus on is the Queue pane in the upper left corner (Figure 1).

Figure 1: The Queue pane of the Adobe Media Encoder is where you can convert video and audio files to the correct format for digital publications.
Click the plus sign to add files for conversion. Use the Format options to choose the new format for the file. Choose MP3 to create audio files.
When you have added all the files you want to convert, click the Start Queue button (green triangle). The new files appear in the location specified in the Output File area. Once they have been converted, your sound files can be placed into your InDesign documents.
Working With Audio Files
Despite the mind-bending concept (to a print person) of adding sound to a page layout, it’s actually very simple to work with audio files. Our favorite use for a sound is as a click effect that plays when a button is activated. We might also add short bits of music that play when a document is first opened. If you know how to place an image into InDesign, you already know how to place a sound in a document.
Placing Sound Files
Choose File > Place, and then choose the sound file you want to import. Your cursor changes into a Sound Clip cursor  that you can click or drag to add the sound clip to the document. The sound clip appears inside a frame with diagonal lines and a small sound identification icon
(Figure 2).
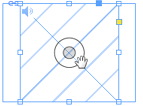
Figure 2: A sound clip, indicated by the diagonal lines, inside its container frame.
Unlike placed images, there is no size or resolution or proper ratio for the sound clip inside the frame. It can be made taller, wider, or placed inside any shaped frame. The diagonal lines indicate how much space the sound clip takes up on the page. The width of this area is the width of the controller that can be used in PDFs and ePubs to play and stop the sound (Figure 3).

Figure 3: Different sound clips inside different sized frames. Only the width of the clip governs the size of the controller.

But you cannot “clip” or mask the sound clip inside the frame for PDF output. The mask will be adjusted to display the entire size of the sound clip rectangle, even though there is no visual element associated with the sound.
However, not all features for sounds work for all export options. Use the following table as a guide for what you can expect to do with sounds in digital publications.
| Feature | ePub | DPS | |
| Poster | Yes | No | Yes |
| Controller | Yes | Yes | No |
| Button prompts | Yes | No | Yes, but only on Tap |
One important thing to understand about sounds in reflowable and fixed-layout ePubs is that only ePub 3 files support multimedia actions such as sounds and videos. This means that Mobi books in the Amazon Kindle store do not support sounds.
Using the Media Panel
Once you have the sound clip on the page, use the Media panel to preview the sound and set the options for the sound in PDFs and ePubs. (Use the Folio Overlay panel to set the controls for the sound in DPS apps. See “DPS Folio Overlays” for more information20.
Select the sound on the page. Choose Window > Interactive > Media. The Media panel shows the controls and the poster image for the sound (Figure 4).
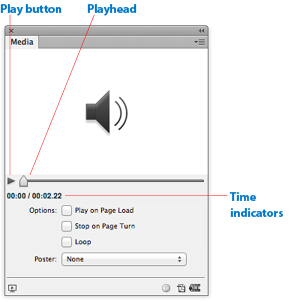
Figure 4: The Media panel with the sound controls visible.
Previewing sounds
You can preview placed sounds in your documents with the Media panel. Click the Play button to hear the sound. The playhead moves along the sound playline to indicate the current playback position within the clip.
As the sound plays, the Play button is replaced by a Pause button. Click the Pause button to stop the playback. The two time indicators show how far along the playback is and the total length of time of the sound clip.
Setting the sound options
The Media panel also lets you apply various sound options for how the sound plays in the document (Figure 5, next page).
Play on Page Load sets the sound to automatically play when the page is visible. This makes sense for PDF and fixed layout documents that display individual pages. However, there are no pages in reflowable ePubs. So a sound set to play on page load plays as soon as the ePub opens—even if the sound clip itself is placed much further along in the document.
Stop on Page Turn sets the sound to automatically stop when the page is no longer visible. Again, reflowable ePubs don’t honor this command, as there is no concept of a page turn.
Loop repeats the sound until it is manually stopped. This option is not often used, as the practice of looping sounds continuously is considered evil.

Figure 5: The options for sounds in the Media panel.
Setting a Poster for Sounds
When a sound is included on a page, it acts like a button that can play the sound when clicked. So you might want to include a poster, or visual indicator, that lets people know there is a sound in that location.
Use the Poster menu in the Media panel to choose an image that will be used to show where the sound is in the document. These poster controls aren’t visible in either reflowable or fixed layout ePubs exported directly out of InDesign.
None leaves the sound clip frame empty. The sound is still there, but there is no visual.
Standard uses the standard sound poster image—sound waves coming out of a stylized audio speaker. It’s not a bad identifier, but it’s not your own (Figure 6).
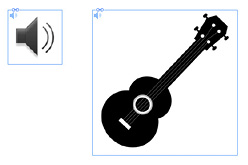
Figure 6: The standard sound poster (left) and an image used as a sound poster (right).
From File/Choose Image lets you import a custom image to use as the sound poster. Click the Choose button to choose the custom image. Not all graphic file formats can be used as a sound poster. We have found that the best choices are pixel-based files, such as JPEGs or PSDs.
Using Buttons to Play Sounds
Sound files can be prompted to play by clicking the placed sound file, or you can set a button to play, stop, or pause the sound. (Buttons don’t work in ePub documents.)
Creating a button to play a sound is fairly simple. Open the Buttons and Forms panel (Window > Interactive > Buttons and Forms). Create the object, and then click the Convert to Button icon at the bottom of the panel. The object displays the button icon when Show Frames is turned on.
Next, you need to set the event. This is the mouse or finger control that will prompt the action. If you are creating for PDF, you can choose any one of the events listed: On Release or Tap, On Click, On Roll Over, On Roll Off, On Focus, or On Blur. However, if you are creating a button for DPS or expect that your readers will read the PDF on a tablet, you should only use the event On Release or Tap; the other events aren’t available.
In the Buttons and Forms panel, click the plus sign (+) next to the Actions options. Choose Sound. This opens the sound options.
The sounds that have been placed on the page are listed in the Sound menu. Choose the one you want to play. Then use the Options menu to choose what you want the button to do: Play, Stop, Pause, or Resume playing the sound (Figure 7).
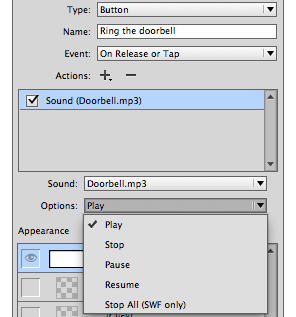
Figure 7: The sound options for buttons.
Hiding the Audio Rectangle in PDFs
When a sound file plays in a PDF, you see the sound’s audio controller as well as a gray rectangle that covers the size of the sound file within the frame (Figure 8). The controller lets your viewers play, stop, or change the volume of the sound. Usually this is a good thing. Unfortunately, most designers don’t want the ugly gray rectangle popping up. They create their own buttons to control the sound and don’t want any distractions on the page.

Figure 8: The sound controller as seen in an exported PDF.
We used to hide the rectangle and controller by making the sound and frame that holds it only one pixel in size. But it was hard to work with a microscopic sound frame. Fortunately, we discovered a better way. The trick is to cover the sound file with a white button. This button can then be set to do nothing with no actions.
Because it is above the sound, it stays above the sound in the finished PDF. However, the Hand icon will still display when the cursor passes over this non-functional button. You can turn that off in Acrobat Pro by selecting the white button and changing it to Read Only in Acrobat’s Button Properties dialog box.
Working With Sound Controllers in ePubs
ePubs always show the controller for a sound. This is helpful if you want the reader to be able to start or stop the sound themselves. But if you want the sound to play automatically, you may not want the controller to be visible.
For a fixed layout ePub, just draw an opaque object over the sound clip. For a reflowable ePub, you’ll need to group the opaque object with the sound clip.
One of the exciting uses for sounds in fixed layout ePubs is the read-aloud feature that highlights each word of the text as a recorded voice reads along.
It’s a terrific feature; unfortunately, there is no way to export the text with sound from InDesign. The read-aloud sounds and word highlights have to be manually added after the ePub is created. This is why the feature is mostly found only in children’s books that have limited amounts of text.
DPS Folio Overlays
When you create DPS apps, use the Audio tab of the Folio Overlays panel to control how the sound plays as well as add advanced features.
Auto Play: This setting is the same as Play on Page Load in the Media panel. It causes the sound to play when the user turns to that page.
Delay: If you set Auto Play in the Folio Overlays panel or Play on Page Load in the Media panel, only the Folio Overlays panel allows you to set a delay before the audio plays. It’s usually a good idea to set a brief delay, even .125 seconds, so that the audio does not start playing before the page loads. It also gives your reader a chance to take in the entire page before the sound starts (Figure 9).

Figure 9: Use the Folio Overlays panel to set a delay on Auto Play, which helps prevent the audio file from playing before the page is fully loaded.
You can also set a sound to Play in Background Across Folio. We’re not too sure if readers want that type of long-lasting sound, but it does ensure that a narrator’s voice doesn’t get cut off in mid-sentence.
Working With Sound Controllers in DPS
One of the interesting things you can do with the Folio Overlays panel is to set images to control the audio playback. You can create either a simple controller or a progressive controller, which shows the progress of the audio as it plays.
For a simple controller, you need only two files. However, they must have very specific names. Name the files with a _pause or _play suffix, such as audio_play.png and audio_pause.png. Add these two images to an assets folder that contains no other files.
Next, load the images by clicking the Controller Files folder icon in the Folio Overlays panel. Point to a folder that contains only the controller images. To use the audio_play.png image as the poster image, select the Show First Image Initially checkbox (Figure 10).
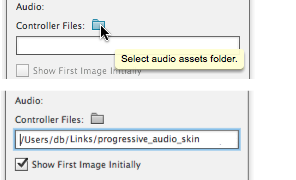
Figure 10: Click the Controller Files folder icon to choose the images for audio controllers for sounds in DPS apps.
You can also create a progressive controller that displays a series of images that show the progress of the audio as it plays. Again, point to the Controller Files assets folder to load the images. For a progressive controller, the images must be named in a very specific sequence that includes an increasing number, such as audio01_play.png, audio01_pause.png, followed by audio02_play.png, audio02_pause.png. As the audio plays, the images will be shown in a sequence that displays a visual of the audio progress. The total number of play files you use will be divided equally by the length of the audio. For example, if your audio is 30 seconds and you want the image bar to progress every second, create a total of 30 files, named audio_play01.png to audio_play30.png, with their corollary pause versions (Figure 11).

Figure 11: These images are part of a sequence that displays the progress of the audio as a controller that fills up from bottom to top as the audio plays.
It’s also a good idea to create the images in the exact pixel size you want; scaling them up will cause pixelation, and scaling them down will make the file size larger than it needs to be. Use PNG or JPEG images with medium compression to best balance image quality and file size.
Because it can take quite a bit of time to create the images for a progressive controller (unless you automate the process; see the sidebar on the next page), it’s a good idea to choose a controller look and stick with it throughout your DPS publications. It can be very time consuming to change them all with each new issue.
Audio in DPS Scrolling Text
DPS pioneer Bob Levine (boblevine.us) recently showed us an ingenious use of sound that he created for a March of Dimes app called My 9 Months: My Guide to a Healthy Pregnancy. It takes advantage of the fact that sounds in DPS apps, by default, don’t show any controller.
Create a multi-state object with an object state for scrolling text. Anchor each sound clip, with no poster, so that it covers all the text. Without a poster or controller, there is no indication that there is a sound above the paragraph (Figure 12).

Figure 12: Scrolling text within an object state with an anchored sound clip for that paragraph of text.
In the app, as the reader scrolls through the text, she can tap inside the area for the paragraph. The sound clip that covers the paragraph acts like a button that reads aloud the text in the paragraph. This is very helpful for readers who are not familiar with the terms that the healthcare provider may use when discussing the pregnancy with the mother.
Sound Advice
As you design digital publications, consider how sound can enhance your readers’ experience. A ePub on bird watching can have the calls for each bird. A DPS magazine might have an audio interview with the subject of an article. Even the most simple PDF can be enhanced with buttons that play sounds. In any digital publication, sound turns readers into listeners.
Using Illustrator to create audio controllers
Adobe Illustrator is a great tool for creating the image sequence for an audio file controller. You can create objects for Start and Pause buttons and then use blends to precisely create the progress display. For example, if the audio takes five seconds to play, double-click the Blend tool and create a blend so you end up with ten total objects (eight specified steps plus the original two objects). This creates a player that runs for five seconds, with each step lasting half a second.
Once you’ve created the artwork, exporting PNG files from Illustrator is tedious. And if you need to make a small change, it’s twice as tedious. Fortunately, Adi Ravid has created DPS Audio Player SkinMaker, a simple script for Illustrator that automates the process of creating those files and naming them correctly. You can download the script here. That page includes instructions for installing and using the script in Illustrator. Thanks, Adi!


