Rounded Corner Tables and Brackets on Frames
E.R. wrote:
After seeing your corner-only border segment, it reminded me of a problem that I hadn’t been able to solve: I want to make the right- and left-hand side of the text frame a square bracket so that anything I typed into it would elongate the brackets as I typed. Alas, I’ve never found a solution.
I banged on this problem for a bit, too, and was about to give up when Sander Pinkse from the Netherlands sent me the answer from out of the blue. Not only that, but he showed how to make a rounded-corner table (sort of), which many people have also requested!
Let’s do the brackets first. This trick relies on combining two other tricks: First, the corner-frame trick that Rufus came up with a couple of years ago and which I wrote about recently. Next, it makes use of another classic trick: putting text inside a one-celled table in order to create cool effects.
After you have created a “corners-only custom stroke,” you can put a bracket around some text by making a one-celled (one column, one row) table and placing the text inside it. Now select the cell (not the text) by pressing Esc (or choosing Table > Select > Cell) so you can adjust the strokes on each of the four sides. Set the thickness of the solid line stroke in the Stroke panel or the Control panel.
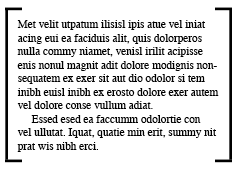
Now for the trick: De-select the left and right strokes of the cell in the Control panel or the Strokes panel, and then (while only the top and bottom strokes are selected) choose the corner-only stroke. The result is simply delicious:


As the amount of text changes, the bracket gets taller or shorter automatically.
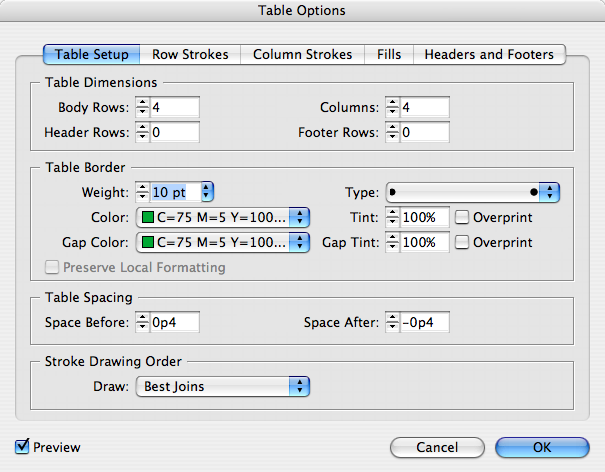
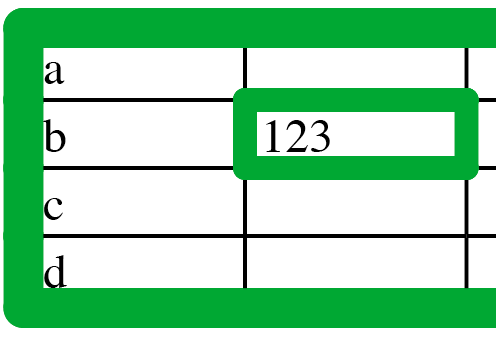
The rounded corner tables aren’t exactly what I had always hoped for, but they are certainly a pretty cool application of tables and the corners-only trick. Basically, Sander pointed out that you can make a Dotted stroke with a large Pattern Length, then set that stroke as the table border in the Table Options dialog box. (Or, alternately, set it as the stroke in Cell Options.) Finally, make the stroke weight thick and make sure the Color and the Gap Color are both set to the same swatch!


InDesignSecrets rocks!
Thanks again for a tip I never thought I would need, but after reading it I will use & use again :D
I can’t get the round table corners. (CS2). What am I missing? I have tried rounding the joins, etc.–nothing seems to work.
If you draw a line segment, add a couple end shapes, i.e. SimpleWide arrow, you can use this as a length label…
GOOD NEWS — you don’t need to add a fill to the text frame to block out the line, consequently blocking out any underlying image.
BAD NEWS — the gap between the end points isn’t dynamic, obviously, and so the distance between the label text doesn’t work for all cases
MY OWN FIX — 1) fill the the text frame with white, then adjust the fill opacity to 0% — 2) use a standard solid stroke, without any gaps — 3) group the two together and check off Knockout Group…
Philip, did you make a custom dotted frame with a really wide pattern length and “adjust gaps” turned on (as disussed in the earlier post)? That’s the trick I’m referring to in this post.
Casey, that’s a very interesting idea!
Hmm, with regard to the rounded corners I think I’ll stick to pasting inside and applying the rounded corners to the containers outer edge, it gives you more flexibility when styling up the outer stroke, such as aligning the stroke to the outside, center etc. etc.
Also if you look very closely at the “dotted” stroke, at each point where the Row and Column dividing lines are you will see a little bump where the dot is used as part of the stroke, which to me wouldn’t be a good thing if they were noticable at the print stage, You can see them on the left edge in the screen shot above, plus I don’t think I’ll ever need to apply a rounded stroke to an individual cell inside a table.
Famous last words.
David, I have gone back through the earlier tutorial for the text brackets and created the adjustable text brackets. Works fine. I am applying that same style to the one-cell table, giving a 10 pt stroke, with the same gap color, using best joins, as shown in the screen shot above on this page. Corners remain entirely square, unrounded, as in the brackets. I have reread the above tutorial about five times now, and honestly, from the description given, I don’t know what would cause the corners to round anyway. What exactly is it? Clearly, I;m blocking on something here. Help appreciated.
Philip, for round corners you need another stroke style, one that creates a *dotted* rule instead of a *dashed* rule.
I found a quite simple solution for rounded tables. You create your table as you want. Create an empty frame with your choice of corners. Position your corner frame over your table. Cut your table and select your corner frame and “paste into”. I found adding an extra column and extra row allow me to adjust the cells away from the corner effect.
Thank you David!
That was the easiest trick- (making an empty frame and pasting into) for rounded corners.
So now it is year later, is this still the best way to to do rounded corners?
Yes, sadly, the Paste Into feature is still the best option for creating rounded corners on tables.
OOOOrrrr….
1. Copy the table
2. Draw another box with rounded corners.
3. Paste Into the new box with rounded corners
4. Say out loud – “Viola, my work here is done!”
I tried the “Paste Into” and the table gets pasted too far away from the left edge of the rounded corner box, so there’s a gap. I’m new to ID and was wondering how to fix that.
Let’s just face facts. Rounded corner tables in Indesign don’t work successfully!
that looks very handy, thank you!!!
I have followed the cut and paste into a rounded rectangle, but it seems that because my footer has a colored fill, the square-edge is sitting on top and pushes out. I almost want to place a larger stroke rounded rectangle on top, but then that sort of defeats the purpose of cutting and pasting into. Can anyone help?
Thanks,
Ted
opps, found out why.
Which was… :-S
Another question – can I round the corner of a cell? I want to create a calendar grid with one rounded corner and two sides, no other border lines. I’ve seen this in print multiple times but can’t figure out how to do this short of creating a rounded corner box for every single cell… would very much appreciate your help.
Other than what is in the article above, you cannot round table cell corners.
But you could make a table and then use the Gridify feature to quickly make a bunch of frames over (or under) the cells.
Thank you David
I ended up using the old “paste anchored object in each cell” trick. It seems to work so far, I just wonder if there is a way to mass copy and paste contents into cells, because right now I’m going cell by cell, clicking on them, pasting in, etc. It’s a bit tedious.
Again, thanks for sharing your knowledge!
Tehilah