Split Images That Span Across Two Pages
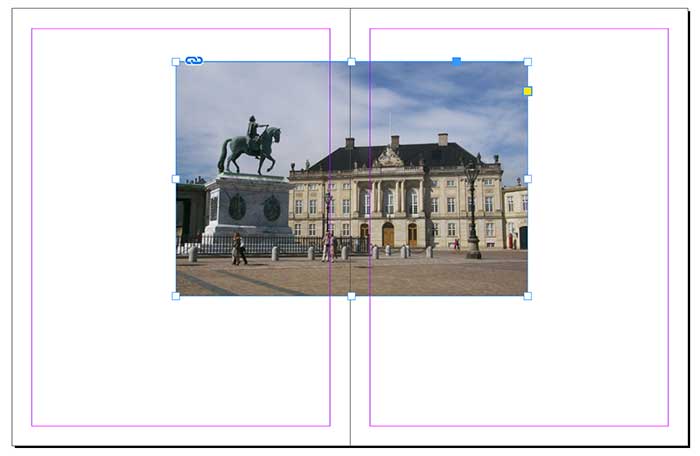
You’ve placed an image so it spans across a two-page spread, and your printer tells you to split it. That is, they want you to break the image into two — one graphic on each page. This isn’t hard to do, but it takes a bit of time, and if you had to do a lot of them it would get boring quickly. So I’m going to tell you three ways to do it, including a free script.
And also: I want to point out that in many (perhaps most) cases, you do not need to do this! Most printers handle this kind of imposition work for you. And if you export a PDF for them, InDesign splits the image for you when it makes the PDF. So the technique falls into the category of: Do it only if your printer insists.
The Manual, Slow Way
Here’s the procedure to change images manually:
- Select the graphic frame, copy it to the clipboard, and then choose Edit > Paste in Place
- The duplicate is now selected, so drag one of the side handles over to the spine (where the two pages touch). If Snap to Guides is enabled, the frame edge should snap to the side of the page.
- Select the original graphic frame, then drag the opposite side handle over to the spine.
In some cases, you’ll also want to move the images inside the frames toward the outside edge (away from the gutter). This adjusts for the little bit of the image that gets lost where the two pages come together. The result is that a bit of the image gets duplicated in the middle. To make this adjustment, double-click on the image (to select the image inside the frame) and move it toward the outside of the spread… for example, on the left-hand page, you might press the left arrow key on the keyboard 6 times (6 points is about 2 mm).
So, here’s the image before (one graphic frame):

And here is it after (two frames; just the one on the left is selected):
Use the Gap Tool
Anne-Marie Concepción taught me a great method that uses the MakeGrid script that ships with InDesign:
First step: Select the image and run the MakeGrid script (which you can find inside the Scripts panel > Applications > Samples). Set it to 2 columns, 1 rows, and zero space gap:

Second step: If the image was centered on the spread, then you’re done. But if the graphic frame was off-center, then: Use the Gap tool to move where the two frame touch.
This is actually kind of tricky because you have to put the Gap tool cursor exactly over the edge where the two frame meet, so you only have a tolerance of about one pixel. But when you get it, it will look like this:

Then, drag the edge to the spine (where the two pages meet).
Using the Script
OK, so let’s say you need to do 20 of these. At that point, doing it manually is too annoying and you want to find a script to automate it. Fortunately, a guy name Chris Bennett had this problem a few years ago and paid Martinho da Gloria (the brilliant mind behind the company Automatication) to write a script to do it. Even more fortunately, Chris has agreed to offer his script to the public for free!
You can download the script here.
Since the script was written for an older version of InDesign, you must put it inside a folder called Version 14 scripts.
![]()
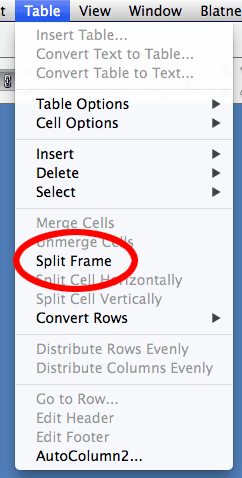
This is a “startup script” which means that, unlike most scripts, you have to restart InDesign, and the script activates when you “start up” the application. But the benefit of this is that the script becomes a feature in the normal InDesign user interface. In this case, it shows up in the Table menu, listed as “Split Frame”:

Why is it in the Table menu? (Makes no sense, because this has nothing to do with tables.) I don’t know, but that’s okay; it works!
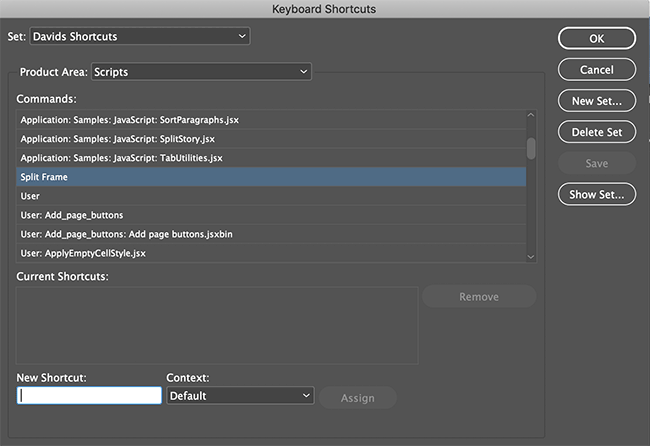
To run it, select the graphic frame and select Table > Split Frame. If you had to do this a lot, you could apply a keyboard shortcut to it. The shortcut lives inside the Scripts product area:

So now you know!
A huge thanks to Chris Bennett for sharing this script with the InDesign community!


“Why is it in the Table menu? (Makes no sense, because this has nothing to do with tables.) I don’t know, but that’s okay; it works!”
I think it’s been told to appear in the sixth menu across and eleven positions down (or something similar) which made sense when it was written for InDesign 2 or 3 or 4. I had trouble finding it in the menu once after an upgrade. That’s my guess, anyway.
Thank you so much for writing this up and making it more accessible for anyone who needs it!
I have the script installed and it works but for some reason, I’m unable to see it in the Keyboard shortcuts table menu in which to assign it a keyboard shortcut.
Go into Keyboard Shortcuts and click on Show Set. In the text file that opens do a Find for Split Image. Doing so will show you where the command lives in ID.
Awesome!!! I’ll never understand people who don’t like (or don’t give a chance to) the scripts usage.
Thanks for this, both of you!
I think I’m missing something…is this a better way to do it than a compound path?
Jenn: Well, a compound path is an interesting idea. But you could not move the image in to the left on one side and to the right on the other. And if the page got moved, it wouldn’t work.
(For example, let’s say someone decides to actually do the imposition in InDesign, with a 16-page doc, and they move page 2 next to page 15… I’m not saying that’s a good idea, but people have been known to do crazy things.)
I think having two separate frames is probably safer.
aha! i get it now. thanks!
I design a perfect-bound magazine for which our printer advises that crossover photos be adjusted to accommodate for content lost in the binding. (Printer advice: https://www.cummingsprinting.com/technotes/designing-perfect-bound-pages/.)
I see a great future for this script in my workflow — maybe with some modifications to reorient the respective x coordinates of the image in the two new graphics frames.
At any rate, this is an example of where you could use this script for reasons other than shuffling pages and doing your own imposition.
Would there be a way to allow this script to perform the action on multiple items selected at once? currently it seems to only allow one item at a time.
I get an error when I run the script. It’s definitely in the folder above. I don’t see a way to post a screenshot. The error is “Object does not support the property or method ‘pdfs’. Do you want to disable this event handler?” with the option to click yes or no.
The script was working great in all of my chapter sections and then in one section I got this same message. After determining, the script nor my image was corrupted, it seems maybe there is something in the master page set up of this particular chapter that the script does not like. My work around was to open a chapter of master pages where the script was working and to copy and paste in place the image on a new blank spread, run the script to the image, then copy and paste in place the two images to my pages where it had given me the message. I am not sure what the script found faulty in that one set of pages, but this is a work around.
Handy script. And for free as well. Many thanks Chris Bennett and Automatication.
It would be great if the offsets could be changed.
I agree with William. The script works well, and I had hopes for some of my jobs, but without the ability to change the offsets I wouldn’t be saving any time.
3mm each way was what the print house asked for, so that’s the amount I got programmed into the script. If the print house was to change their mind, and now said that they wanted 2mm or 4mm, I would simply carry on as usual and tell them that it has been changed. No one would spot the difference. After all, 1mm is slightly less than 3 points (from memory) or 2 poppyseeds or half a barleycorn if you’re American.
I must admit that I was surprised that I couldn’t find anything available out there before I got the script written. It appears to be a more common requirement from printers than some people think.
any one want to be my hero and tweak this script so that it splits, then offsets the image with in the frames to the left right to account for perfect binding? That’s the only time my printer requests I split images for production, to account for the area lost within the spine.
I have to do this for 200 page books twice a year!
That’s exactly what it does? The offset is set to 3mm each way as that was what my print house required.
Hi every one, when i tried the script in my project in Windows InDesign 2020, it generate an Error(The Requested Action couid not be Completed,etc.., Here is the Screen Shot :
https://ibb.co/QCRzFwV
Hi,
So, I inherited a 60pg look book designed in Illustrator.. is there a script for Illustrator that’s similar? I’m having issues with critical thinking today (and most other days) and I’m sort of at a loss on how to do this..
Thanks.
I’ve never seen this for AI, no. Someone designed the book in Illustrator? That’s the worst thing I’ve heard all day. How horrible. They need to read our “InDesign vs. Illustrator” feature article in this month’s issue of InDesign Magazine!
Was this “book” created using artboards in AI? Or with 60 different AI documents? I would suggest just placing all the artwork into an InDesign document, one “page” at a time, by placing them as images.
Yup haha. Sounds like a very informative issue, I’ll have to check it out!
It was created with art boards, thankfully, not individual docs. I’ve been placing the images in InDesign, running the script, then copy/pasting back over to AI. Going to redesign it all in InDesign once I have the time LOL.
Thanks!
I know I’m a little late to the party here but is there any way to adjust the amount the script moves the image? I know its set to 3mm but it would be good if there was a way to adjust this or supply additional scripts set to different sizes so you had the choice of how far the images are moved. Would make the script more usable than being stuck with just 3mm.
Unfortunately, the script is encoded so you cannot edit it. You could try reaching out to Martinho at Automatication.com to see if he can do a custom version for you for a small fee.
I need to split 1 image across 3 pages for a presentation is there a way to do this easily?
See “The Manual, Slow Way” in the article above.
This script doesn’t seem to work in the latest version of InDesign. I get a JavaScript Error! Is there an updated script out there?
I don’t know if an updated version of the script exists but I can confirm that this one doesn’t work in InDesign 2023. As an alternative, try using the MakeGrid script that comes with InDesign. You’ll find it in the Scripts panel, in Application > Samples > JavaScript. With your image centered on the spread, run the script and in the dialog box, set Rows to zero, Columns to 2, and the Column Gutter to zero.
I found the script you mentioned but when inputting the details you gave the image is deleted and disappears!!? Tried all kinds of alternative options on the numbers but it won’t split the image as the original script did???
Ack! I’m sorry, Antony! I should have written set Rows to 1. You’re right, if Rows is set to zero, the image gets deleted.
Hey Antony, this script works, tested on ID22 and ID24. https://file.io/uJcy5176n5CQ
Hey Matt
The file is no longer available …