

Starting Chapter Text at a Fixed Position on the Page

Here are two chapter opening pages. The title on the left is a single line and the other is three lines, yet the lead paragraph begins in the same place on both pages. An InDesign user asked me if there is a way to automate this so that, no matter how long the title, that lead paragraph will always start at a fixed distance from the top of the page. There is. Each of these pages has only one text frame, there are no blank lines or other hidden characters, and the paragraph styles are identical.

No, this isn’t another InDesign Secrets Mystery Challenge. There are no prizes for finding the right answer, because (spoiler alert!) that’s what I’m about to get into.
We want to start the main text in a fixed position on the page, no matter how many lines in the title. There’s no single combination of “Space Before” and “Space After” that will do it. We would need a Paragraph Style for a one-line title, another for two lines, and so on, with different “Space After.” The Invisible Rule Above trick (more about this later) won’t work either, because that affects only the first paragraph in a frame.
You could put the chapter title in its own text frame, threaded into the main copy frame, but that’s an awkward workaround. If a chapter title were to change (not that your authors, paragons that they are, would ever do such a thing), you’d probably have to adjust the frame. This is not what you’d call “efficient.” Unless you’re being paid by the hour, and handsomely, “inefficient” soon morphs into “tedious” en route to “thoroughly annoying.”
The better way (you knew there was a Better Way)
Use a Primary Text Frame that fixes the text starting point, independent of the Chapter Title.
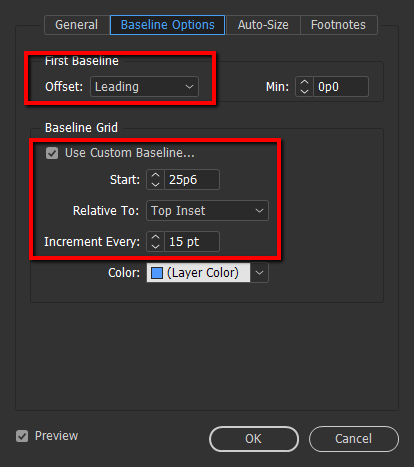
In the Text Frame Options dialog (Ctrl/Command+B), go to the “Baseline Options” tab. Set the Offset to “Leading” and turn on “Use Custom Baseline…” The value you enter for “Start” is the distance from the top of the frame to your first paragraph. If your document uses a baseline grid, enter the same leading value for “Increment Every:”; if not, you can leave it at its default.
Setting the Paragraph Styles
Next, edit the Paragraph Style of your lead paragraph (mine is “Lead Para”) so that it aligns with the new custom baseline grid. On the “Indents and Spacing” panel of the Paragraph Style dialog, change “Align to Grid” to “All lines,” if it isn’t already. If you aren’t using a baseline grid in the document as a whole, set this to “First line only” (unless you like seeing paragraphs explode).
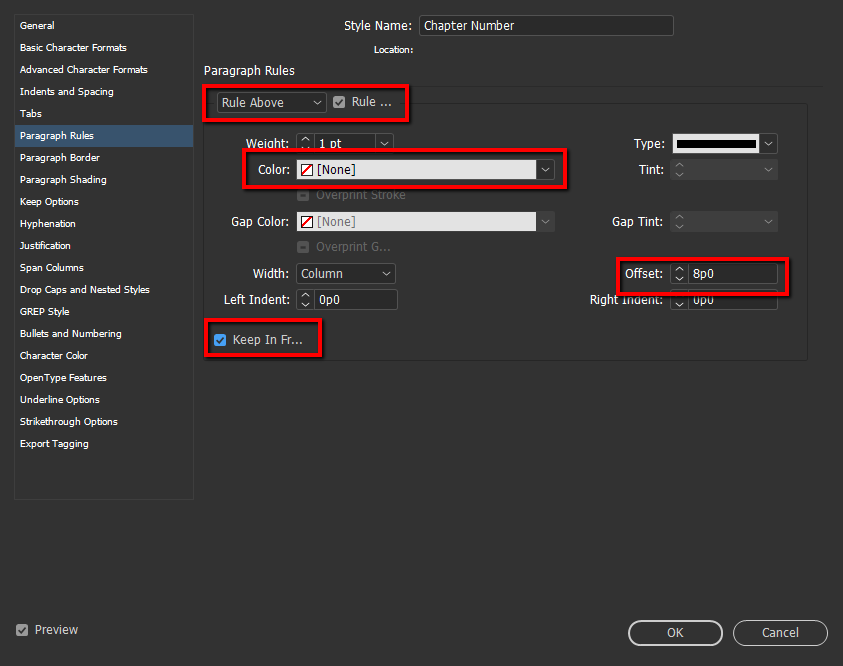
 Next is the Chapter Number paragraph style, which must also start at a fixed distance from the top of the page. You could simply lower the top of the text frame. If the position of the chapter number paragraph ever needs to change, you change the height of the frame. But the Lead Para first baseline position is relative to the top of the frame, so you’ll have to change that, too. Too tedious. Use the “Rule Above” trick outlined in this post instead. This allows you to set the position of the chapter number and title without affecting the lead paragraph. Here are the settings in the example I’m using:
 Now that the chapter number and the first text paragraph are in their correct positions, put the final polish on it with “Next Style.” Set Chapter Number’s Next Style to “Chapter Title,” Chapter Title’s to “Lead Para,” and Lead Para’s to your body text style. This isn’t strictly necessary if you aren’t importing raw text into your document, but it’s just the Right Thing to Do.
Here is how the chapter opener page lays out with all those settings in place, showing how the first baseline setting makes this work.

This Can Really Save You Time
Perhaps, like me, you’re the kind of designer who likes to experiment on the way to a final design, or you need to give the client several variations to choose from. This setup will allow you to change not only the number of lines in the chapter title (and chapter number), but also the typeface, point size and leading, all independent of the body copy.
Very cool. Thanks.
Clever and elegant, thanks!
Thanks ! Will be helpful !
Thanks so much! I’ve used both these functions but not in conjunction with each other, not quite this way or for this purpose and, as a book designer, this is a trick I can really use! Thanks for posting!
Genius. This will really help streamline my book designing!
Neat trick, I will be using. Though it doesn’t work for e-books. I do use the invisible rule above and build in space above that does translate to the e-book (not the rules but the space above).
Does anyone on know of a way to use percentages rather than specific amounts of space above or below, from within InD? That would be excellent if we could, because then it would do a better job of supporting multiple-sized devices without tweaking code.
Hi,
You need to edit the ePUB file after export and change px for %. I use Sigil for this.
Regards
Please note: This trick will not work, when you chose »Fixed Height« as First Baseline option in the Text Frame Options dialog.
I am trying to get back to having a Primary Text Frame. It is grayed out since I started my doc without it.
This works perfectly when I edit the text frame options on a live page but I can’t figure out how to perform this edit on the primary text frame of a master page. There is no frame to select or options to edit on the master page. What am I missing?
Tried several times … not working … The Chapter number moves into the correct place … Can’t get the lead paragraph to do anything. No chapter title.
Also, plain text styles … what happens if I add special font or size to the chapter number? Will that mess everything up?
Are we making a text frame for the chapter number and a separate text frame for the story text?
All the spacing occurs with the Chapter number … the “Lead paragraph” just moves up and down with it …nothing fixed about the location.
I suppose everyone has lost interest in this topic.
Rich, maybe this is your point: Chapter number and chapter title must not be aligned to baseline grid – only body text.
There is only one text frame for all stuff.
Alan, couldn’t you provide a .idml example of the whole thing? I think, it would be easier to understand, if one can download and examine it for themselfes.
The IMHO only drawback of this workaround: I have to manually change the text frame. In my daily work on text books of various kinds, I have a good chance, that the (page) position of a chapter changes within the correction phase. If this happens, I have to check all pages after the change and correct the object style or change the master page (if one prefers).
So (IMHO!) I can’t see a great improvement vs. having multiple chapter title paragraph styles – one for each additional line of chapter title text with a different setting of margin bottom – and apply them in one run before page break (sorry, if this is the wrong terminology – I’ve grown up with German terms). A guide rule on the master page then helps to have the body text at the fixed position.
(In my eyes, one of the basic rules in typesetting of long text books is: Try to never touch the text frame.)
Wow, Tobias, I don’t know why I never received an alert about your comments, so I apologize for being a year late!
If you use InDesign’s book feature, you never have a problem with chapter openers being on the wrong page, and pages can add or subtract as you go. Putting an entire book in a single document, especially if it’s going to go through an extensive editing phase, isn’t a great idea. Creating a book has a short learning curve to it, but the effort pays off in the long run.
Thanks, Alan, for your reply – better late than never ;o)
It’s quite interesting, that you mention ID’s book feature. About 18 years ago I used the book feature regularly. But since then in most cases I tend to run one file per book. Lately I caught myself reflecting about this, and asked me, why I don’t use the book feature any more.
Using the book feature is IMHO not basically the best option. It depends on many things, as
– Am I working in a team or alone?
– Is it a complex (scientific) book or a simple novel layout?
– Are there many complex features in use (footnotes, tables, etc.)?
– Are there many big images placed in the book?
– Do I need endnotes sitting at the end of each chapter?
– etc.
I think, I’d like to read an interesting, profound, and overarching article about InDesign’s book feature on indesignsectrets.com – maybe this will – once again – change my daily work … :o)
We all have our own ways of working, but it’s been ten years since I created a book in a single document. The advantages of InDesign books far outweigh the disadvantages. In InDesign’s earlier days there were problems with the book feature, and it was rather primitive in many respects. You might want to give it a second look.
One of the areas that’s confusing me is: “Now that the chapter number and the first text paragraph are in their correct positions, put the final polish on it with ‘Next Style.’ Set Chapter Number’s Next Style to ‘Chapter Title …'”
Alan walks us through the specs for “Lead paragraph” and “Chapter Number” … but where do the specs for “Chapter Title” come from? Are we copying the “Chapter Number” style and renaming it?
Rich, just a quick built of Alan’s tip:
https://www.wantzen.com/Starting-Chapter-Text-at-a-Fixed-Position-on-the-Page.idml.zip
It’s not a clean, production-ready file for book setting, but it illustrates the above (including the paragraph which confused you). Hope, it’s clearer now.
Thanks, Tobias, but I can’t open it. I only have Adobe CS3 — could that be part of the problem?
I have stood my ground for a few years, but I’m coming to the grim realization I may have to cough up money and upgrade, at least to CS4.
Yes, that’s definitely the problem. CS3 is lightyears away from nowadays InDesign: CS3, CS4, CS5, CS5.5, CS6, CC, CC2014, CC2015, CC2017, and now it’s CC2018.
Thanks Tobias, for providing the sample docs. The chapter opener text frame wasn’t set up in the master, but I was able to get this to work, to test for production purposes. I copied the Chapter opener frames (with the text and all the settings for the frames) to a new master—called chapter opener. Then I cut the text from the master. I created another master for the full pages of text. I flowed text for the opener on to new pages set with the new master (including the special text frames) and then linked them to new pages set with the master for full pages of text. Works perfectly.
If your document is set up without Primary Text Frame you cannot change it retroactively, but you can load masters from another document that have them (docs must be same size with same baseline grid, etc.). However it may be easier to set up a new document with all the parameters perfected with masters that have the special text frames—then flow the text into the new docs. I would work with a chapter text to get the text frame, and styles all working together—then copy that into the master to proceed to production—then never touch the master again. Voila!
I’ve copied this new document into my file: InD DesignTemplates and How To’s. It’s handy for when I’ve forgotten how to do something like this!
By the Way on a related topic. I almost always use one master for the chapter opener and another master for the full pages of text. When text reflows this can be a pain to re-assign the correct master to the page.
However, I use the Mastermatic script, by ID Extras. This is a paid script that will automatically update the master pages based on what paragraph styles appear on the page (and with multiple options for intended blanks etc. Also object styles!) This script was WELL WORTH the $50 it costs. I recommend it!
I have no connection to ID Extras, I just love that it works and saved me time and headaches. They have a bunch of other scripts too, but this is the only one I have used, so far.
I’m compiling a book of poetry for the state poetry association and I want to FIX my position for the heading which will change almost each page. This will be the poet’s name for the poem on that page. I want to learn how to use your suggestions, but wow, this is straining my 73 year old brain. I can do it, but is there a primer that starts out a bit more simplistic that I can study and play with as a prototype before I tackle the real book format?
Great help
I would like something like this but not exactly this.
I am designing a book and I keep all stories in a single text block
Now every story has a chapter heading with heading style that starts in a new page with 20mm space from top
as of now I am doing this by dragging the text block to a gridline that I put in the master page
is there any way I can automate this so that whenever a heading style is found, it would start flowing from a new page with a fixed space from top
That calls for the “Invisible Rule Above” which Mike Rankin explains here: https://creativepro.com/mystery-baseline-contest-answer-winners.php
Please note: »Invisible Rule above« only works with every type of offset in »Text Frame Options » First Baseline Options › First Baseline › Offset« EXCEPT for »Fixed«.
this was awesome; have been looking for something like this since a long time. thanks a ton Alan.
Alan, This works well if you only need one primary text frame. However, in a novel I need one on both sides. How do you specify left or right? If I make a single primary text frame it puts it in the middle of the left/right frames. It seems a bit bothersome to create two masters with a left primary and a right. Thoughts?
Instead of a primary text frame, create an Object Style that sets the baseline option, position, and paragraph styles (by checking “Next style” in the dialog). Then it won’t matter whether you’re on a recto or a verso. Once the object style is set up, you can convert a regular text frame into a chapter opener with a single keyboard shortcut.
You’ll want to adapt this to your particular way of working and the project, but object styles in general are a great way to speed things up in any book project.
Thanks for the insight!
You’re welcome. Anytime. :)
A little late to the party … but this is an ACE tip! thanks
Whilst I’m here …
Do you have any tips on keeping this formatting when exporting to epub? For me everything jobs up to the top of the page. Maybe that’s another topic altogether?