

Creating Inset Stroke Effects with Custom Stroke Styles

Someone recently asked me how they’d be able to create the following stroke effect in InDesign:

I had to put my thinking cap on, but the puzzle was solved. It’s amazingly easy to generate an effect like this. There’s two things you’ll need to do: create a new stroke style and change the stroke alignment.
Doing the math
InDesign allows us to design our own stroke styles for dashes, stripes and dots. The above effect is created using a stripe. Before starting let’s do some maths.
Let’s assume we want to add a 1pt inner stroke, that’s 7pts away from the edge of the image.
Math time :)
- Our total stroke weight is going to be: 1 + 7 = 8pts
- Our 1pt stroke is 12.5% of the total 8pts stroke weight. (1 divided by 8, then multiply by 100).
- That means our gap fills the remainder? 87.5%.
Now that we’ve got those couple of numbers sorted let’s get started.
Building the stroke style
Display the Stroke panel, by clicking the stroke panel icon or choose Stroke from the Window menu.
From the Stroke panel menu select Stroke Styles?

The Stroke Styles dialog appears.
Click New? to add a new style.

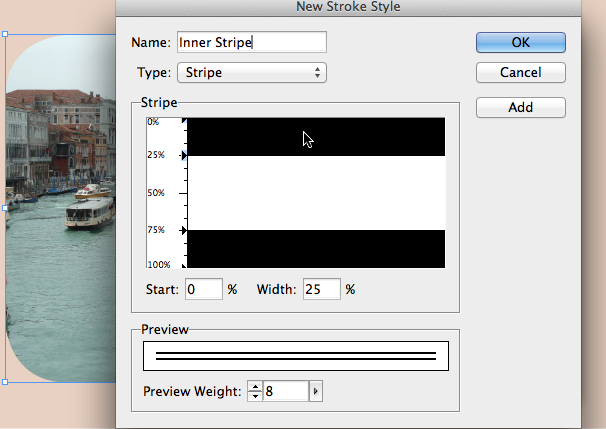
In the New Stroke Style dialog, enter the Name of your new style (I used ‘Inner Stripe’).
Next select Stripe from the Type menu.

The default new stripe consists of a double stripe and a single gap. We need to remove one of the stripes first as we don’t want to see a double line on our image later on.
To remove the top stripe, click the top stripe (black) to select it. The little triangles to the left appear with a blue highlight to indicate that you have the stroke selected. Next drag the selected stripe out of the Stripe part in the dialog (I sometimes say ‘just throw it up in the air’) to delete it.
You’re left with just one stripe area (black) in the Stripe part of the dialog.

It’s now time to set those numbers we calculated earlier :)
Select the remaining stripe.
Change the Width to 12.5%.
Change the Start value to 87.5%.
Click OK to add the new stripe to the Styles list.

Click OK once more to return to the Stroke panel and your layout.

Applying our new stroke style
We are now ready to apply our newly created stroke style.
Select the graphic to which you want to apply the new stroke style.
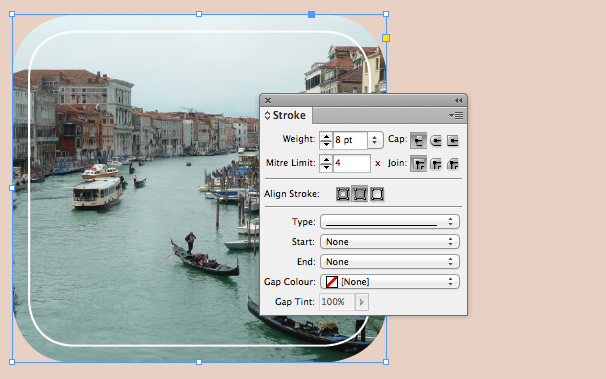
Set the stroke weight to 8pt and the stroke color to Paper (white).

Next we change our stroke type from Solid to ‘Inner Stripe’… any newly added stroke styles will appear at the bottom of the list that displays the stroke types.

Ok, we’re almost there… but not quite yet.
By default InDesign tends align strokes to the center of the path (our graphic frame) to which it is applied. This means that what we are seeing is indeed a 1pt white stroke, but the distance from the edge of the graphic isn’t the 7pts we wanted?
Change the Align Stroke setting to ‘Inside’.

And we’re done :)
You might want to experiment by applying additional effects to the Stroke using the Effects panel.
To reuse the various formatting applied to your graphic, you can capture them with an Object Style that you can easily apply to other images in your layout.
Time for your imagination to take over and be creative with stroke styles :)
Nice! And ingenious. I confess I don’t think I would’ve come up with that. Love it!
Cary,
It’s a cool modification of using the stripe but has two problems.
First, unless you want to use the stripe on many images, it seems like too much work. For a single image (or even several) I would just copy the original frame, paste in place, and then reduce the size of the copy by typing minus 7 for the size. Then add the stroke.
Next, both techniques (yours and mine above) actually don’t give the proper appearance of the rounded corner. Look carefully at your effect and you’ll see that the rounded corner of the inside stripe extends beyond the shape of the rounded corner of the outside image.
A proper design for this effect would have both rounded corners starting and stopping at the same horizontal and vertical places.
With your technique you’re stuck with the mis-shaped rounded corner.
But with my effect, you can adjust the size of the rounded corner of the stripe to fix it.
But I still applaud how you’ve created a custom stripe.
Ha, Sandee
Well spotted… to get it ‘spot-on’ you’d need to be able to set an adjusted corner radius for the ‘stroke’… (and do more maths I guess :) :) )
Your technique would allow for that, as the second object can be adjusted accordingly, my technique doesn’t allow for that, and you’d indeed have to live with the shape difference.
Maybe future version of InDesign can have separate corner radius settings for ‘object’ and ‘stroke’ ;-) or if the engineers are kind to us, they will recalculate the rounding :) #featurerequest?
CJ
I love this! I think Strokes styles are too often ignored. I don?t think it?s too much works.
What I like about this is that you easily make the inner stroke to act as some «see through» effect using an opacity of 0% at the stroke level, and enabling Knockout Group at the object level using the Effect Panel.
Editing strokes is great, but has anyone found a way to create a stroke with a slanted hash that is thinner than the built in ones? I know you can place a stroke into a picture box and skew the angle there, but would love to have access to a proper line stroke for the rules palette and be able to apply it as a style-sheet or object style.
@M Sullivan: I did a little writeup you may be interested in: https://creativepro.com/making-slanted-strokes.php
@M Sullivan: I did a writeup a while back that may be of interest to you. It involves using a Rorohiko plugin to allow separate objects to “stick” to each and other, and resize dynamically. I use it for when I need a background image or pattern behind a text frame.
I AM SOOOOO THANKFUL THAT I FOUND THIS POST!!
Yesterday, the non-profit that I work for just had our big Christmas Concert. I spent well over 100 hrs TOTAL designing & perfecting the 24 page concert program book (only to my horror to find in the printed version that I had BUTCHERED one of the performers names & made good ol’ “copy & paste” errors on two others!!
In the process of creating & perfecting the Advertising Copy (that pays for 100% of the production costs of this program and provides some good profit for our agency), I ran into the very problem you describe here! I must have spent 5 or 6 HOURS searching through Lynda.com, Adobe TV, and other tutorial websites to find out HOW ON EARTH I CAN CREATE A NEW STROKE STYLE IN InDesign!!! All of that time proved to be A TOTAL WASTE since NOBODY even mentioned THE MERE EXISTENCE OF THE PANEL THAT YOU’VE SHOWN HERE!!
I just wish that I had found this post A WEEK AGO, when I was so frustrated with InDesign and the fact that I couldn’t make it do what I wanted it to do!!
Thanks Again for your post!!