

Tab Leaders (Part 3): Fill-In Blanks in Paragraph Text

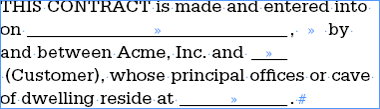
In parts 1 and 2 of this series we discussed inserting and formatting tab leaders in columnar text. The process of separating columns of text is extremely straight forward: hit the TAB key on your keyboard, highlight the resulting tab character, and, using the Tabs Ruler palette (Text > Tabs in InDesign CS3 and Window > Text & Tables > Tabs in InDesign CS2 and earlier), set a tabstop that defines the end of the tab space. If, for instance, you insert a Right-Justified tabstop at 2 inches, text after a tab will always line up at 2 inches. When you want to create clean, (relatively) even columns of text with distinct separation and dots, underscoring, or some other leader, that process works beautifully. It’s not so pretty when you need fill-in text blanks within paragraph text, though (see Figure 1).
There are two types of tabstops–default and manual. When working with columns of text you need manually set tabstops inserted and positioned via the Tabs ruler palette. InDesign automatically includes default tabstops every half inch. When you insert a manual tabstop, you simultaneously clear out all the default tabstops ahead of it. For instance, if you set a tabstop at 2-inches, the three default tabstops ahead of it–at 0.5-, 1.0-, and 1.5-inches–are erased; hitting the TAB button once jumps text to the 2-inch tabstop. Default tabstops remain after the manual one–stops at 2.5-inches, 3.0-inches, and so on. If you don’t insert any manual tabstops, all the defaults remain intact, one every half inch from one side of the text frame to the other.
Although there are a couple of ways to create fill-in text blanks in paragraph text, the one I prefer relies on default tabstops.
- Begin with the paragraph text, inserting one tab per blank (see Figure 2). Note that your tab spaces will already be up to 0.5 inches wide. If you don’t see any of the tab spaces, or they appear too narrow, don’t worry. A single tab space will extend only to the nearest half-inch default tabstop; if the tab begins at, say, 0.4 inches, the entire space will appear as only 0.1 inches. We’ll take care of any such short tabs momentarily.

- With all the needed fill-in blanks represented by single tab spaces, it’s time to create the underscoring that will communicate to the document’s viewer that she’s expected to write in information. Instead of leaders added from the Tabs ruler palette, we’ll use the customizable underlines introduced in InDesign CS2 (and still in CS3 of course).Highlight one of the tabs–any one, but only the tab space itself–and open the Character palette/panel (Window > Type and Tables > Character). From the flyout menu in the upper right corner of the Character palette/panel, choose Underline Options, which will open the dialog in Figure 3.

- In the Underline Options dialog, check both the Underline On and Preview checkboxes. The former enables underlining on selected text (the tab space in this case), while the latter lets you see what you’re doing. In most cases, the default underline options are exactly what you want for fill-in form blanks. It will be a solid rule line whose color, tint, and weight InDesign bases on the same attributes assigned to surrounding text; the offset, the vertical distance of the underline relative to the text baseline, will also automatically compute to place the underline appropriately. Feel free to adjust any of the settings to get the perfect look for your underscores. Parentheses around option field values (such as those you see back in Figure 3) indicate default or automatically calculated values. The advantage to letting InDesign base one or more attributes of the fill-in blank underscore on surrounding text is that, should you change the text color or size, the underscore will automatically adapt to match.Once you’re satisfied with the look of your underscores, click the OK button to leave the Underscore Options dialog.
- Leave the now underscored tab space highlighted and create a new character style on the Character Styles palette/panel. The character style created from the one tab space will become the template that underscores the other tabs. First, though, we need to make sure that the character style contains only the underline information. If the style retains other formatting attributes like the font family, leading, and so on, it could cause problems down the road if you decide to change the look of a paragraph containing fill-in blanks.
- Double-click the new character style you just created to simultaneously apply the style to the highlighted tab and open the Character Style Options dialog.
- Rename the style to something useful like “Fill-In Blank” or “Underscored.” Then, go to the Basic Character Formats pane. Does that pane list a Font Family and/or a Font Style? It almost certainly does, and we don’t want that; the only attribute we want in this particular character style is the underline so that the style may be applied to any text.One at a time, highlight the contents of any field that isn’t empty and press BACKSPACE (Windows) or DELETE (Mac) to clear the field. Leave the Underline checkbox at the bottom selected (with a black checkmark) and the other checkboxes as is (with grey marks). Move on to the other panes in the Character Style Options dialog (Advanced Character Formats, Character Color, and so on) removing the contents of their fields.On the Underline Options pane you’ll see options identical to those in the Underline Options dialog with which we were working a moment ago. Don’t erase the values in those fields.
Click OK to commit your changes to the style and leave the Character Style Options dialog.
- Apply the “Fill-In Blank” character style to all your tab spaces to underline them as well. Now they’re all underscored, but still probably too short to be useful. Let’s work on their width.
- Because factors like type size, column width, and the amount of copy before a fill-in blank, among others, could cause problems with manually set tabstops, let’s avoid them entirely and rely on InDesign’s default tabstops. To make a tab space wider, place your Text tool cursor immediately after the first tab space and press TAB on your keyboard again. The space should lengthen by 0.5 inches and already be underlined. If yours didn’t underline, you missed the insertion point; undo and try again, making sure that the I-beam cursor directly abuts the right end of the underscored tab space before you insert another tab. Glyphs (including tabs) inserted directly after text to which a character style has been assigned will inherit the character style.Continue inserting tabs in this fashion until you have fill-in blanks of, or close to, their desired widths (see Figure 4).

- The best case scenario is that multiple tabs on the default half-inch tabstops will create fill-in blanks of ideal width. If that isn’t the case, we need to do a little manual tweaking.Tabs, although special, invisible characters, can still be formatted like any other character. If you need to slightly shorten or lengthen a fill-in blank highlight one or more tabs and, using either the Character palette/panel or the Control palette/panel in Character mode, use the Horizontal Scale field to narrow or broaden the tab character(s). You can constrict them down to 1% of the font’s em width or up to 9 times that width (900%). If you need greater adjustments, remove or add another tab and then adjust as needed.Although tempting, don’t use the Tracking field to space out the tabs; it could introduce gaps in the underscoring that may not be immediately recognizable on screen.
You can see in Figure 5 my completed fill-in blanks (with sample data).

Part 4 of the Tab Leaders series will show how to create nested styles that automatically apply formatted tab leaders as you type.
Sorry to be late on this one, folks. The holiday weekend threw my schedule way out of whack. :-)
Please don’t apologize, Pariah! I’m delighted that you’re writing these at all. Thanks!
Thanks for the effort, all 3 parts were really interesting.
keep them comin
I’ll be darned. Underline options. Learn something new every day. Thanks, Pariah!
Thanks- this is exactly what I was searching for!
???????,???????????,????????????,????????B2C?????????,????????? ?,???”??”??????:??????,??????;???????,???????(??????????)????????????,?????”??????????????????”?????,???”????”???????
Awesome post.