

Tab Leaders (Part 5): Fixed-Width Floating Tabs/Spacers

Although I had planned to make part 5 the last in this series, a reader question prompted me to push the tips and tricks out a week and cover another topic this week.
After reading the first few “Tab Leaders” installments, reader Tom asked:
I would like to add words to a text frame and hit tab and know that the space is always a defined amount, say 5mm, regardless of how long the preceding word was. Is it possible to set this up without having to set a load of individual tabs? For example: word(tab 5mm) long word(tab 5mm) longer word(tab 5mm) longest word
Because text in InDesign follows a horizontal ruler, and tabstops are linked to absolute positions on that ruler, there really isn’t a way to set a floating tab of constant width. The end points of tabstops are fixed, you see, while the beginnings are determined by preceding text. However, there is a way you could fake it–probably a few ways, but here’s one.
- Using the Rectangle tool, click and release on the pasteboard–don’t click and drag, click and release. Up will pop the Rectangle dialog, which allows you to precisely specify the dimensions of the rectangle (see Figure 1). Set the rectangle to 1mm wide by 1mm deep and click OK. (I know you want 5mm, but trust me.)

- Switch to the Selection Tool and select your new rectangle. It probably has a default appearance of black stroke and empty fill. Swap that by pressing SHIFT+X to make the tiny box easier to see. If you want even higher visibility, fill it red or magenta; the fill is only temporary regardless.
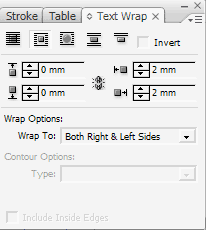
- With the rectangle still selected, open the Text Wrap palette/panel from Window > Text Wrap. Choose the Wrap Around Bounding Box wrap style and set the top and bottom outset values to 0 while making the left and right outsets 2mm (see Figure 2). Also make sure that Wrap To is set to the default of Both Right & Left Sides (otherwise, text to one side of the box or the other will drop below the box).
- On the Object Styles panel (Window > Object Styles), create from, and apply to, the little box a new styled named something like “5mm Spacer.”
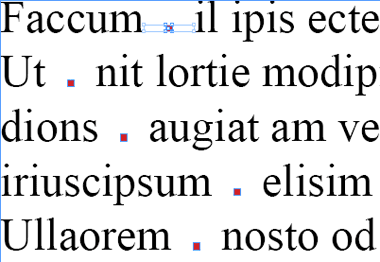
- Now, copy the spacer box, and, switching to the Type tool, paste it directly into text at the position where you’d like your 5mm-wide space. Make sure that you don’t have spaces or tabs before or after the inserted box. As you see in Figure 3, the division between words is now exactly 5mm–1mm box + 2mm left outset + 2mm right outset = 5mm.
- Finally, return to the original box still on the pasteboard and select it once again with the black arrow Selection tool. Change its fill to None, and then update the style with the Redefine Style command on the Object Styles’ panel’s flyout menu. All the instances of the spacer box within text will update to reflect the change, emptying their fills to leave you with fixed-width, floating spaces.
Why, you might ask, didn’t we just create a 5mm box and be done with it? Why complicate the matter by adding a text wrap? Where some may see superfluous complication, I see futureproofed simplicity.
Are you absolutely positive you’ll never want to adjust those fixed-width, floating spacers in your document to be 4mm wide or maybe 10mm? If you rely on the physical dimensions of the box to define the width of your spacer, then you must manually resize each and every instance in the event that you need more or less space. Object styles can’t store or affect physical dimensions. Conversely, making the rectangle a minimal width, just large enough to grasp with the Selection tool, and then setting its width via a formatting attribute like Text Wrap outset does enable you to alter the width of all object instances by changing the object style.
If your fixed-width, floating spacers need to be changed to 4mm wide, edit the object style and change the left and right outsets to 1.5mm each; if you need 10mm spacers, make those outsets 4.5mm each. Use the text wrap outsets to control the width, down to zero values, which leave you with the spacer box’s own 1mm width. If you need narrow spaces than that, don’t use this technique. Instead, use some of the special spaces on the Type > Insert White Space menu.
Next week in the final, final segment in this series, I’ll proffer those promised additional tips and tricks for working with tabs, leaders, and nested styles that are too small for their own posts but definitely too big to miss.
I know you’re talking about doing this with tabs and all that, or something simialr.
I’m not knocking anyone or anything, or saying it’s a bad way of doing it. I actually like it, I think it works well and it’s a good idea.
But I’ve been thinking, I know I know, dangerous.
Anyways, would there be an advantage in just placing en space and adjusting the kerning, providing your maths is right you should be able to get a specified distance in mm/inches if you want to.
It just seems to be that placing “spacers” in the text could be a bit tedious if you have a lot of it to do. Where if you place an en dash or some other white space, then you can search this space out and increase the kerning/tracking of it where needed.
If you know your type size is 10pt, then an en space is 5pt which is approx. 1.7 mm, then adjust the tracking/kerning the same way to increase the spacing.
With this you could have it as a character style or something.
Or am I just rambling again?
Thank you for this tutorial, it’s just the solution I needed!