

Tab Leaders (Part 6): Tips and Tricks

This is the last installment in the back-to-basics-and-on-to-advanced “Tab Leaders” series. If you’ve been following the series, we began by inserting tabs and dot leaders in columnar text (Part 1); moved on to formatting tab leaders differently than the text they separate (Part 2); created in-line, fill-in-the-blank-style tab spaces (Part 3); used the automated formatting of nested styles to eliminate manual tab leader formatting (Part 4), and; responding to a reader question last week, created fixed-width floating tabs and spacers (Part 5). The “Tab Leaders” series has spanned a range of topics, techniques, and skill levels. I’d like to wrap it up with some sundry tips, tricks, and mini-topics that should help you streamline your tab work and polish the results.
Right Indent Tab
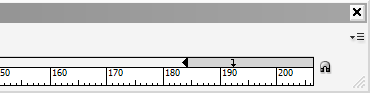
Up on the Type menu, under the Insert Special Character submenu (CS2) or Insert Special Character > Other (CS3) you’ll find the Right Indent Tab option. Using this command you can insert a right-aligned tab, at the paragraph’s right indent or right margin, without having to open the Tabs palette. In fact, the Right Indent Tab will not appear in the Tabs palette; instead it shows within text as a special character when hidden characters are shown. The purpose of this command is to make short work of columnar text. After insertion of a right indent tab, any text to the right of the insertion point aligns to the right.
Although the Right Indent Tab indent tab isn’t managed on the Tabs palette, assigning a dot, dash, or other leader to the Right Indent Tab does require use of the Tabs palette (Window > Type and Tables > Tabs in CS2, and Type > Tabs in CS3). To give your Right Indent Tab a leader, set a tab stop outside the right margin of the text frame, and give that tabstop the leader (see Figure 1). If you already have tabs defined (within the text frame area), the Right Indent Tab will pick up and use the leader assigned to the last tabstop on the ruler.
One of the greatest benefits of a Right Indent Tab is its flexibility. Because it is a special character that sends text to the right frame edge or indent as opposed to a regular, fixed-position tabstop, it adjusts itself automatically if you widen or narrow the text frame.
Tabs Inside Tables
Also on the Type > Insert Special Character > Other menu is a command to insert a Tab. Why on Earth would Adobe create a menu command for a function already included on every keyboard manufactured in the last 30 years? Does Adobe really expect you to navigate two or three menus deep instead of flicking your left pinky finger? No, of course not. Tab is included as a command for a couple of reasons: First, to make it easier to include in InDesign (and InCopy) scripts, and, second, to give you the ability to insert tabs in places where the keyboard’s Tab key has another function–such as within tables.
If you’re cursor is inside a table cell when you press the Tab key on your keyboard what happens? Right: the cursor jumps to the next column. Utilizing tabs to effect indentation or separation inside a table cell becomes problematic then. That’s when the Tab menu command comes in handy. It will insert a tab space even inside a tab cell; you can then use the Tabs palette to add a leader or change the position or alignment of the tabstop.
The menu command is great for the first or an occasional tab, but if you need to insert several tab spaces inside table cells, save yourself a little time (and wrist strain). Insert the first, show hidden characters (Type > Show Hidden Characters), and then highlight and copy the first tab space. From then on, just paste it where you need it. Note that you’ll be inserting just the tab itself–the position and alignment are a function of paragraph formatting, and will not be copied (or pasted) with the tab space/character.
End Nested Style Here
In Part 4 of this series, “Automatic Styling,” we used nested styles to format tab leaders and a lot more. For InDesign to begin or stop using a particular character style automatically, you must specify a break point, a marker of some type, that says to InDesign stop either before or immediately after this. In the price list example I employed, tabs, dollar signs, decimal points, and even numerals were used as the break points to exchange character styles. What do you do if you haven’t such easily identifiable markers? Insert one.
The End Nested Style Here marker is an invisible, dimension-less character that can be inserted anywhere in text (or a table cell) as a break point for a nested character style. No matter what the nested style is supposed to be looking for, what condition or break point character, the End Nested Style Here marker will stand in for it, ending the nested style at that point.
Obviously, the End Nested Style Here marker must be inserted manually, reducing the utility of using nested styles to automate formatting in the first place. Therefore you shouldn’t use it as a means of controlling formatting throughout a document. Find the most common break point in your text and define that as the nested style start/stop conditions, and use End Nested Style Here as an exception, when the usual condition can’t be met.
Align On
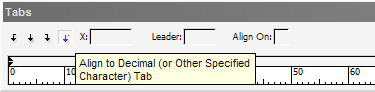
In the Tabs ruler are four kinds of tabstops–Left-Justified Tab, Center-Justified Tab, Right-Justified Tab, and Align to Decimal Tab (see Figure 2). The first three are self-explanatory; the fourth, however… Well, most people think they know all about Align to Decimal (aka Align On) tabstops, but many of them would be surprised. It’s all there in the tooltip that appears when you hover your mouse cursor over the Align to Decimal Tab button, but even many of the long-time InDesign users I teach misinterpret Align to Decimal tabstops as being only for lining up on decimal points.
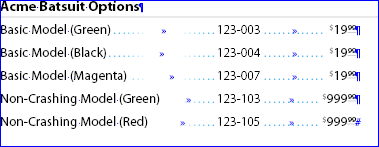
True, the most common purpose of align on tabstops is to line up prices or statistics in a list. In such cases, all numbers are aligned such that their decimal points are stacked regardless of how many digits appear before or after decimal points (see Figure 3). That’s if you typeset primarily prices in US Dollars. In the UK, decimal points and commas are the reverse of the way they’re used in the US; periods are used to separate whole values in the hundredths, thousandths, millionths, and so on while commas precede less-than-whole value digits. Therein lies a clue to power of align on tabstops–the Brits don’t align on decimal points, they align on commas. So can you. Or you can align on dollar signs, zeros, exclamation points, the letter A…

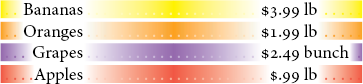
When you select the Align to Decimal Tab type of tabstop the Align On field activates. In this field you can type (or paste) any single glyph and press Enter, Return, or Tab to commit that glyph as the align on marker. For instance, if you chose the capital letter A as your align on marker, then InDesign will configure text following the tab in all affected lines to snap the letter A to the tabstop (see Figure 4). If there isn’t an A following the tabstop, InDesign presumes there would be one after whatever text is actually there.

Although the vast majority of the time you’ll align to decimal points, commas, or other numeral punctuation, aligning on other glyphs can be very useful on those rare occasions when you need something special.
Fading Leaders
In my figures in earlier installments of this series I used but didn’t specifically call out gradient or fading tab leaders. As you may (or may not) know, InDesign can fill glyphs with gradients (so can Illustrator, incidentally, but not as easily or obviously as younger brother InDesign). Tabs are treated like characters, so fill a tab with a gradient and its leader will fade from one color to another (see Figure 5).
This is one of my favorite little tricks, actually. Tab leaders are incredibly useful and necessary for leading a reader’s eye through columns of text like a table of contents, but sometimes they’re too obtrusive. This is particularly so, I find, in one-color documents; you can tint the leaders down, make their constituent periods, dashes, or what-have-you smaller or tracked out, but sometimes, no matter what you do, they look out of place. Gradients can help–whether its a subtle shift from one tint to another or making a leader actually fade out into the background and then reappear again.
Experiment on your own leaders; see how they look with subtle or even bold gradient color or tint changes.
Double Leader Underlines
Combine tab leaders and character underlines for interesting effects (see Figure 6).
That concludes the “Tab Leaders” series… Unless there are questions or suggestions that might inspire more installments (hint, hint)? If not, go forth, Padawan, and tab something.
It’s unfortunate that when you apply gradients to text it factors in the entire text frame and not just the selected text :(
In other words, to achieve the faded underline effect in your last example, using the same colour (not different colours for each line) you would have to customize the colour stops for each line factoring in the position and length of the text, correct?
Thankfully, if we can come up with it, it can be done. After all, we’ve been coming up with tricks (read: workarounds) for Quark for the last 15 years. LOL
I’ve used a similar workaround to address a transparency limitation for tables. That being you can’t apply transparency to individual cells, rows, or columns.
Well I can get most of the way there, with the exception of rows. Depending on the effect, I include enough colour stops to cover off the rows of my table. Adding and adjusting as I go. Albeit not automatic, but workable.
That last paragraph was supposed to read:
“…with the exception of CELLS…”
That reminds me, is there anyway to incorporate an edit or delete button for our posts. For those that don’t proof read before clicking on submit.
Casey
Re the Insert Special Character > Tab thing … a tip.
On the Mac, you can just press Option-Tab to insert a tab inside a table cell.
On a PC, Alt-Tab is reserved for flipping through your open programs. However, that doesn’t mean you need to go to the Insert menu all the time (or copy/paste). Just go to Edit > Keyboard Shortcuts and assign a keyboard shortcut to it. It’s listed under the Type Menu product area; look for Insert Special Character > Other > Tab.
On a PC you’ll see that “Tab” is already set as the default keyboard shortcut for this ;-) but only while in a Text frame (it says “Context: Text”. If you choose “Table” from the Context menu, you can add another keyboard shortcut for this command. I use Control-Tab.
In other words, when I want to add a tab inside a cell in Windows, I press Control-Tab. Works great.
Can you update the “Tab within a Cell” procedure for Indesign 6
I can’t maker this work as shown
Casey,
In InDesign CS2 and CS3, you can apply gradient fills (and strokes!) to selected text. Just highlight some text with the Type tool and apply the gradient (or a gradient swatch). Just make sure that, on the Swatches or Color panel/palette, the text fill rather than the frame fill is selected.
Ohhh! I understand what you mean. (I’ll leave the first response anyway for those who may be confused about that.) What you mean is, horizontally, a left-to-right gradient applies to the entire line of text. Yeah, unfortunately, it does. You can see that in Fig. 5, the second to last image with the white-cyan gradient. In that case, what I did was apply the same gradient to the tab stops.
Now, in the last example, I did something a little different. There are actually 4 tabstops in play there in the following configuration:
All four have a dot leader (actually space then dot), and all the dot leaders are colored with a color to white gradient. The background gradient is a thick underline with a negative offset; the underline is set to the text color, so it picks up the leader gradients. I created 1 character style and four gradient swatches. After inserting the tabs and setting the stops, I highlighted all the tab spaces and applied the single character style, which made all the dot leaders and underlines yellow to white gradients. I did this for all lines, manually overriding the yellow-white gradient with orange-white, purple-white, and red-white with my prepared swatches. In order to get the fade-in and fade-out effect, I reversed the gradients on tabstops 2 and 4–just highlight the tab spaces and click the Reverse button on the Gradient panel/palette.
Naturally, if I were doing more than these four I would have created separate character styles to change the colors and/or directions, and all based on a parent character style.
I’ll look into it.
Right you are, Anne-Marie. I left my Windows versions of InD with CTRL+Tab assigned to switching document windows because it’s easier on the fingers than the more common CTRL+F6 and SHIFT+CTRL+F6.
I too have inserted my own keyboard shortcut for Tabs, but I did this in CS2 and never set it up in CS3. One thing I did do was to have the shortcut setup for Tables Only. That way if I needed to press Ctl + Shift outside of a table for some reason then I would not insert a tab.
Excellent series Mr. Burke, I followed with great interest. I think it’s great the things you can do with tabs.
Now how can I stop people sending me files with 10 tabs per line for one item???
I’ve found that F2 in Windows is a good shortcut key for tabs.
Since I’m accustomed to pressing the Tab key with my left hand, F2 is close by and works like the Tab does.
One more leader tab question.
If you end a line with a right aligned underscore leader tab (no characters such as a page number) it will not align with a paragraph rule above it. It’ll be a little shorter – about the size of the invisible paragraph marker.
It’ll look something like this:
_______________________
Item ________________
Tried kerning the right aligned tab with some success but not perfectly aligned.
So my hack is to add a right indent to the paragraph rule.
Duh! Strike that last post. Your “Tab Leaders Part 3” has the answer.
Working on an annual report. Columns and columns of financial figures. Is there a way to get ID (CS3) to ignore the brackets used around negative figures so that the figures themselves line up correctly in the column?
e.g. https://designicu.com/pub/temp/figures.jpg
Every year I align these negative figures by hand. Surely there’s a better way…?
What I seem to need is a special character?something like the Right Indent Tab?but which says, “Keep this all in the same column only, in terms of right-tab aligning, just ignore everything after the special character.”
So, part 3 didn’t really address this but sometimes (it was this way in Quark, too), the space before leaders is different on different lines. There shouldn’t even be a space there but it looks like there is. Keep in mind that the tabs and leaders are set to the same position AND if I can, I make a style sheet. Proof reader always dings us on it and I just don’t know what to do about it.
Would I have to do the underline thing and use a dotted line?
Can anyone help?
(respond to dserpa at ism dot ws if you get this message, thanks)
@Diane, here’s one answer for you.
Hello,
I’m impressed by your 6 parts of Tab Leaders. However I have no luck following except part 1.
I want to know if there is a video training or a more detail step by step graphic tutorial available.
Thanks for your help.
Best,
Eric
Just one small point:
“That?s if you typeset primarily prices in US Dollars. In the UK, decimal points and commas are the reverse of the way they?re used in the US; periods are used to separate whole values in the hundredths, thousandths, millionths, and so on while commas precede less-than-whole value digits. ”
Actually, that’s most of Europe excluding the UK. Decimal points are periods and unit separators (when used) are commas in the UK.
Dear Pariah,
Thanks a lot for this deep insight serie on Tabs, a topic
that had always troubled me in the past and my InDesign
books wouldn’t resolve entirely. Also a spacial mention
to the writing and pedagogy which brought me to follow
the entire serie.
Cheers,
Luc, Paris
Apologies if I’m reinventing the wheel as usual, but earlier today I discovered another reason why a “dotted underline nested style” method can be better than the “dotted leader”.
Suppose you are working on a telephone directory, using a right indent tab to keep telephone numbers to the right of a column. Because the names and addresses are of varying lengths, they can bump right up against the numbers before the line breaks — if the only thing keeping them separate is a right indent tab.
However, if you have an em space as well as a right indent tab keeping them separate, both with a “dotted underline” character style applied (by being nested in the main paragraph style) the addresses can never get closer to the numbers than one em. And since that em space has dots in it like the right indent tab, there will always be a few dots between them.
I am having a huge problem. I cannot seem to delete tab leaders I experimented with in a document. I keep clearing them all in the tabs palette and have deleted the “.” I put in the leader box of the tabs palette.
No matter what I do, when I hit the tab key, the unwanted leader dots show up. What’s worse, they are different for certain parts of what the ToC I’m trying to design. AND I can only get them to show up to the right of the middle item on each line:
June 1 Name of Chapter ……………….page number
can’t for exmple get the leader dots to show up between the June 1 and the Name of the chapter AND can’t clear the dots that are occurring between the name of the chapter and the page number. I am center aligning the center column (name of Chapter) and right aligning the folios.
I’d appreciate any help you can give me.
Thank you!
@Stephanie: Are you sure you aren’t using Shift-Tab (right align tabs), which pick up the tab leader from a previous tab stop? Have you tried to delete all the tab stops by choosing Clear All from the Tab panel flyout menu?
Thankyou for the tabs inside tables tip! I was worried I may have to re-do a document that needed leader tabs but IndesignSecrets to the rescue!
Tabs Inside Tables
After fiddling around a bit with this feature I came to this solution;
If you select a column from a table and you want the text aligned on a certain point, comma or other character..
get to Tab (ctrl/cmmnd + shft + T) to setup your tab
set Align to decimal > set Align on sign (character) > shift your messurement.. (you’ll see your text moving in the cell at a certain point)
So no tabs inserted in the table. Did this in InDesign 5.5
I am building a dynamic table in which i had some empty rows. the table had two columns product and price. In between these two columns I need a lead character “.” . How can we restrict this leading for empty rows. I am getting … for all my empty rows which I dont want to. And I need these empty rows in place for my table. Can you help me out?
Thanks…
OK not a comment but a question for the experts.
I have automobile ad that lists all the used cars and I do this every day.
I have the whole formatting automated using search and replace (about 5 to clean up the spread sheet that the text is provided in).
I need to know is there a way to keep this from happening.
‘15 NISSAN ALTIMA 2.5S: 4 Door, Auto, Air, Cruise, CD, Remote Start, Power Windows, #3280..$14,995
I need at least 6 dot leaders to show up between the stock number and the price.
Any suggestions would help.
Please ,How to create leader dots in a table without tabs?
Oh my, it’s not as simple as it sounds. But thank you for the tutorial, I’ll give it my best to learn the tabs!
Tabs inside tables – this is how I found your blog as I struggled with it a lot. So there you go, you helped one more person!