

The Swatch Panel’s Stealth Feature

The Eyedropper Tool has been with us for a long time. It’s a fantastically useful tool, but, as they say in the ads, “Some restrictions apply.”
- It can only select colors from the current document.
- There are some situations, like complex objects pasted from Illustrator, where it won’t read the color at all unless you click through multiple graphic frames to an underlying path.
- It can’t pick the color at a single point in a gradient, only the gradient swatch itself.
- If there’s a frame with a fill of “None” overlaying the part of the object you want to sample, the eyedropper will return “None” unless you hide that frame first.
There was much (deserved) ado about the new Color Theme Tool, which can read colors from complex pasted objects and from gradients, but it makes its own choices about which five colors to pick.
While we were all distracted by the wonders of automated color themes, another wonder slipped in on little cat’s feet, entirely unnoticed. You won’t find it mentioned in the InDesign Help, you won’t find it on InDesign Secrets (well, not until now), and you won’t even find it in James Wamser’s invaluable New Features Guide. (If you don’t have a copy, what were you thinking? Seriously. Go get it now, and we’ll wait.)
See also: Using the Color Theme Tool
The Hex Problem
Until recently, if you wanted to grab the hexadecimal value of an RGB color to use on a web or e-book project, you had to use a script or other workarounds. And you couldn’t create a new swatch directly from a hexadecimal number without a script. All that has changed.
Somewhere between CC and CC 2015 (David says 2014, which is probably right), the InDesign team silently added two items to the Swatches dialog: a new field that allows direct entry of a hexadecimal color, and a new eyedropper that scoffs at the limitations of lesser tools.

You will find this new feature in the New Color Swatch dialog, as above, or Swatch Options, when you switch the Color Mode to RGB. Need to know the hex value of an existing swatch? Right click on the swatch and choose “Swatch Options.” The hex value will display in the “#” field and you can copy from there. Creating a new RGB color from a web spec? Type or paste the hex value into the field.
The usual out-of-gamut warning will show up if your starting point is a color that can’t display correctly in RGB (say, a 100% Yellow CMYK swatch).
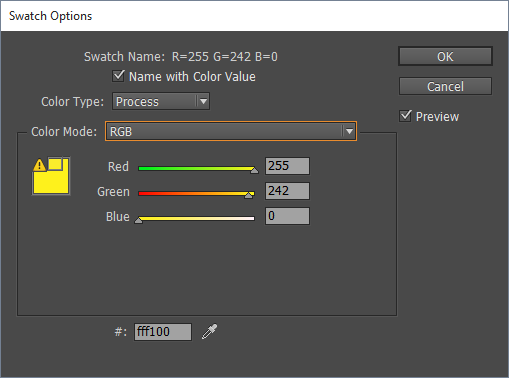
Double-click the warning icon to have InDesign automatically adjust the RGB values to bring them to heel safe values.
See also: InDesign’s Evil Color Picker
Photoshop’s Eyedropper Comes to InDesign
The new eyedropper works exactly like the one in the Photoshop color picker. (It probably is the one from the Photoshop color picker.) Click and hold, then move the mouse cursor over any color anywhere on the screen (even outside of InDesign). The color in the dialog updates continuously as you move.

When you have the color you want, let go of the mouse button. Your new swatch is ready to add to the swatches panel.
Like its Photoshop twin, this eyedropper reads pixels from the display, not from InDesign objects, so if you have the empty part of a text frame overlapping the object you’re trying to sample you won’t get a “None” swatch value, you’ll get the RGB value of that point. And yes, it will only return RGB values, never CMYK or Lab. (If you hear of anyone manufacturing a CMYK display, let me know.)
See also: Why You Should Import RGB Images Into InDesign and Convert to CMYK On Export
A couple of advantages to keep in mind:
You can pick the result of a color blend, if you have overlapping objects. The normal eyedropper will give you the assigned color of whichever object is on top, regardless of what the blend looks like.
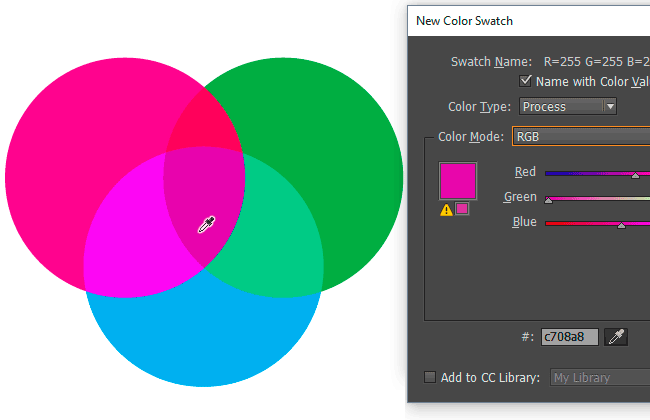
You can also pull a solid color from any point in a gradient.
These two very useful additions to the Swatches panel are worth making a fuss about, especially if you’re working on any kind of RGB document, such as a web banner, e-book, DPS app, or electronic billboard. With a bit of attention to color management, it can even be pressed into use for CMYK work in situations where the regular eyedropper can’t do what you need.
Thanks, Alan, for documenting those valuable color tips!
It still amazes me, given all the current attention on HTML export, ePub and digital publishing in general, that this was never announced at the time. I came across it quite by accident.
It arrived with the October 2014 release of InDesign CC 2014. The same time we got the Color Theme tool. Unfortunately, InDesign Magazine hadn’t assigned someone to write the “new feature” article until the last moment so that article missed it. A few of us who were on the beta team knew about it. I think Sandee Cohen showed it at her color class at MAX, I recall (saw the streaming version of her class).
I’m on the beta, and I missed it completely. Too fascinated by the Color Theme tool, I guess.
Also missing in James Wamser’s InDesign New Features PDF. Needs to be added.
I was waiting to comment on that fact until after this article was online, but yes, it should be there!
I just sent a note to James.
Thanks Alan and Steve!
Look for an update next week to the InDesign New Feature Guide (PDF). It will include Alan’s valuable color tips and more…
But do these hex values represent sRGB or are they a 8-bit representation of whatever rgb work colour space the InDesign document has defined (i.e. Adobe rgb)? I know David would be vary of this small but important detail.
Well, remember that hex values are literal representations of RGB. Each 2-digit hexadecimal number (from 00 to FF) literally represents a decimal number from 0 to 255. It’s just more efficient to write it with 2 digits rather than 3.
As for the color model, when you take a reading/sampling with this tool, it appears to capture the current RGB values from the screen. I think it is literally just asking the OS what the the RGB value is at this position on the screen. So the value you get could be different depending on what application is displaying the color that you are capturing.
However, if you are capturing color on screen, then you are probably doing it because you are creating an interactive/on-screen document. I would NOT use this tool to capture a color that you want to use for print. And because interactive documents should almost always be in sRGB space, it’s probably rarely a problem.
True, but the most obvious use case for hex values are in a web context (alas, sRGB). In my opinion it would make sense being able to sample a colour from any document whichever it’s source space to use this colour directly in sRGB (css/html).
I can see it being convenient copying hex-values from a InDesign document to a Photoshop document, but isn’t that the whole point of shared libraries in CC 2015? It could anyway work as expected if a conversion to-and-from sRGB happened seamlessly. In this scenario hex values would not reflect the actual 0-255 values of the source RGB colour space, but being converted by the colour setting rendering intent to the corresponding sRGB hex value. This would only be a problem for colours out of gamut of sRGB.
Short: In my opinion it will be confusing if hex values are used for anything else than web colours as this is the most relevant case for hex encoded rgb-values today. Will have to check this out tomorrow. Thanks for the reply.
For web, DPS and similar purposes, “on-screen color” and “accuracy” should never be used in the same paragraph. In the real world, how a color appears on any given monitor has far less to do with its color space than the peculiarities of the monitor in question. This sort of thing comes up occasionally when a client frets about wanting their logo PMS color to be “accurately reproduced on the website.” That’s when I launch into my explanation of why that is neither possible nor worth spending time on.
The only situations where this would become relevant are in a color-managed workflow intended to be viewed on color-calibrated monitors — just about the ultimate edge case — or for some television/video work where there are very specific color requirements.
When it comes to the web (paraphrasing the Borg): “Color space is irrelevant. Calibration is futile.”
Tested this feature today in a workshop context and found it to be quite questionable. The colours it reproduce might be near-metameric pairs to the original colours, but I cannot recommend any of my students to use this one in a colour-accurate reproduction workflow (mostly for print).
The only context in which it might be considered is when colour settings are syncronized across the CC suite. But then again. The CC library fulfill the same task if these are colours that are to be used across various documents.
It’s inherent in the function that you’d never use it for a color-critical workflow (e.g., an ad layout for a new lipstick, fine art reproduction). That should be self-evident. The practical fact, however, is that in most real-world use cases, such as the ones I’ve outlined, “close” is plenty close enough. John McWade gives an exceptionally good explanation of why that is on his Design Talk blog.
I am a bit confused about how the tool samples colors in a color blended item. Based on the rest of the article, when you show the graphic of the three overlapping circles, I thought you going to say that the tool gives you the RGB value of the area where all three of those circles overlap.
But immediately following the graphic, you say “The normal eyedropper will give you the assigned color of whichever object is on top, regardless of what the blend looks like.” To me that sounds like you are saying that the the eyedropper gives us the RGB value of the circle that is on top of the stack of circles, regardless of the color blend result we see in the very center of that stack.
Because the rest of my office only uses Microsoft products, I actually spend a surprising amount of time determining the RGB value of colors that result from a blend/transparency created in InDesign in order to provide an approximate color match in Microsoft Word.
Thanks for clarifying this for me, and pointing out the hexadecimal thing (which I had noticed already, but hadn’t really registered). I wish I had had this tool about a year and a half ago when we went through an entire web redesign, and I was pulling my hair out trying to provide the web designer with hex values for our brand colors.
Sorry to be obscure! By “normal eyedropper” I was referring to the regular eyedropper tool that you’ll find in the tools panel. Its behavior is quite different from the one that I’m introducing here.
If you were to sample that blend (created using Blend Mode in the fx panel) the regular eyedropper would return the fill color — CMYK, Spot or RGB — of the topmost circle, as if no blend mode had been applied. A gradient fill would return the gradient swatch, not the color value of the spot clicked on.
The new eyedropper, by contrast, returns the RGB value of the blended result at the exact spot being sampled. It’s always an RGB value because it is reading from the display, exactly as the Photoshop eyedropper does.
Okay, I got it now. Thanks for pointing out this new feature–it really is going to be such a help for me on a regular basis.
Thanks Alan!!
Your scientific description of InDesign/Photoshop Color Picker way to work, guided me to solve a problem that nobody online was able to explain until now:
The colors offered in the panel by moving Eyedropper through screen didn’t absolutely match with the ones where the Eyedropper was on. This from one day to another without an apparent reason. It never happened to me before. I was going crazy to find solutions.
It takes a while to understand that it had nothing to do with Preferences, Eyedrop settings, files CMYK or apps RGB’s issues, ..and at last nor even with what really seemed to be a bug coming from Adobe cross adaptations of it, between apps!
After a whole day lost browsing through posts and experts advices without finding the solution, I came on your article saying this important thing: “..this eyedropper reads pixels from the display, not from InDesign objects..” It was illuminated: So I started to do an empiric approach of what was happening on screen: as I moved around the eyedropper it was as if there were two different areas on screen, with eyedropper acting in two total different ways depending to were it was positioned:
– In the first one the eyedropper simply collects and showed the right colors in the Color picker panel.
– in the second one things go crazy and colors didn’t match at all.. but.. I noticed something: the cross cursor of the Color Picker Panel was independently bouncing quickly inside his square palette area and the colors choosable there, were confined to just these ones and not the from the ones staying right under the eyedropper!!
So, I make room moving aside InDesign main panel and leaving on screen only the small ColorPicker panel, then I start again sliding across screen desktop and observe…
Big surprise! By doing this I saw that the double switch of behaviour of the eye dropper explained before depended by crossing the border of what seemed to be an invisible rectangular screen area!
It wasn’t absolutely NOT depending of menus items or windows present in that Desktop area.
This virtual rectangular area was taking almost all screen area (80%) but not the whole, just as if it anchor positioned on the top left! Do you now guess what it could be? :-)
The solution of the mystery:
A few days ago I connected my laptop on a new bigger monitor and tried to reduce fonts and app panels sizes by confuguring Windows. Nothing was changing but I didn’t investigate too much about that thinking having reached the limits of my videocard.. since I got a lot to do I go on with my work.. The computer wasn’t restarted for days, until that very annoying Eyedropper issue.
After having tried some suggested Indesign configurations without success, I finally closed all and restart my PC.
Second surprise!: at restart all panels and icons were super tiny on screen!
What happened: to see the results of those Hi-screen resolution changes on a PC you must often restart all (3200×2150) and I didn’t do it.
Indesign eyedropper cursor was recognizing right colors ONLY outside perimeters of the invisible resized RAM memoryzed Desktop (and applicaton), Inside it, it looped with no logic, in fact you could see my mouse-drived eyedropper going in one direction and the totall diconnected cross indicator flying and bouncing out of control in its own colors palette square area!
I think that many Adobe people got the same problem from what I read. The solution is to check your desktop resolution system fonts and app sizes if you have recently done monitor auto-recognizing size switchings or begin to work with more monitors.
Even if not requested after a change simply close all apps shut down and restart.
Pierre Peter DenV