

The Ultimate Contact Sheet

The other day one of my clients told me he wanted to create a contact sheet from his archive of images, but he also wanted to add extra metadata to every image. And of course he wanted to do this using only InDesign. Now that made me think of the way we used to create contact sheets. I remember that I used to do this in Photoshop (back in the pre-Bridge period, long time ago), later I used Bridge to create an InDesign contact sheet, but today that option has been discontinued leaving us all to fend for ourselves.
And it’s not only the contact sheet that sometimes leaves people with a big question mark hanging above their heads, the metadata part isn’t simple either. Sure, you could invest in a few handy scripts that do all the work for you, but there actually is a perfect workflow that you can use within InDesign.
The Tools
First of all, let’s take a look at our available tools? what can we use today to accomplish this? Well, our job requires things:
- Find a way to automatically place an entire folder of images, page per page, in a new InDesign document
- Find a way to automatically create the necessary metadata and place this information under our image thumbnails
The metadata part might be something you’ve heard before: Yes, we will be using the Captions option in InDesign — more on that in a minute. But first, how to get all the images in? One option is to use the Gridify feature. But remember that we have a very large folder of images and Gridify requires that you place the grid one page at a time. Another option might be to use Data Merge, but that requires other setup.
However, there is a free script included with InDesign (yes, you already have it!) that allows you to import all the images — it’s called ImageCatalog.jsx!
Let’s Get Started
First of all it is very important to know how much metadata you want to use on your page. Because adding more metadata means having smaller images on each page. So let’s do a quick test. Choose Window > Utilities > Scripts (to open the Scripts panel) and there you can open the Application > Samples > JavaScript folder in the panel. In this folder you will find the ImageCatalog.jsx script.
The Scripts panel with the highlighted ImageCatalog script
Double click the script to run it, and select a folder with images, then choose Open. (You probably want to choose a folder that has just a few dozen images — not hundreds or thousands — as this is just a test.) After having selected a folder you can set up the specifics of your contact sheet. Choose your preferred amount of rows and columns but don’t change anything else at this point and just click OK to create your contact sheet.

The basic setup in the ImageCatalog script dialog window.
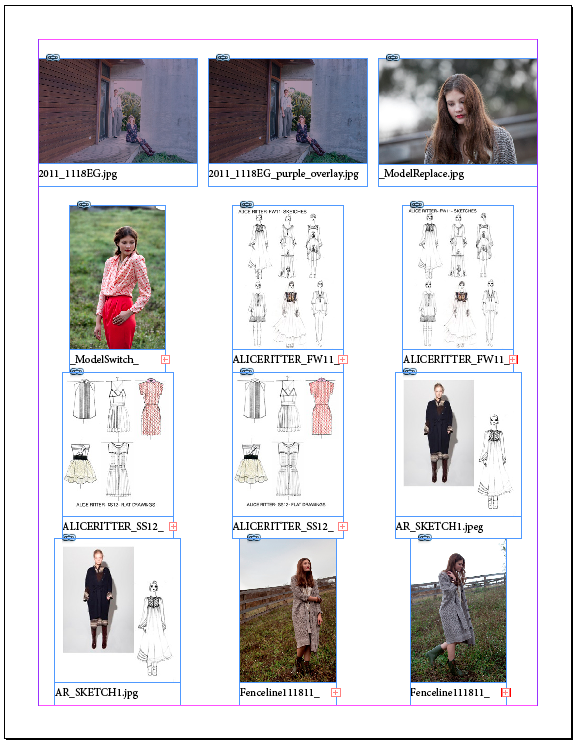
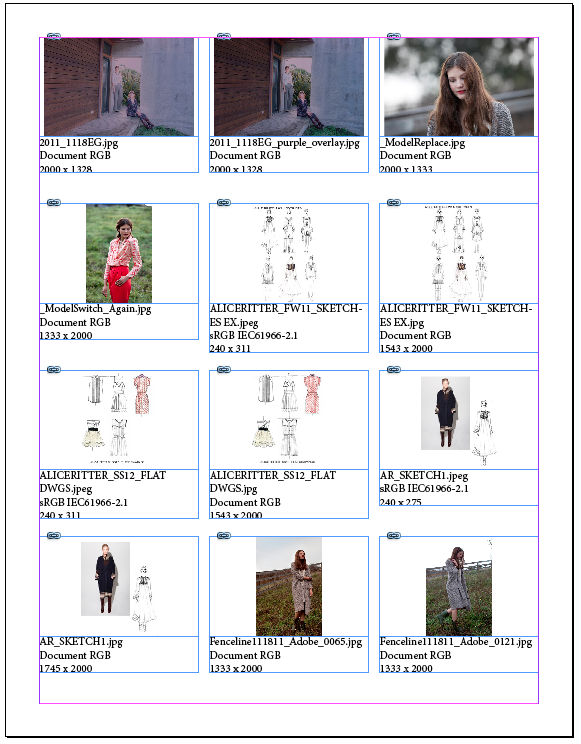
The basic result.
Notice that the graphic frames have different proportions and not all the image names are visible on the page. This is because these file names are too long and thus result in overset text frames.
Setting up the Captions
Now it’s time to see how much room we need for our captions. Delete the filename of one of the images on your page, then select that corresponding image and choose Object > Captions > Caption Setup.
I would like to use three metadata fields in my contact sheet: filename, ICC profile and image dimensions. So click the (+) symbol at the right of the window to add two more metadata fields. Here you choose Image ICC and Dimensions from the dropdown list.
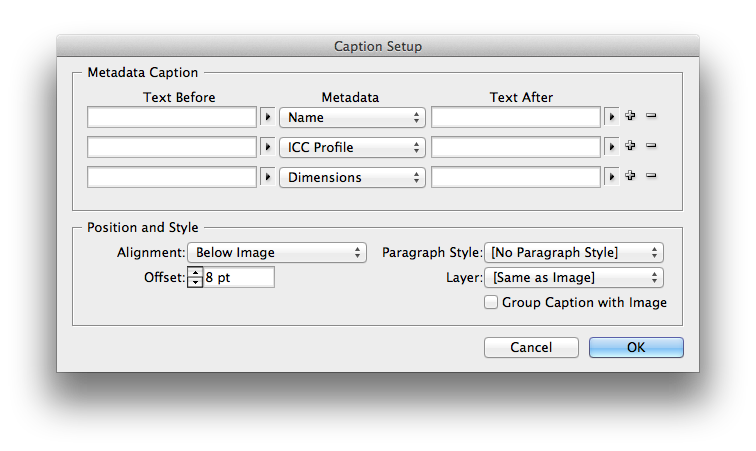
I will keep most of the Position and Style options at the bottom of the window as they are but only want to change the Offset value, there I choose 8 points. This will be the distance between the image and the actual caption text. Click OK when you’re done to close the window.
Now apply the caption by selecting your image and choosing Object > Captions > Generate Static Caption. (Note: if the resulting text frame says <Multiple intersecting links> then this means the text frame is probably touching other images, and you’ll need to move the other images away.)
Now let’s measure the total amount of space that is needed to position the caption. For this I use the Measure tool and measure the total height. Notice that the Info panel will pop-up automatically and tell you the total distance (about 72 points in my case). Now that we have all the needed ingredients it’s time to close our test file and start building the actual contact sheet.

Use the Ruler tool to measure the much needed space for adding captions.
Putting it all together
Double click the ImageCatalog.jsx script again and choose your image folder. But this time we’ll be changing a few of the script settings.
- Choose the same number of rows and columns as before.
- Type in your measured height in the Vertical Offset field, in my case 72. This will add enough space in the contact sheet for us to add the captions later
- Also deselect the Frame to Content checkbox if you want the image frames to be a uniform size.
- I also deselected the Labels checkbox because we will be adding the filename later as part of our captions, so we will deselect this to avoid a double entry.

Click OK when you’re done.
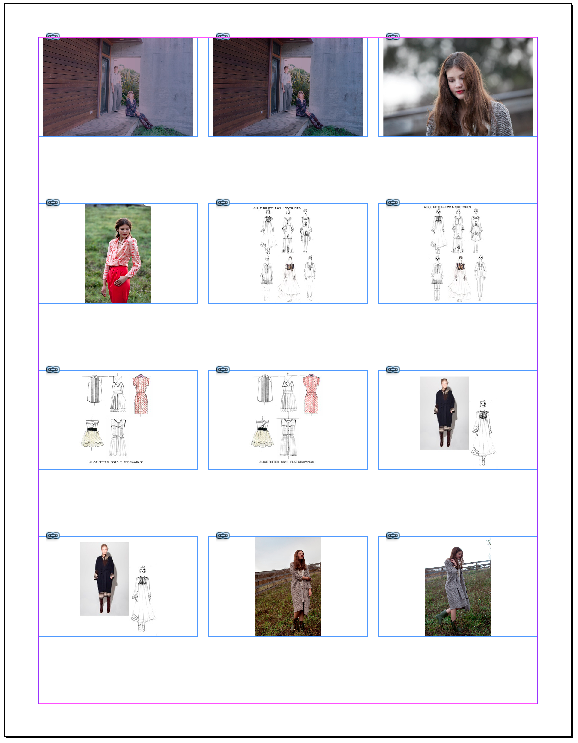
Now we end up with a contact sheet that has evenly spaced images but is still missing the captions:
Now at this point you might be thinking “hmm you need to select images if you want to add captions, so I guess I will be selecting all the images page per pa?” WRONG! Instead, there is one place in InDesign that allows you to target all the images in the file at the same time and apply captions to them? but where…?
Give up? The correct answer is the Links panel. There you get a list of all the images in your file but also allows you to add captions to all these images. So you are actually crossing over to different pages using one simple command.
First set up the captions for this document using the exact same method as before (choosing Object > Captions > Caption Setup). Now open the Links panel (Window > Links) and select all your links (you can click on one and Shift-click on the last one). Finally, choose Captions > Generate Static Caption from the Links panel menu!

Apply the captions from the Links panel, not the Object menu.
The finished contact sheet.
So now we have a finished contact sheet with added metadata!
Adding Finishing Touches
- In case you do end up with overset text somewhere you can always enlarge your text frames automatically by double clicking the [Basic Text Frame] object style and activating the Auto Frame option inside of the Text Frame Options area.
- If you want to fill your frames proportionally you can also edit the [Basic Graphics Frame] object style and choose Fill Frame Proportionally inside of the Frame Fitting Options area.
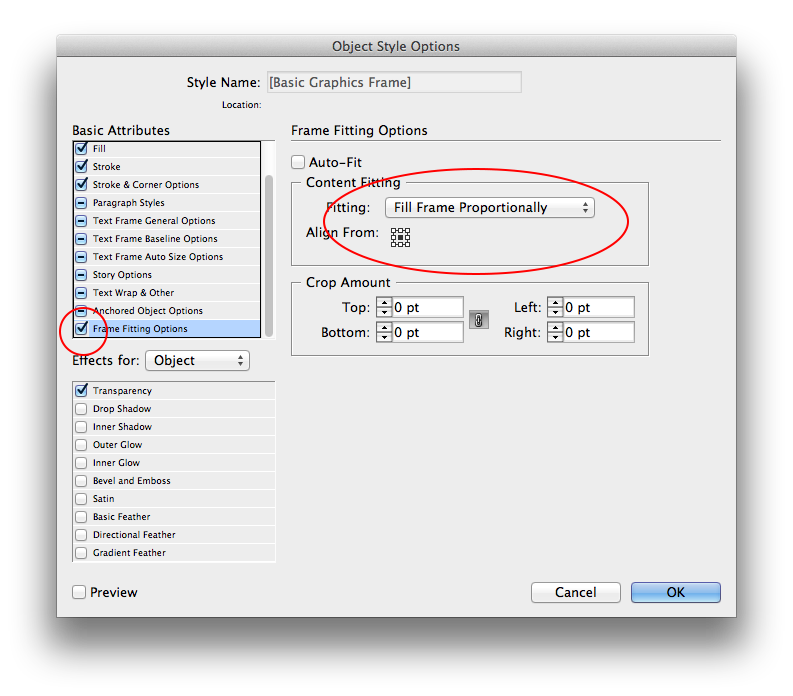
Use Frame Fitting Options to fill your frames.
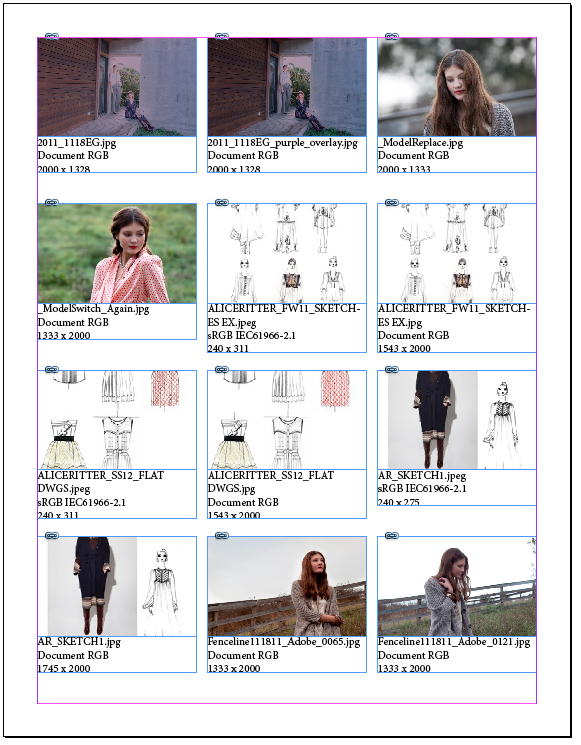
The same contact sheet with filled graphic frames.
- If you wish to change your document dimensions to a different page size you can always use the Layout Adjustment and Liquid Layout options.
I’ve been using a modified ImageCatalog script since CS3. I adjusted it for those rare instances that the extension was in all caps; and I also included Scitex CT (.sct). If I recall correctly, only one line of code needs to be edited, and it’s pretty easy to tell which line of code it is.
I do have two tips:
First, at the very end of the post David mentions ways to adjust the document dimensions after running ImageCatalog, but there is a way to adjust that BEFORE running the script. It’s not made evident anywhere–and it took me days to figure it out–but the script will use the LAST, USER-DEFINED document preset. I usually use Tabloid in Landscape orientation, so I have a preset for that and for Portrait orientation. Since the script will create a new document, start by creating a new document. If the desired preset is already displayed, just cancel. If not, choose the preset and let InDesign create a blank document. As aforementioned, the script will create a new document based on the preset.
The other tip is simple: Take note of the number of images in the folder. The script displays how many images will be placed on the contact sheets. If the numbers don’t match up, look for possible problems. Sometimes it’s as simple as other folders within the primary folder.
Though I use Live Caption frequently, it hadn’t crossed my mind to combine the two features.
Thanks David,
Bob
Hi Bob,
Every time I run the script, it makes the page vertical 612PX x 792px. Even if I have a blank landscape page set in inches open, it always generates the contact sheet to the size I mentioned. Do you know how i can create a contact sheet on a landscape page set in inches?
thanks so much!
Tara,
Sorry for the very late reply. I was having trouble myself and doing some Googling when I came upon my old post. Anyway, it appears that the ability to adjust document size before running the script no longer works with CC 2017.
It is an old script, but I’m bummed. I don’t use it for anything critical, so I reverted to using CS6 and that works.
Bob
Tara,
One of my talented co-workers edited the script to create landscape tabloid (17 x 11 inches) documents. If you would like another size, just edit lines 238 and 239 with the ExtendScript ToolKit CC of this document: https://goo.gl/oq54og
It would be great if it presented a dialog box instead, but till then…
Bob
Even better, Carlo’s comment from September 4, 2015, instructs how to prevent INDD from creating a new document altogether and uses whatever document size you have created. (If you use my edited text, it’s line 236).
@Bob: Thanks for the tips! Just a note: This was written by Bart, not me. (There was a mess-up in our cms and it looked like it was by me for about 10 minutes… sorry!)
Well, thanks to Bart then…
Thanks for the tips.
Note: “I used Bridge to create an InDesign contact sheet, but today that option has been discontinued”…
It was resurrected in CS6! Select images in Bridge, then Tools > Photoshop > Contact Sheet II.
Our company usually skips a version on CS so we had just gotten used to having the contact sheet/InDesign ability in Bridge and we were so sad it disappeared.
I’ve never understood creating larger files of files just so you could see them all together. (in Photoshop). :)
This workflow is fabulous. Thanks so much.
@Bob thanks for the feedback! I wasn’t aware that indesign uses the last used user defined preset, I’ll try that one later.
@contact sheetII lives What I meant by saying that was that the INDESIGN contact sheet from Bridge was discontinued, but that was’t really clear in the article.
I’m missing something. I’m using CS6 and I do not have Photoshop/Contact Sheet II under Tools. I’m running the windows version. Am I not seeing something or does the Windows version not have it?
I think the contact sheet plugin is an option you select when you install. Luckily, you can also just download them later…
Also just found this (paid) script which claims to add InDesign/Bridge contact sheet capability…
Bridge does have a very basic built-in function to create PDF contact sheets without having to install any plug-ins. In the upper right choose the Output workspace (also available via Window > Workspace > Output or keyboard shortcut Cmd/Ctrl + F4). It does not give you access to any metadata other than the filename, so it’s not nearly as robust as the other solutions mentioned, but it’s good for quick-and-dirty contact sheets.
Thank you, David.
“Note: ?I used Bridge to create an InDesign contact sheet, but today that option has been discontinued??
It was resurrected in CS6! Select images in Bridge, then Tools > Photoshop > Contact Sheet II.”
Uh, no. Photoshop Contact Sheet II is not the same thing as creating InDesign contact sheets from Bridge.
From what I remember, a freelancer convinced Adobe to drop InDesign contact sheets from Bridge and that freelancer is now selling it as a plugin.
I can vouch for Bob Stucky’s wonderful InDesign Contact Sheet script for Bridge (https://bit.ly/Ydsz8s). Absolutely love it.
Thank you so much Bart. I’d never have found that withour your article. Brilliant!
Thanks for outlining the process in such detail!
I usually use Bridge “Output” workspace, and do contact sheets/metadata that way, but I like the option to have everything spaced evenly on the page :O)
Would it be possible to tweak this tool a bit? I’m hoping to be able to use it to print one image per page (figured that part out), with the images at 100%, with the caption displaying the file name, the file type, and the image dimensions (in picas).
I did a test run and was able to get the script to place one image per page but not sized at 100%. Also, I was unable to get the captioning to work. I could setup the captions in the “caption setup” dialog box but when I went to add the caption using “Object > Captions > Generate Static Caption”, the generate static caption option was greyed out.
Any advice?
Thanks
Its just completely crazy that this is so fussy to do. It should be super easy and none of the methods (Bridge, PS script, ID script, or even Lightroom output) work well at all. It should be as easy as File > Script > Create PDF contact sheet. Options of row and column, resolution, captions, compression/PDF settings > RUN and Save. Done.
PS CSII just makes a huge PS file for EACH PAGE, the script in ID is so clunky and ugly…
The capability was already there in the past – its an obvious thing for designers and photographers to need to do. What bury and wreck a simple capability?
Thank you SO SO much for taking the time to post this! It saved me 3 hours today when I needed to create a document with all of our photos from Try-Ons. THANK YOU!
hi is there a way doing this with pdf file with multiple pages placing it in to one new indesign sheet? (e.g. I have 151page pdf and need to impose it in to 19 pages in indesign?? manually it takes ages :(
thanks
Jana-
Have you tried using InDesign’s Gridify feature?
You can place a multi-page PDF and as you drag to draw the frame, use your right and up arrow keys to add columns and rows.
But here’s the trick: you can’t use Gridify if you just select the PDF. You have to either turn on Create Static Captions in the Place dialog box or select a second file along with the PDF (you can just discard the second file after you’ve created the grid of PDF pages). Then Gridify will work with a multi-page PDF.
Here’s a post David wrote on the static captions method: https://creativepro.com/place-multiple-pages-of-a-pdf-in-a-grid-in-indesign.php
I’m using this guide to impose 478 images 2-up on US letter-sized pages. Everything works fine, except for the order in which the script places the images. I cannot figure out why they are not placed alphabetically (by file name). InDesign is using some kind of consistent order, because each time I run the Image Catalog script on the folder, it places the images in the same (wrong) order. Any tips?
Two points:
Windows used to have a program called Picture Manager that did all of this so easily and included some basic photo editing capabilities too. Unfortunately it is no longer offered with Office 2013. Dumb move.
Second, I am using CS5.5 for Mac and cannot figure out how to adjust the size of the caption text. I followed everything in your excellent post up to the last part about Finishing Touches. Nothing I do makes any kind of change in the text. Any suggestions?
how do I get the scripts to do both inches and picas. I need this badly…..
Are there special codes on how to format metadata like the date and time stamps? Specifically looking to get seconds in the live Caption.
First, I want to thank you for this excellent tutorial and script to go with it, it has saved me hours of work.
There is one problem I’ve encountered when importing the images into inDesign and that’s the sort order they import, I would like the images to sort by filename on the template as they appear in Bridge i.e. cc1.jpg, cc2.jpg, cc3.jpg etc and not cc1.jpg, cc10.jpg, cc11.jpg and so on.
I have tried a number of different forums for a solution, unfortunately no luck.
Look forward to hearing from you
Paul
Hi Paul,
What I find helpful is to number images as 001, 010 thru 516. As in CC001 thru CC010. By adding the extra zeros in front of the single and double digits numbers, you should be able to sort in the order you need.
Hope that is helpful in your situation too.
-Greg
i don’t know how to define text before in turn: figure 1, figure 2, figure 3…etc like that?
There are ways to do in indesign by creating a numbering style paragraph. There you would use the intiger as the paragraph number and “figure ” including space would be a prefix to paragraph number. (the paragraph style should have numbering to a custom list called figures, if you want to keep things in order) see also https://creativepro.com/tag/numbered-list.
Personally though I would probably use the batch rename in bridge so that the images had the “figure …” as part of the file name the sequence can be generated by the batch function. (https://www.photoshopessentials.com/essentials/how-to-batch-rename-images/)
If the images are not as you would like there is also a script that could be useful from Marjan Tompa (tomaaxxi) but his site is down says he’ll be back in a month. (So check the link mentioned here in a month https://creativepro.com/topic/renaming-within-links-palette)
This is super helpful; thank you!! I’ve been missing Contact Sheet II, but this is really much better anyway. :)
I can’t speak for previous versions of Lightroom, but the current version (Lightroom 5) makes very short work or creating contact sheets (via templates), while allowing a lot of customization for anyone with specific sizing needs. It does take quite a while for larger contact sheets, but that’s to be expected.
Is there a way to get it to sort by filename? It just seems to be placing them in a random order.
I’ve never had it place the images in anything except the same order they were in the source folder. How are the files named?
Rename files “alphabetical”. “Dog -1.tif” should be followed by “Dog-11.tif,” then “Dog-12.tif,” and so on to “Dog-19.tif” and then “Dog-2.tif,” “Dog-20.tif,” “Dog-21.tif,” etc.
One solution to this would be to have them numbered as 01, 02, 03. . . 09, 10, 11, etc.
I have the photos named as 1.1, 1.2, 1.3, 2.1, 3.1, etc. They’re still coming out as random order, any other suggestions?
A problem: Actually, Image Catalog script make a new document, but when InDesign creates a new document, assigns it the default size. If, instead, as we wish, use the current document, so you can simply create a new document and run the script.
To make sure that the script does not create a new document must change the line 237.
Change line 237 of script (make a backup first, just in case)
From:
var myDocument = app.documents.add();
To:
var myDocument = app.documents[0];
Personally I duplicated the script and changed the line. Now the modified script works as I want!
perfect
Any updates for InDesign 11.3.0.34 (April 2016)?
Did it stop working when you updated? This would seriously mess with my workflow.
Hi, I’ve been using this however when indesign imports the images they’re not sorted via file name. Any suggestion how I could fix this? I might be missing something. Thanks!
Hi Michael,
I have found when it comes to sorting you may need to rename the files. See the reply I posted above from December 2015!
-Greg
https://creativepro.com/the-ultimate-contact-sheet.php/comment-page-1#comment-1751164
Thanks for the help Greg! :D It WORKED! :D
Regards,
Mike
Hi,
would there be any way to modify this script to make random pages of images? so that each page would pull from the same group of images, but every page would be different. I’d like to use this for a bingo card game I’m working on. Thanks.
Hi Noel,
I know at least two ways to do this:
Withe Imagecatalog.jsx script, just set Number of Rows and Columns to 1.
or search for “Import a Folder Full of Pictures, One Per Page”
https://creativepro.com/import-folder-full-pictures-page.php/
Good luck,
Greg
You can use Long Path Tool to solve the problem of long filenames . It is very useful to solve such type of problem.
I’m having some problems with this issue for one project. I have some eps files where I’ve had to crop things out using the artboard in illustrator. When this script places them in indesign it doesn’t show the objects that are outside of the artboard but the bounding box is extended to where those items are. Any ideas?
Hey!
Very useful script and beautiful guide. I have one question though.
Any ideas on how to make this but for more pre-defined layout? Let’s say I have 5k+ images and want to make a catalogue of them.
Only problem is, they have different dimensions and proportions. I’d like them to all be, let’s say, 38x38mm.
Tried editing the script, but my JS skills leave much to be desired.
Thanks for any answer, I’m open to buying a script or a plugin if it makes this work.
Ok so I’ve found out that the width of frames is calculated from the default margins. You can edit those by making a new empty document and then running the script. It’s gonna take the latest margin settings you entered.
This solves my question. Everything else is just trial and error.
Keep me posted on your latest finds.
I try to run this and for some reason, I keep getting this error:
JavaScript Error!
Error Number: 29441
Error String: Cannot place this file. No filter found for requested operation.
Engine: main
File: /Applications/Adobe InDesign CC 2018/Scripts/Scripts Panel/Samples/JavaScript/ImageCatalog.jsx
Line: 300
Source: myRectangle.place(File(myFile));
There are 165 files I’m trying to catalog a certain way. When I try in a different folder, those files work fine. Any suggestions?
Meg,
Since the script is working with other folders of files, it stands to reason that the script is encountering a file it can’t work with. I believe its intended use is for static images like TIFFs or JPEGs, so check your files. Something like a movie or some type of audio is going to stop it dead in its tracks. Don’t remember for sure, but multi-page PDFs may present a problem as well.
@Bob Thanks for that. Also thanks for the tip. I alway foudn the script a bit weird that it starts from blank. Never really checked how i could add a sstyle guide. But i only used it once perhaps.
I see that script you provided is very long…. it was 11 pages in google docs!!!! WTF
Im a metric person, so perhaps i will convert this to A4 papersize. Or just add a HD version. Since these will mainly be viewed on a display so a 1920×1080 is perhaps better
Is there a way to change the margins? I would like to add headers and footers with page numbers and a logo to the master pages.
You could do that upfront and adjust the margins in the script
Jan,
This variation https://drive.google.com/file/d/0B9S-HYvR-wc0akxMY3V3cjVfd0E/view (courtesy of a talented coworker) may get you at least part of the way there. Instead of creating a new document upon initiating the script, it uses whatever document you’ve created including the left and right margins. Because the script adjusts the images to fit, the top and bottom margins apparently are a bit trickier.
Jan,
I decided I had better run another test using some “extreme” margins top and bottom with a little more typical left and right. What the script does is keep the images proportioned correctly within the area defined by the margins. What this means is that sometimes it will “stop” at left and right and other times it will be top and bottom and you’ll have a bit of space on whatever is opposite.
So, I think you’ll be golden with your headers, footers, etc.
Bob
Hya Bart, Great article. Been using several features for the past few years but the way you combine this gives me new insights. And since I am a big fan of scripts this is really cool, thank you! Question: I would like my customers to be able to tick a box for images they need/want when I’m sending a contact sheet to them. How do I set this up? Use the bullet-function to create a square and then use interactivity to make each image-name clickable? Any good ideas here?
Ta, Els, Nederland
I am trying to import a large number of images, one to a page. It works fine except that it imports them in a random order, and I would like them alphabetical. There does not seem to be any way to control the order. Am I missing something?