

Tip of the Week: Finding Hidden Items With Preflight Profiles

This tip was sent to Tip of the Week email subscribers on June 12, 2014.

Sign up now and every Thursday you’ll get a new InDesign Tip of the Week and Keyboard Shortcut of the Week, along with roundups of new articles at InDesignSecrets and CreativePro, plus exclusive deals sent right to your Inbox!
Just scroll all the way down to the bottom of this page, enter your email address, and click Go! We’ll take care of the rest. Now, on with the tip!
Normally, once you hide an object in an InDesign document (via Object > Hide, pressing Command+3/Ctrl+3, or clicking the object’s Show/Hide button in the Layers panel), it leaves few traces of its presence. Hidden objects aren’t printed or exported, and they won’t show up in a Find/Change. They can, however, still affect other objects with text wrap.
But if you really want to give these objects nowhere to hide, use a preflight profile to reveal them.
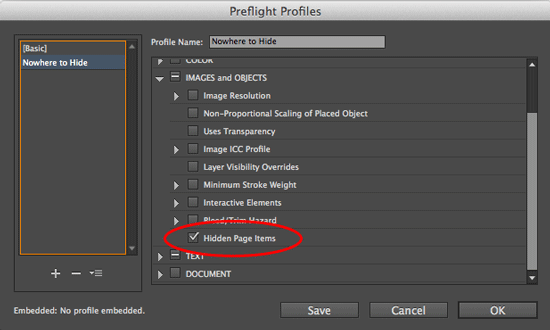
From the Preflight Panel menu, choose Define Profiles. Click the + (plus) button to create a new preflight profile. Give your new profile a name, and in the IMAGES and OBJECTS options, select Hidden Page Items (plus whatever other conditions you want InDesign to check for).
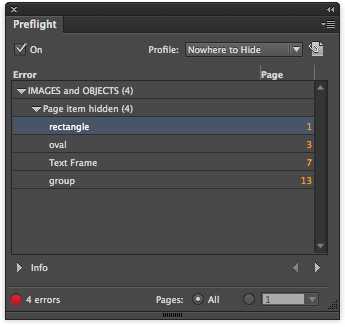
Click OK, and then select your new profile from the panel menu. If there are any hidden objects, they will be listed as errors and you can double-click them in the panel to jump to their location in the document.
But you still won’t see them until you show them (by pressing Command+Option+3/Ctrl+Alt+3, or choosing Object > Show All on Spread, or clicking the object’s Show/Hide button in the Layers panel).
Well, at least inside InDesign.
Hmmm actually is something I don’t really use – hidden layers, or hidden items on a page.
Probably a good idea to help clean up the pasteboard without actually removing anything – but then I’ll have to remember that I’ve used hidden layers…
Nice tip all the same.
thank’s
Thanks for all of your posts!