

Tip of the Week: Placing Images at a Specific Size

This tip was sent to Tip of the Week email subscribers on July 23, 2015.

Sign up now and every week you’ll get a new InDesign Tip of the Week and Keyboard Shortcut of the Week, along with roundups of new articles at InDesignSecrets and CreativePro, plus exclusive deals sent right to your Inbox!
Just scroll all the way down to the bottom of this page, enter your email address, and click Go! We’ll take care of the rest. Now, on with the tip!
Need to place an image so it’s a specific width or height in your layout? By default Smart Guides appear if you drag while placing an image. But the guides show you the percentage of the image size, not the size of the frame you’re drawing.

If you want to see the width and height of the frame, keep an eye on the Control panel. When you see the size you want, release your mouse button.
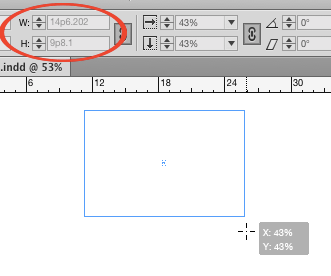
If you can’t get the exact values in the Control panel that you want, hold Shift as you drag the image frame. Now the Smart Guides will show you the width and height of the frame with more precise control.

But there is one downside to holding Shift: the frame won’t automatically fit the image.

So to deal with that, release the mouse button when the frame is the desired width or height.
Then use the Control panel buttons to fill the frame proportionally and/or fit the frame to the content, as needed.

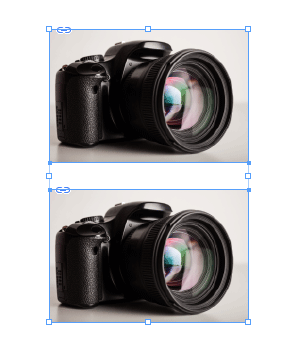
If using the Control panel buttons slows you down, try the keyboard shortcuts instead: Command+Shift+Option+C (Mac) Ctrl+Shift+Alt+C (Windows) for Fill Frame Proportionally and Command+Option+C (Mac) Ctrl+Alt+C (Windows) for Fit Frame to Content.
Holding shift while placing doesn’t give you “more precise control,” it simply lets you make a box that’s not in proportion to the content you’re placing. You’re still going to have a nightmare of a time trying to drag that box to a specific size, unless you’re happy with _almost_ perfect. If a specific size is your goal, make the box first (just click with the frame tool to manually enter your measurements) and then place into that box. And if you know you’re going to want your placed content to fill that box proportionally, choose that option ahead of time in the Frame Fitting Options… dialog.
I have worked in inDesign for almost 6 years and quickly figured out how to keep my image at the same ratio so it doesn’t get disproportionate, but not until I read this, that I can click on the control panel buttons to fit my image frame did I know that!! It is a LIFE SAVER. Cause I am updating several graphics and was having to manually fit them in the image frame. WOW. Thank you!