

Tips for Fixing Overset Text

For an experienced user, fixing overset text is so simple that we overlook it, but for a new user, overset text can be quite a conundrum. So I wanted to share with you several different ways to fix overset text.
To fix overset text manually

To fix overset semi-automatically
- Click on the red box in the lower right of the text frame.
- Then go to (or make a new) page and Shift + Click on the top left corner of the margin area.
Note: You can make a new page after the current page by pressing shift + Ctrl + P.
To fix overset fully automatically
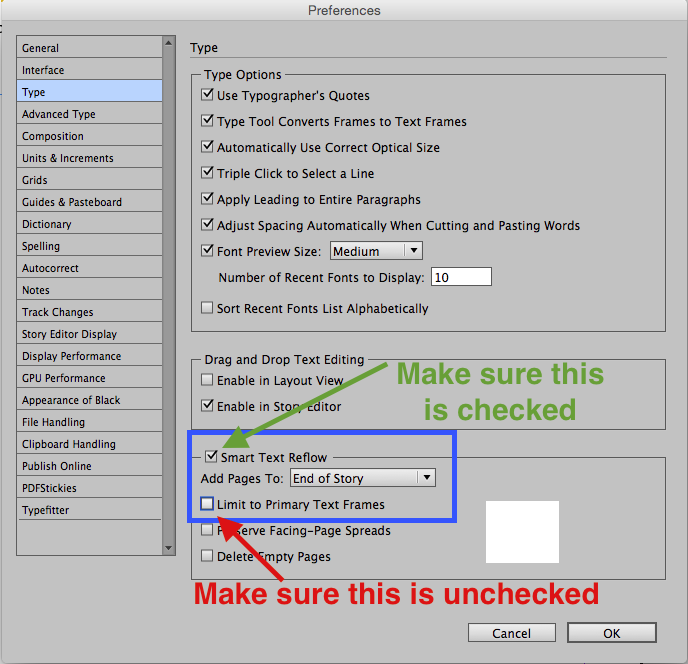
Using Text Frame Options to Automatically Reveal Overset Text
Steve Werner write a great article several years ago explaining how to allow your frames to resize with your text. It involves setting the text frame options to Auto-Resize. This is a great trick for sidebars and other small text frames that have a variable height (or width) that is dependent upon the amount of content.


Fixing overset text in tables
Ten years ago, Anne Marie wrote a post about revealing and fixing overset text in tables. The trick is to have the cell height setting set to “At Least.” Though the post is old, the information is still completely applicable today.

Understanding Overset Text in Table Cells
Table cells have their own overset text symbol, and where it’s located in the cell will determine how you need to adjust the size of the table cells. I wrote an article about that here.

Do you still have issues with overset text? If so, leave a comment here!
i like it
I set books, all day every day, from many different authors. They all use Word and frequently I import text (holding Shift to get the Options), map the styles and so on — and half way through the layout I find there’s overset text. Flowing text onto a new page does nothing except produce text frames with the little red cross. All I can do is go to Edit in Story Editor (which helpfully tells me there’s overset text). Sometimes changing the para style helps but usually I have to delete something to get the text to reflow. Examining the Word document itself doesn’t help any more than saving it as an RTF. I’ve got so used to it now that it rarely worries me … but I suppose there’s always some sort of disaster to come! Goodness, how pessimistic!
My guess is that if you turn on invisibles, you’ll find there’s a column break in the text. I’ve never looked into it, as it’s not a major problem for me, but you can probably deal with it via a find change. Do you run a script on your text to strip out double spaces, double paragraph returns, etc? If so, you should be able to add the search to the script.
Thank you for your idea but I have invisibles turned on all the time and would love to see something as visible as a column break in the original Word document before I import. Yes I run a multi find/change to do those things and a lot of others (like applying character styles to italics etc.). Anyway, thank you for answering.
If I need to delete overset text and rethread to other text, what’s the best way to go about this?
Shift + Cmd/Ctrl + End. Then press delete. Then click on the out port of the text frame and click anywhere on the next text frame to which you would like to thread the text.
Thank you, Kelly!
The shift+cmd+delete worked for some, but not all of my text frames. What else do I need to do please? I have a rounded rectangle shape w/ 3 smaller text frames laid on it that I’m trying to write sales info, names & contacts. I’m unable to finish typing my info because. It will not allow me too!
I’ve tried all these methods to no avail. All my text is overset! I can edit it in Story Editor, but nothing will make it show up in the Layout Editor. If I create a new page for the overset text (tip #2), the “end of story” icon (#) appears at the top of the page, and although I can place the loaded text cursor on the page, nothing appears, just more blank pages with the overset text box at the bottom of the last one/
Here are some more ideas for why text could be overset:
https://creativepro.com/the-case-of-the-disappearing-text.php
and
https://creativepro.com/5-reasons-unexpected-overset-text.php
Sometimes in the Story Editor (because I get exactly the same problem importing Word docs into InD CS6) I can highlight the last pilcrow (is that what the Return symbol is called?) before the overset text and click on a Para Style I’ve already set up — if that doesn’t solve the layout, I move the cursor to the first word of overset text and give that a Para Style. Usually one or the other works if all the other methods above haven’t.
This is save me many time!
Thank you!
Hi Kelly, thanks for the article. I have a question for you. Do you know how I can export an idml to PDF and keep/show overset text? I know this is not a normal procedure as you usually would want to fix overset text before exporting, but in this case I need to find a way to do it. (I’m using the latest version of In Design on a Windows PC). Thanks!
I have just had the same problem and it was a graphic I had posted (twice!) but was too large for the linked box I created to try to determine the “overset text”. I added another box to flow into and enlarged it and suddenly it placed and I could delete it and get rid of the annoying red plus box bottom RHS!