

Fit content to frame, while maintaining one original frame edge location
Learn / Forums / General InDesign Topics / Fit content to frame, while maintaining one original frame edge location
Tagged: align, content, fill frame, fit, fit content to frame, fit frame, fit frame to content, fitting, frame, frame alignment, frame fitting options, script, Scripting, snap frame
- This topic has 2 replies, 2 voices, and was last updated 7 years, 1 month ago by
klipp86.
-
AuthorPosts
-
-
March 18, 2017 at 7:16 pm #92971
klipp86
MemberHaving a hard time putting this into words but I think I might be looking for a script or some combination of tricks to accomplish a frequent task. Anyone up to the challenge? I’m not a script writer at ALL, so I need some kind samaritan to help!
I frequently have catalog pages featuring book covers where the template of gridded out empty frames that the covers will be placed into…the frames have a certain height x width in place, yet each book to be placed into the frames are slightly different in size from each other. When I’m done placing all my images, I want to be able to snap all the frames to the content, but do so globally to the bottom edges of each individual frame, and let the top edges fluctuate in height.
As a good starting direction, I already use this script called “Tomaxxi Resize Each” and it’s marvelous! (Tomaxxi’s site has been down for some time with no news of coming back up, or else I would have linked to it! I can send anyone a direct message with this script attached in it if they like). I wonder if some of its properties could aid in building a script to accomplish my goal? It doesn’t directly relate to my need but I wonder if some of the code might be helpful?
Maybe all that is too wordy. Here’s a summary of what I need to accomplish in this order:
I’m not using these objects as anchored objects. They need to be free floating. Really What I’m saying is, I just need a keyboard shortcut to accomplish the following tasks in this order:
1) fill frame proportionally
2) fit frame to content
3) realign the bottom edge of the frame to where it originated BEFORE I told it to fit frame to content.I did just discover Frame Fitting Options shortly before I posted this but it still isn’t working right. Not sure how to use that feature correctly or what I can expect it to do. What is that feature for, primarily?
Also if this is possible WITHOUT a script, I have no clue how to do so. Please help! Thanks!
-
March 19, 2017 at 5:17 pm #92982
David Blatner
KeymasterIt’s not hard to do with 2 quick steps:
Select all the frames on your page, then apply an object style with Frame Fitting options like this:
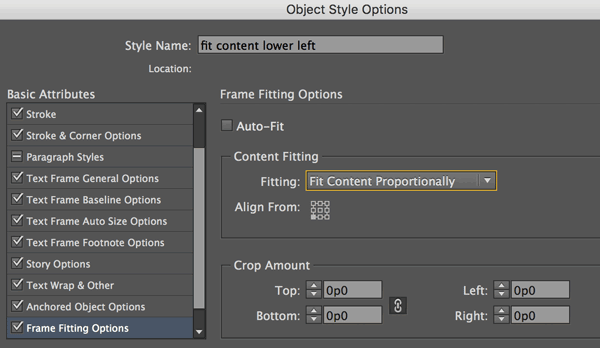
That will fit the images to the frame, anchoring them in the lower left corner.
Then while everything is still selected, use the keyboard shortcut for Object > Fitting > Fit Frame to Content.
-
March 20, 2017 at 8:15 am #93002Member
Thanks for the speedy reply, David!
(For all reading, I’m on a Mac, by the way, in regards to my keyboard shortcuts below)
Ok that is pretty helpful. I think that takes me 90% of the way, and what you explained works…mostly. Here is an example of what is hanging me up.
My empty frames are all sized at 40mm wide x 60mm tall, which is generally a good average aspect ratio for most of our book covers.
When I place a book cover that has a *wider* aspect ratio than the empty frame, this works great: it takes up the entire width of the empty frame (part of my desired end result, which I forgot to explain in my original post…I need the width to remain constant so all my frames are visually the same distance apart from one another in a grid-like fashion), and it leaves some unfilled space towards the top edge of my frame…so that when I hit “fit frame to content”, the top edge of the frame snaps down to fit snuggly against the top of my content). This is great!
But when I place a book cover that has a *narrower* aspect ratio than the empty frame, the book fits itself snuggly height-wise within the top/bottom bounds of my empty frame, and leaves some unfilled space towards the right edge of my frame. This is undesirable, as I described in the last paragraph, that I need the top edge of my frames to be the variable in this equation, and to always have the bottom edge stay in place, while also filling the frames entire width, while making the height be the variable.
I did play around a bit, and I altered your suggestion to have the “Fitting” dropdown say “Fill Frame Proportionately”, and that seems to catch more of my desired fittings than your original suggestion, but then what happens is that the *wider* aspect-ratio-covers are filling up to be *too wide*…
I see that I might be asking for too much—that I need to pick a priority for my covers and manually manipulate the ones that aren’t filled the way I want, and just be happy with the majority of covers filling my frames correctly.
I imagine that, if that’s the case…that if I pick the latter option (using “Fit Frame Proportionately”), then I’ll have to insert a step into your suggested solution:
David’s Steps:
1) Select all frames
2) Create Object Style with Frame Fitting Options
(in this case, we’ll use *my* settings for “Content Fitting” dropdown)
3) Place all images into framesInsert my new step:
4) Select only the frames that have a *wider* aspect-ratio image and execute “Fit Content Proportionally” (opt + shift + cmd + E) so that it takes up the width of the frame and leaves some blank space at the top. Now, in regards to a content-to-frame relationship, these wider ones are placed just like all the others.Back to David’s:
5) Keep all selected, then execute “Fit Frame to Content” (opt + cmd + C)Now with that completed, my catalog images are all unified…meaning the bottom edges are aligned, the widths are the same as one another, and the tops are fluctuating in height.
If there’s a setting that I can alter within Frame Fitting Options so that *no matter what ratio image* goes into my frames, it does what I’m trying to do automatically, please let me know! In regards to that idea, I noticed in your screen shot that the “Auto-Fit” box is unchecked. Can you tell me a bit more about what that’s for and why you left it blank?
Thanks SO much David. I just wanted to explain this all out in hopes of being more clear. It also seems to not let me upload images as a basic user on the forums so I haven’t uploaded any screenshots of my own. If I’m able somehow, and if that would be helpful, please let me know (though some of the specific of my work I need to keep confidential).
-
-
AuthorPosts
- You must be logged in to reply to this topic.