

What’s New in InDesign CC 2018

A bevy of feature improvements bring a sigh of relief to long-time InDesign users
Adobe has just released a major new version of InDesign—InDesign CC 2018. Following the precedent of CC 2017, Adobe released it in connection with its big Creative Cloud event, Adobe MAX 2017, held this year in Las Vegas.
Unlike InDesign CC 2017, which emphasized a new user interface more than new features, this release has major new features, some of which users have wanted for a long time. They include endnotes, paragraph borders, the ability to store an object’s size and position in an object style, and the ability to store shared text assets in CC Libraries. In addition, there are helpful new ways to filter fonts in the Font menu, an integration of the German Duden dictionary, improvements in export of HTML and PDF accessibility, and a number of other, smaller features.
As always, this major version upgrade brings a new file format. This means that if someone using InDesign CC 2018 creates a new file, and you open it using an earlier version of InDesign CC, the Creative Cloud must convert the file backward to your older version (or you can use the old “save as IDML” process). I’ll describe the process at the end of this article.
But first, heeeeeeere’s the new features…!
Endnotes (finally!)
InDesign users have been able to add and manage footnotes in documents since version CS2. But until now, InDesign users have had to rely on third-party products or scripts to add endnotes at the end of a story or document. It has been more than 18 years since InDesign 1.0 was released, so to say we’ve been waiting a long time for endnotes would be quite an understatement. But the wait is finally over. You can use InDesign CC 2018 to create endnotes for either a story or document, and the endnote frames can be placed in various locations.
Creating an endnote
You can now create an endnote similarly to creating a footnote: Place your insertion point where you want the endnote text reference to appear. Then choose Type > Insert Endnote (or right-click and choose Insert Endnote).
By default, a new page is added at the end of the document, and an endnote frame is created where you can enter the endnote text. InDesign places your insertion point between two colored markers, where you can enter text for the endnote. Subsequent endnotes in the same frame will be placed within new pairs of markers.
The reason that consecutive endnotes are placed between markers is that, unlike footnotes, endnotes often include text that is not part of an endnote—for example, headings or chapter numbers. You should place that text outside of the markers. (Markers are not printable, and just visually indicate the area of an endnote.)
Clicking in the endnote and choosing Type > Go to Endnote Reference (or right-clicking and choosing Go to Endnote Reference from the context menu) takes you back to the referenced text.
By default, creating an endnote in another story places the endnote in the same document endnote frame. However, you can also choose to restart the numbering for each story in the same frame using a setting in the Endnote Options dialog box. Or you can set the endnotes to follow each story.
Endnote frames
The endnote frame is a special kind of text frame. When the frame is selected, a special adornment on the bottom left indicates an endnote frame (Figure 1). To see it, you must select the frame with the Selection tool and turn on Show Frame Edges.
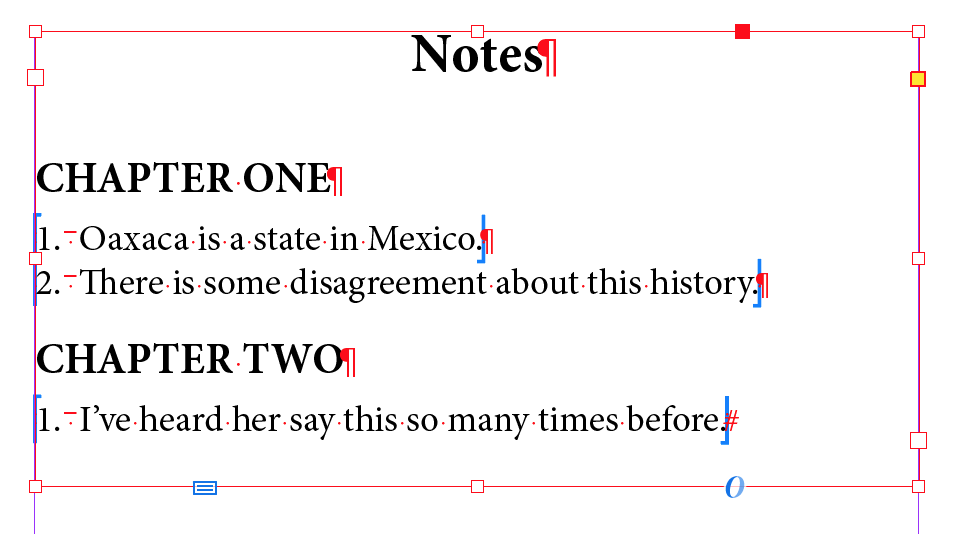
Figure 1: Text in an endnote frame is placed between marker pairs. Text that is not an endnote—for example, a chapter number—can be placed outside of the marker pairs. The new adornment/icon in the lower-left corner of the frame indicates this is a special frame that contains endnotes.
By default, an endnote frame is created based on the scope of the document. This scope means that it includes all the endnotes in the document, and it is created on a new page at the end of the document. However, in Positioning Options (in the Endnote Options dialog box), you can set the scope to Story. In that case, a new endnote page will be created at the end of each story, and it will include endnotes only from that story. If you choose Story as the scope, you can alternatively choose Load the Place Cursor and place the endnote frame wherever you like.
Setting endnote options
To change the defaults for numbering, formatting, or layout of the endnotes, choose Type > Document Endnote Options. This opens the Endnote Options dialog box (Figure 2).
TIP: Clicking the endnote text frame adornment also takes you to the Endnote Options dialog box.

Figure 2: The Endnote Options dialog box is where you specify the layout, numbering, and formatting for endnotes.
Many of the Endnote options are the same or similar to those for setting footnotes. The numbering options are similar except that endnote numbering can be based on a story. The formatting options for the endnote reference number are similar to a footnote’s “Reference Number in Text” options. Prefixes and suffixes can be applied to a reference, to the endnote text, or both. Choices for Position, Character Style, Paragraph Style, and Separator are also similar.
Editing endnotes
Unlike footnotes, however, you can copy and paste endnotes and endnote frames. You can also move endnotes within documents and even insert endnote references in a table. (Sorry, no footnotes in tables yet.)
And, of course, the numbering of each endnote frame will auto-adjust based on the ordering of the endnote references in the text.
Document vs. Story-based Endnotes
Put all your endnotes at the end of the story, and now changed your mind? No problem! You can change the scope for endnotes between Document and Story.
For example, if you change the scope from Document to Story, InDesign creates a new endnote frame for each story. The previous document endnote frame and its page will be deleted. However, note that numbering will not be continuous when it is based on a story; each story has its own numbering and numbering restarts in each frame.
Unfortunately, you cannot place endnotes at the end of a book document, or in a separate document in a publication made of multiple documents and compiled using the book panel. This is a serious limitation, as so many book designs require notes in the backmatter.
Importing Word Endnotes
You can import Microsoft Word endnotes. You select this option in the Word Import Options dialog box (select Show Import Options in the Place dialog box). All the endnotes are imported and added to a new document endnote frame. When you import multiple Word documents at the same time, all the endnotes of the documents are imported into a single frame.
Paragraph Borders and Shading
Back in InDesign CC 2015, one of the most requested new features arrived: the ability to add shading behind a paragraph. But it was missing its companion feature—adding a border around the outside of the same paragraph.
That deficiency has now been remedied with enhancements to paragraph shading and the addition of a paragraph border feature in CC 2018.
Corners on Paragraph Shading
The original Paragraph Shading feature gave you the ability to put shading behind the text in the paragraph, while setting its color, tint, and offset values on each side (how far it should sit from the edge of the paragraph). You can also choose to clip shading to the frame and prevent printing or exporting.
New in InDesign CC 2018, Paragraph Shading also includes the ability to set Corner Size and Shape independently on all sides (Figure 3). Yes, that includes rounded corner shading!

Figure 3: Paragraph Shading has been enhanced to include setting corner size and shape independently on each side. This example also uses the Paragraph Border feature on the same paragraph, shown on the left side of the figure.
Paragraph Borders Options
The new Paragraph Borders feature lets you create borders on all sides of a paragraph and apply them to one or more paragraphs. The borders can either be used by themselves or combined with Paragraph Shading in the same paragraph (Figure 4).

Figure 4: The new Paragraph Borders feature can create borders independently on each side of a paragraph. This example shows the border settings for the paragraph illustrated in Figure 3.
To add a border, choose Border in the Paragraph or Control panel, or Paragraph Border in the Paragraph Style Options dialog box.
TIP: As with many of the Control panel icons, Option/Alt-clicking the Paragraph Border icon opens the Paragraph Border options dialog box.
The top section of Paragraph Border controls is Stroke settings. You can independently create borders on each side of the paragraph using the four controls for Top, Bottom, Left, and Right. Setting the stroke weight to zero or changing its color to None turns off a border.
However, each of the four border segments must share other stroke attributes. Here you can set Stroke Type, Color, Gap Color, Tint, Overprint, and Cap and Join attributes. They cannot be set independently.
As with Paragraph Shading controls, the paragraph borders can have independent Corner Size and Shape, and the controls look the same.
Paragraph Borders also set controls for positioning similar to Paragraph Shading controls. These include offsets on each side, Top Edge, Bottom Edge, and Width (Column or Text).
There is one more option at the bottom that determines what happens when a paragraph border breaks across frames or columns. The default is to clip the border; if the option is selected, the border can be closed at the top or bottom of a column or frame.
Limitations
These new paragraph-formatting controls are very welcome and pretty great. But there are features that should probably be added to future versions of paragraph borders. It’s difficult to set up both paragraph shading and borders on the same paragraph: many of the settings (offset, corner settings, etc.) will be the same in the two dialog boxes, but there is no way to link the settings to make it easier to edit them.
A second difficulty is that if you want a border to seamlessly continue across more than one paragraph, it’s complicated to set up and may require multiple paragraph styles if used repetitively. Adobe really ought to make “borders across multiple paragraphs” as easy as a checkbox.
Size and Position Options in Object Styles
There are times when you want to ensure that multiple objects share the same size and position on a page. Previously, if you needed to make any sizing or positions changes to the objects, those edits had to be made for each instance of the object separately. But InDesign CC 2018 adds the new Size and Position Options choice in the Object Styles dialog box, so you can make and modify certain page elements much more efficiently. Note that the new options support not only independent objects like text or unassigned frames; they can also be applied to anchored objects, tables, and image frames.
Setting Size and Position Options
For each object, you can set three size options: Width Only, Height Only and Height and Width. There are also three options for position—X Only, Y Only, and X and Y. And of course InDesign offers you a reference icon to choose from which part of the object the position is measured. Position can be aligned relative to either Page Edge or Page Margin (Figure 5).

Figure 5: A new Object Style option lets you store and reuse an object’s size and position.
In the example shown in Figure 5, I created two objects styles for a sidebar—one for left pages, one for right. (Unfortunately, the new feature doesn’t yet support a Relative to Spine command, which would allow you to use just one style.) The Width was set to adjust to the width of the column, but the Height might vary. The frame was positioned using the upper left reference point. Both the X and Y offsets were defined relative to the Page Edge.
Eyedropper option
Another way to work with reusing object dimensions and position is with the Eyedropper tool. This tool now has a new Transform Options choice, with options for Dimension and Position. With those options turned on, the dimensions and position are copied when you click on any object, and can then be applied to another object.
Adding and Sharing Text Assets with CC Libraries
For over two years, InDesign users have been able to store objects, color swatches, and paragraph and character styles in CC Libraries. (To learn more about CC Libraries, read InDesign Magazine #83, “Creative Cloud Libraries.”) These objects can be shared between InDesign documents and also used in Adobe Illustrator and Adobe Photoshop.
What has been missing is the ability to repurpose text assets (from a sentence to an entire story). Beginning in InDesign CC 2018, you can drag text or a text frame into a CC Library. This text can be used in either another InDesign CC 2018 file, or in an Adobe Illustrator CC 2018 document. As with other CC library assets, you can use them yourself, or you can share them with other users. Text assets retain their paragraph and character styles and other attributes, such as color, that are applied to them.
Adding a Text Asset to a CC Library
You can select any amount of text in a story with the Type tool, and click the Add Content (+) menu at the bottom of the CC Libraries panel. Select the Text checkbox, and click Add to add the text to the new Text category in the current CC library (Figure 6). You’re also given the opportunity to add paragraph and/or character styles or save the text as a graphic.

Figure 6: Text assets can now be stored in a CC library for reuse either in Adobe InDesign CC 2018 or Illustrator CC 2018.
Alternatively, you can select the text frame with the Selection tool to add all the text in the frame in the same way. If you select a text frame, you can drag and drop it over a CC library to add the text.
Using a Library Text Asset in InDesign CC 2018
You can repurpose a saved CC library text asset in an InDesign CC 2018 document in one of four ways:
- In InDesign CC 2018, you can drag the text asset from the CC Library (or right-click the asset and choose Place Linked). This copies all the formatting from the original and also creates a link from the text frame to the text asset in the library. You’ll see a cloud icon on the text frame just as you would for a library linked graphic (see Figure 7C below). Use this method when you want assets to be kept updated to the library copy of the text.
TIP: Library linked text shows a Text icon in the Links panel, much like a locally linked text or spreadsheet file. The Link Info shows the path to the CC Library.
- You can Alt/Option-drag the text asset from the CC Library panel (or right-click the asset and choose Place Copy). This copies the formatted text from the library but doesn’t link it. If the library text changes, the copy won’t be updated.
- You can also Shift-drag the text asset from the CC Library to import the text without saving any previous formatting (or right-click the asset and choose Place Without Styles). You could use this when you want this text to match the styling of text already in your document.
- If your insertion point is already in a text frame, right-click and choose Place Inline to insert the text asset. The incoming text also forgets its styling and matches the existing text frame formatting.
Note that there is no option to link to text in a CC library without including formatting information. For example, you might want to put text such as a phone number in a CC Library and then link to it from several documents, formatting it differently in each file. That isn’t easy to do currently.
Exchanging text with Adobe lllustrator CC 2018
If you’ve ever tried to exchange formatted text between InDesign and Illustrator, you’ll be relieved to hear it is finally possible with CC Library text. (Of course you also need to be using the CC 2018 versions of both InDesign and Illustrator.) When text is exchanged, the applications maintain the styling to the highest degree possible. Any text property which exists in both applications will be maintained.
For example, if you created some text in InDesign which was formatted with Adobe Garamond Pro, 12-point size, with 14-point leading, a first line indent, the color blue, and Keep Options, Illustrator would convert all the values to matching values in Illustrator. But the Keep Options would be dropped, since that feature doesn’t exist in Illustrator.
To place the formatted text in Illustrator CC 2018, drag without a modifier key from the Library panel. Or, drag with the Shift key to place unformatted text. Unfortunately, at this time, Illustrator doesn’t support linking text to a CC library.
TIP: You can tell which application created the text if you view the CC library in List view. An AI or ID icon on a text asset indicates the originating application.
Editing a text asset in CC Libraries
You can edit a text asset in a CC library. To do so, either double-click the asset or right-click and choose Edit. A temporary file opens in the text’s original application. Make changes to the text and/or formatting, and save the file. InDesign-created text assets must be edited in InDesign. Illustrator-created text assets must be edited in Illustrator (Figure 7B).
If an InDesign file with a library-linked text asset is open when the asset is updated, the InDesign file is updated immediately. If it is closed, it will be updated when the InDesign file is opened (Figure 7C).


Figure 7: Formatted Adobe Illustrator CC 2018 text was added to a CC library (A). The text asset was Place Linked into InDesign CC 2018, creating a link to the library. Later, the library asset was edited in Illustrator (B). The InDesign copy of the library asset is automatically updated. The cloud icon on the text frame indicates a library linked asset (C).
Font Classification and Font Similarity Filters
InDesign has added new font filtering features in the Character and Control panel Font menus in InDesign CC. Previously, we have been able to filter by favorites and by Typekit fonts. InDesign CC 2018 adds two more filtering features—Font Classification and Font Similarity (Figure 8).

Figure 8: Font Classification categories can be filtered in the Font menu (top left). A Font Similarity filter can also be displayed. A new black status strip indicates which filters are turned on.
Font Classification
You can filter fonts in InDesign’s font menus using a Type Classification filter. Over the years, typographers have devised various systems to classify fonts. Adobe picked eight of the most common categories for filtering fonts in InDesign CC, as well as Illustrator CC and Photoshop CC.
- Serif
- Slab Serif
- Sans Serif
- Script
- Blackletter
- Monospace
- Handwriting
- Decorative
Font Similarity
When the Font Similarity filter is turned on, InDesign will search for and display fonts that are visually similar to the currently displayed font. Illustrator CC and Photoshop CC have matching Similarity filters, and the results are usually very close to those you’ll see in InDesign.
Applied Filters Notification
It’s common for users to forget that font filtering is turned on and to think some of their fonts have disappeared. So another welcome addition is a black status strip that appears at the top of the font list whenever filtering is applied. This includes filtering for Typekit fonts, favorite fonts, font similarity, or font classification. You can see this black strip in Figure 8.
Duden Hyphenation and Spell Checking for German
For InDesign users who publish in the German language, a most welcome new feature in the upcoming InDesign CC 2018 will be native InDesign support for the Duden dictionary. Duden is a well-respected dictionary authority in Germany (similar to Webster’s in the U.S.) that allows for more accurate hyphenation and spell-checking of German words.
Additionally, InDesign will include a new, updated German language variant in the Language drop-down menu: “German: Austria 2006 Reform.” The new dictionary and Duden integration will also be supported in InCopy and InDesign Server, to smooth German language workflows that incorporate editorial rounds and automation.
InDesign has supported the Proximity and Hunspell dictionaries for German, just as for the other language dictionaries, but knowledgeable users of German consider them inferior. Often, they require the InDesign user or their editor to manually check every auto-hyphenated German word, many of which need correcting, before a project can be published. Using the new Duden options, InDesign’s auto-hyphenation and spell-checking will be much more accurate.
You can read the official Adobe announcement about the Duden dictionary support here. Also, Tim Gouder, author of the German language InDesign-Blog.de, has posted video showing the new Duden features.
If you don’t speak German, here’s how you’ll soon be able to use the Duden dictionary for the German language:
- Choose Edit > Preferences > Dictionary (Windows) or InDesign > Preferences > Dictionary (Mac OS)
- Select one of the following languages from the Language drop-down menu:
- German: 1996 Reform
- German: 2006 Reform
- German: Austria 2006 Reform (a new option in this release)
- German: Swiss
- German: Swiss 2006 Reform
- Choose Duden from the Hyphenation drop-down menu, if it’s not selected by default. At the bottom of the dialog box, under Duden Dictionary, select Show Duden Hyphenation Options.
Duden Hyphenation
Duden hyphenation options are available (1) when creating a paragraph style in the Hyphenation panel, or (2) in the Paragraph panel menu or Control anel menu > Hyphenation (Figure 9).
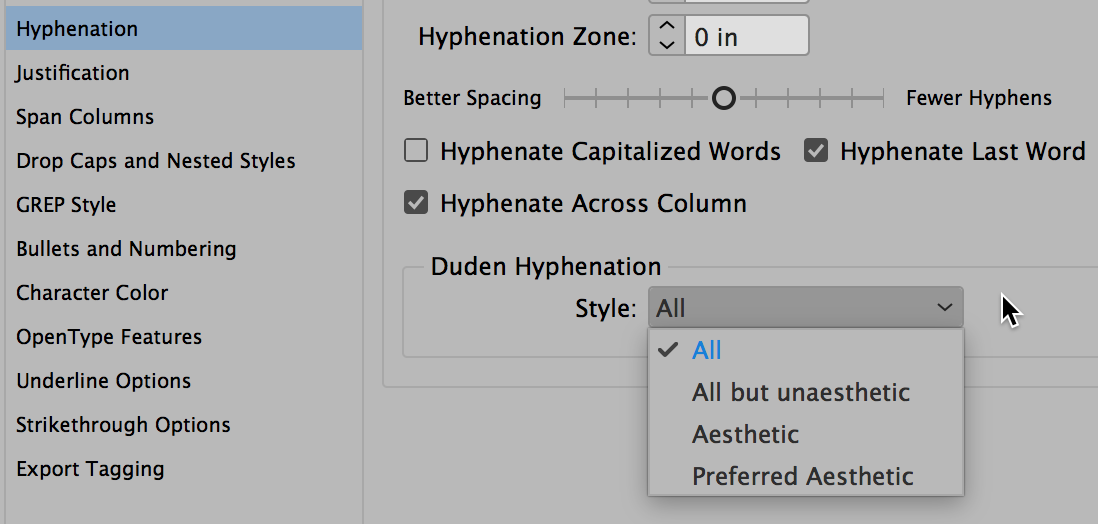
Figure 9: The Duden German dictionary provides improved hyphenation and spell checking.
The following Duden hyphenation styles are available:
All: All hyphenations that are technically “correct.” For example, both Auto-bahn and Au-tobahn are correct.
All but unaesthetic: All possible hyphens (but no unaesthetic hyphens).
Aesthetic: Only hyphens that have been explicitly marked as aesthetic hyphens (Auto-bahn but not Au-tobahn)
Preferred aesthetic: Uses aesthetic hyphenation if possible, but falls back to normal hyphens for words longer than 6 characters and without aesthetic hyphens.
Spell Checking
There are four spell-checking styles for the Duden dictionary, and based on the style you select, one or both the variants are accepted. Duden is selected by default. You can select other options from Preferences > Dictionary > Spelling. The following options are available:
Duden: Only the correct variation recommended by Duden is accepted. Other variants are marked as errors.
Conservative: Accept only old spelling variants like Delphin but not Delfin. Similarly, Graphik is accepted but not Grafik (ph instead of f).
Tolerant: Accept any valid spelling. For example, both Graphik and Grafik are correct. Similarly, both Delphin and Delfin are correct.
Press agencies: Same as Duden recommendations but with a different rule set agreed by multiple press agencies and publishing houses.
We’re sure that our colleagues who work with German text in InDesign will be more than pleased by this addition to InDesign CC 2018.
Export HTML Improvements
If you’ve ever tried to export HTML from InDesign, you’ve probably noticed that it loves to add class and id tags to almost every paragraph and object—it can be very overwhelming and a pain to clean up. Fortunately, a new item in the Advanced panel of the HTML Export dialog box—labeled Don’t Include Classes in HTML—allows you to exclude all these extraneous materials. It removes the class and id attributes present in the tag, and even many redundant div tags present in the HTML, to create clean-looking HTML and remove unnecessary grouping of content.
In addition, in the Edit All Export Tags dialog box (which you can find in the Paragraph Styles panel menu), you can now specify whether to include classes in exported HTML for individual tags (Figure 10).
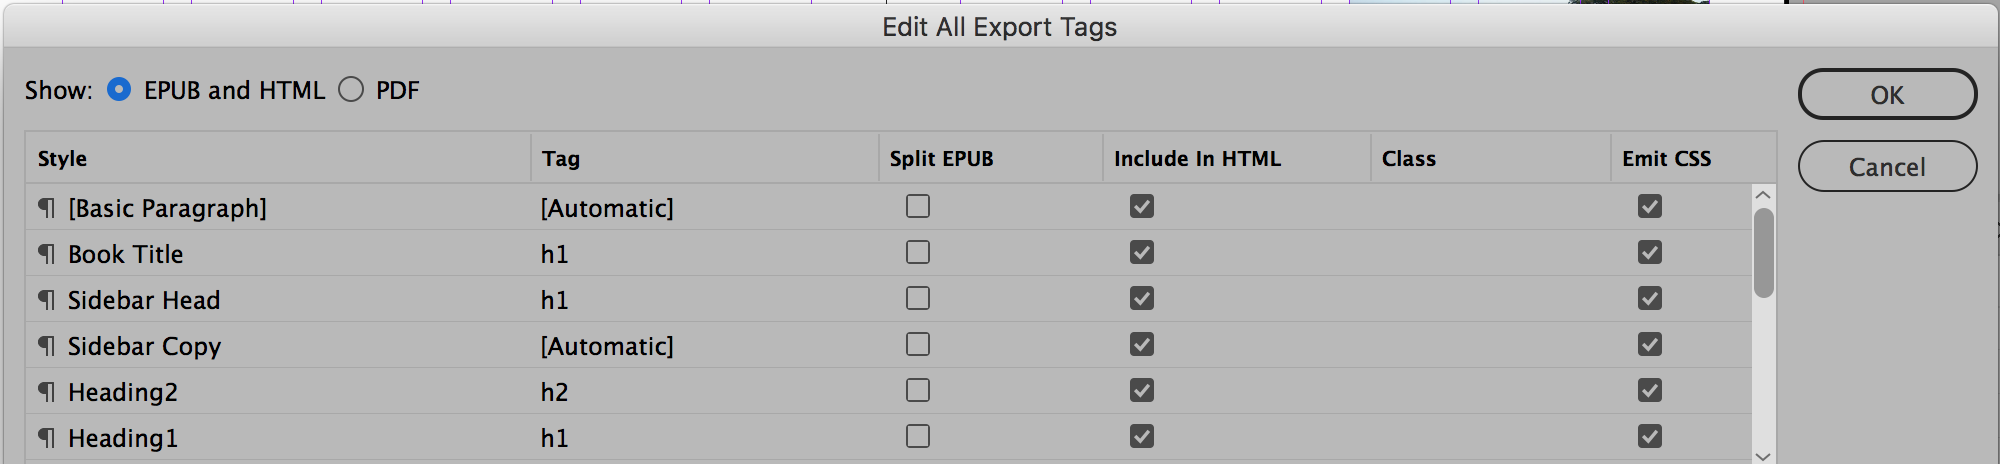
Figure 10: You can now control which classes are included in HTML when exporting.
Smaller Enhancements
There are also some minor (but welcome) new features and fixes.
Ability to Add Gradients to a Swatch Group
Several versions ago, when InDesign added the ability to group swatches in the Swatches panel, gradient swatches were excluded. Now, in CC 2018, you can add gradient swatches to a group, or create a gradient swatch directly within a group.
PDF Accessibility Enhancements
PDF accessibility has been much improved in InDesign CC 2018 with several enhancements. Professionals who need these accessibility features will find this InDesign version is a major advance. The enhancements include:
- Alt Text: In earlier versions of InDesign, you could not tag InDesign native objects and graphics as figures in an exported PDF. Now you can do that using Object > Object Export Options, and Adobe Acrobat and screen readers can read the alt text (Figure 11).

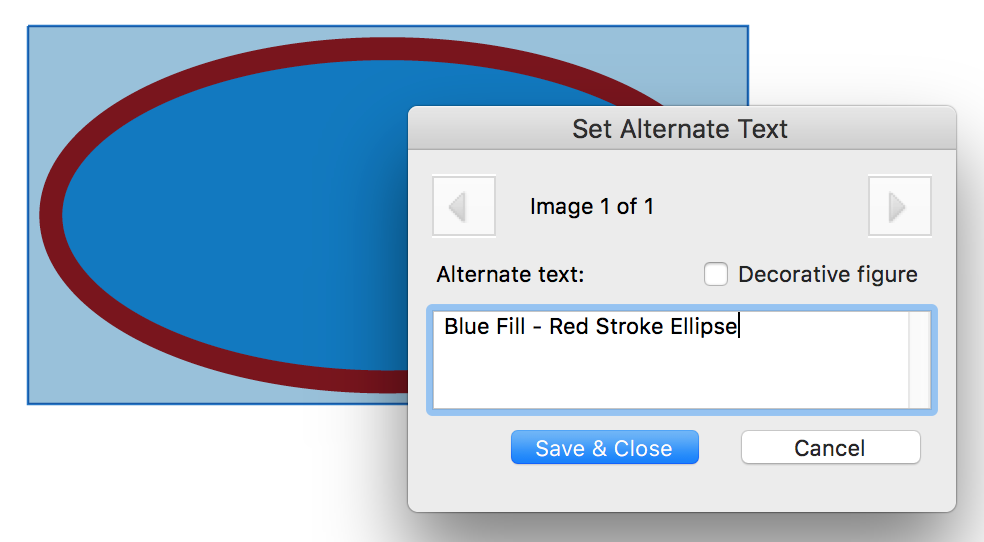
Figure 11: With new PDF accessibility features, you can use the Object Export Options dialog box to tag an InDesign native object (A). The results can be viewed in Adobe Acrobat and recognized by screen readers (B).
- Footnote Tagging is now properly supported.
- Anchored Text Frames and Anchored Groups Tagging are now properly tagged.
- Master Page Tagging is now handled properly: page objects on a master page now correctly show an artifact tag in Acrobat. When a master page object is overridden, it will now show the tags of such an object.
- Index Tagging: Now indexes are properly mapped to index only (rather than simply mapped to paragraph).
- Language is exported in the tagged text as set by the user.
- List Tagging: The correct structure of nested list tagging is exported.
- Caption Tagging: A Live Caption now gets a caption tag as a child of a figure tag.
- TOC: TOC tagging structure is now implemented. It is mandatory for a TOC with hyperlinks to have tags.
Start Screen and Recent Files Changes
- The Recent Files workspace previously introduced has been removed. Small improvements in organization have been made in the Start Screen.
- New Document Dialog Box for MENA Versions: Beginning with InDesign CC 2018, MENA (Middle Eastern and North Africa) versions can choose from a variety of templates previously only for Roman languages.
Ability to Remove Forced Line Breaks in TOC
There is a new option to Remove Forced Line Break at the bottom of the Table of Contents dialog box (Layout > Table of Contents). This automates one of the most common clean-up actions users take when building tables of contents.
Application Name and Version in Application Bar
In InDesign CC 2018 and some other Creative Cloud 2018 applications, the application name and version now appear in the Application Bar. That could make it easier to distinguish application windows. Unfortunately, this feature is more likely to be seen on a Mac, since Mac menus are part of the operating system UI and are displayed above the window. In Windows, the menus are on the Application Bar, and most Windows displays may not have the space to show the feature.
Stability and Speed
Many common sources of InDesign crashes have been fixed. Plus, Adobe’s internal tests show an average reduction in launch time in InDesign CC 2018 by 30% compared to CC 2017.
Bugs from Previous Versions Fixed
Over 20 bugs were fixed, including the following:
- Bigger Fill and Stroke icons in the Swatches panel and Tools panel
- InDesign CC 2017.1’s new “flat interface” made some fields (e.g., in Spell Checking) virtually invisible. These have been fixed.
- Paragraph Shading color no longer changes in a document when opened in a new InDesign version.
- Transformation values that appear near the cursor weretiny on a Retina display device and are now enlarged.
- Problems with scrolling in the Glyphs panelhave been resolved.
- The reference point widgets on the Control panel and Transform panel have been enlarged.
Opening InDesign CC 2018 Files in an Earlier VersionIn the InDesign CC 2014.2 update (January 2014), a feature was added which makes opening newer versions possible if you have a Creative Cloud subscription. If you have an earlier version of InDesign CC, CC 2014, CC 2015, or CC 2017, when you attempt to open an InDesign CC 2018 file, you’ll see a dialog box. It will tell you that the file needs to be converted to your version. It also warns that features in the newer version may be modified or omitted. All you have to do is click the Convert button, and the Creative Cloud will convert it.
A Good Year for InDesigners
InDesign CC 2018 includes a pleasing mix of major new features and minor enhancements that should gratify a large audience. In addition, it makes progress with greater stability and faster launch speed, and it fixes bugs introduced in earlier versions. I’m looking forward to using it!
Great round-up of the features, Steve! It’s nice to see that Adobe is making some real progress with new features, and building on older features again. Thank you.
Hi, did they add by default, the features for (mena) version, like rtl. Thanks.
Ghaleb: No, they did not add any other RTL features into InDesign. There is still the ME version of the software, and also the World Tools suite from in-tools.com (I am not sure if it is updated for 2018 yet).
Unfortunately, the World Tools suite from In-Tools isn’t even updated for 2017 yet. Has In-Tools gone defunct?
i can do right to left in indesign cc. i haven’t used in-tools in a couple of years and I do a lot of hebrew.
WOW! Endnotes!
You never thought the day would come, right? ;)
Nice rundown Steve! Thanks!
Awesome article, thank you!
I know it’s a tiny thing but being able to remove forced line breaks from a toc entry is really big for me! Especially because I do a lot of epubs. Very nice! :-)
When I write an article like this, I try to be as thorough as I can. One important reason is that Adobe’s documentation is now only available online, and it’s skimpier than it used to be. So essentially, what we write in our articles here on InDesignSecrets.com, and what we deliver in our conferences is often the best documentation for how things really work!
Thanks Steve! What a great resource.
Great to hear about endnotes, but as I can see, there seams to be nothing about better OpenType support, variable fonts or colored SVG fonts support (which are now both supported in Photoshop and Illustrator)?
Finally some new little things to play with this time but let’s face it, we have set the bar very low. Nice summary Steve by the way.
I didn’t believe Adobe would ever include endnotes, Mike. I’m still reeling from the shock…
I did a Lynda.com title on the new features in InDesign CC 2018, just went live:
https://www.lynda.com/Design-tutorials/InDesign-CC-2018-New-Features/624300-2.html
Does it fix the issues with High Sierra?
Tom-
That fix came with the macOS High Sierra Supplemental update released last week. You need only apply that update to fix the cursor bug issue with InDesign.
Thanks for the great summary of the new features!
It’s great to finally have the Endnotes feature and also the simplified HTML export. That was a big pain before.
Last time they did a major update they didn’t tell the plugin makers. It took months to get updated versions and some, like In-Tools style utilities, still are not available for 2017 (as far as I know).
Was it better this time? Any idea how soon things like DTP Tools, Typefitter, MultiFindChange, and other plugins will be available?
The long drought is over! This is a great set of improvements. They hit almost all my must haves and the most important exception, better dictionary options, may get carried over from the enhancements to the German version. Adobe, Apple and Microsoft either need to invest enough in Hunspell to make it valuable or come up with an alternative.
You mention improvements to HTML export. It’d be interesting to hear from someone who knows what improvements have been made to ePub export.
I just got through watching Anne-Marie’s new title on Lynda.com on the new features in CC 2018 (she referred to it above). She caught something I didn’t: The Export dialog for Reflowable EPUB > HTML & CSS tab has the same settings for Include Classes in HTML. Also, the Paragraph Styles panel control for tagging allow you to choose which paragraph styles export classes and they work the same as HTML export.
Is there a way to convert footnotes to endnotes? Or am I just wanting too much? Sometimes my editors don’t make this decision until well past the Word stage. Will I need to give them a talking to?
Thanks you.
There is no way to convert between Endnotes and Footnotes, but we brought it up as a necessary request during the beta. I would encourage you to file a feature request as well. Finally, I will have a full feature deep-dive on the new Endnotes features in an upcoming issue of InDesign Magazine.
I wondered that too and did my best to look at the screen shots as they appear in videos. I couldn’t see any way built-in nor is there any mention of that in the documentation I have read.
It might be done with a text-tweaking script that’s working with an IDML file, but those smarter than I would have to check that out. And footnotes and endnotes affect the book layout in such different ways, that may not be possible.
Then again, maybe someone could create an ID script that goes though a document, finding a footnote, grabbing its text, deleting the footnote, and then creating an endnote with that text at that same location. That’d probably require using the search function. I just checked and the search panel has the usual “include footnotes” for a search, but I seen nothing about “include endnotes.” On the other hand, under Find-Markers there is now one for Endnote Reference Marker as well as Footnote Reference Marker. That might offer an opening.
I checked the new scripts and couldn’t find one whose name suggested it might do this. Perhaps someone with scripting skills could give us this most useful of tools.
Real endnotes are such a plus for your company’s workflow, it’s not asking to much for those editors to make the endnote/footnote decision a bit earlier. I’m certainly looking forward to this new feature. The science texts I layout typically have thousands of footnotes in the Word originals that have to be tricked into becoming pseudo-endnote within ID. Editing those has been a pain. This will be far better. Other than that footnote to endnote conversion, this new feature seems almost complete.
Found this hidden in the fine print….
Also, for the first time since the introduction of Creative Cloud five years ago, a modest adjustment in commercial pricing will take effect for North America customers only on March 1 or at existing customers’ next contract renewal. Through March 1, new subscribers will benefit from current pricing and not see any pricing adjustment until their first annual contract renewal. Pricing will vary by plans – for example, CC for Individuals All Apps annual plan will increase by 6 percent from $49.99 to $52.99.
Adobe are charging us £59 in the UK.
Good luck everybody updating. I will wait for your beta-testing results before I move my 1000+ files… I hereby swear ;-)
Let’s go to the Winchester, have a pint, and wait for this to blow over. ;-) Also waiting.
Still no full preview in the Mac Finder?
Still a bug where the scrollbar on the Pages pallet is at the top when not showing the first page.
Good to see the copy/paste tables header missing is now fixed.
And another annoyance is with the book panel, I set to ‘small panel rows’ but when I re-open they’ve gone full size again…
I have that as well in third party plugin (Cacidi) that small panel/preview setting is always jumping to some pref in Indesign thats nice tucked away never to be seen again.
Also important to note that just like before, Adobe has set the Advanced Options default to “remove old versions” of InDesign (and other apps too). I keep multiple versions of InDesign because a) the file formats are different and b) I have a lot of plugins that are not updated yet.
For apps like Photoshop or Dreamweaver I don’t need to keep old versions so I let Adobe uninstall the old one when installing the new one. But even if you had set your Advanced Options to turn off “remove old versions” the last time you updated InDesign, the new one is still preset to remove them. So, if you aren’t careful it looks like it will remove ALL of your earlier versions of InDesign.
Hi Matt,
Could you tell me where to find the Advanced Options panel?
I am practically salivating at the thought of the endnote function (with Word import!) but I have to keep CC 2017 installed for current projects.
Never mind, I happened upon it elsewhere :)
https://forums.adobe.com/thread/2172589
Endnotes here we go! And thanks, Adobe!
In the CC desktop app, as soon as you click Install, you’ll see the Advanced Options panel button. Click on it and you can choose (1) whether to migrate settings from the previous version, and (2) whether to delete previous versions.
Here’s a detailed description of how to create three paragraph styles to get one border around multiple paragraphs:
https://www.bergsland.org/2017/10/book-production/book-design/software-review/indesign-cc-2018-adds-borders/
He also makes a useful suggestion for using this new feature. When you’ve got sidebars in a print document, there’s no way to do that in a reflowable epub, particularly one viewed on a small smartphone screen. He suggests converting those sidebar paragraphs to bordered, shaded paragraphs. That’ll make them distinct from the normal text flow.
Thanks Steve, for sharing these.
Great update!
To make it easier to get the border and shading settings to be the same, I wrote a script called “Equalize Border and Shading Options”: https://www.id-extras.com/equalize-border-shading-options
so handy! thanks Ariel!
Good Morning.
I need help with footnotes.
I have a job that requires the use of two types of notes. One type corresponds to traditional footnotes and a second type where other references are placed but independent of the first type.
Is there any way to create a second continuous note system as the first type?
Thank you
Delfim,
Rather than highjacking this already extensive set of comments on the new features of CC 2018, why don’t you post this in the FORUMS section of InDesignSecrets.com? It will probably take a few questions back and forth to determine exactly what you’re trying to do, and that doesn’t work well here. Good luck to you in finding a solution!
Delfim,
Someone named Liturgia asked a similar question on the Adobe forum this morning. Here is a link:
https://forums.adobe.com/thread/2390084
Now if only they would some of the features of Excel….
Excel? What, specifically, are you looking for from Excel for this document-layout program?
Thanks Steve for this thorough feature update article!
Thanks for a great update! So happy to see endnotes finally included, as well as the removal of line breaks in TOCs. Both are huge improvements for book designers.
thats pathetic. They gave you literally a few minor updates, after years, and one essential – endnotes – after 10 years? …. Its not even 0.1% of most expected features from request list. This IS sick.
In this rate we will get rest of fundamentals after 100 years or more. What a great indesign team.
matt: What do you mean “expected features from request list”? What features do you think they should be focusing on and why? Have you posted them on indesign.uservoice.com?
Hope the export for accessibility fixes the span tag problem. Pretty much everything in CC2017 is tagged ‘span’. Random tags of H3 (why did H3 get the guernsey??) are applied. No apparent reasoning.
Looking forward to trying it out when my government department finally gets to updating (probably mid 2018!).
Thank you Steve.. Thorough overview and a Great “sigh of relief to long-time InDesign users.” Quark has been trying to get me to come back, I wasn’t even considering it, but this release pretty much “puts the nail in the coffin” just in time for Halloween! This will be a Treat!
Now maybe an easy-to-use, functional INDEXING feature will move up the list of features to add. Currently, it seems the only way to remain sane creating an index is with a plug-in. For those of us who work mainly on books, this would be astronomically appreciated (that is, really really a lot).
I fully agree Susan. There are few tasks I find more miserable than indexing a book with InDesign. It is an utter grind. When Adobe’s ID team was in Seattle and I lived there, they were quite open to my suggestion for an iPad app that’d communicate with ID on a Mac, creating an marvelously easy-to-use UI for spinning through a long list of index entries to find the right one. Just flip down that long list and tap on an entry—it would be great. The iOS app would be designed to make common but tedious ID tasks easy, taking full advantage of a touch UI.
The hitch is that scheme needs Apple to innovate an iOS app to macOS communication link and genuine innovation has deserted the company. They’d rather add emoticons for users who’re assumed to be developmentally halted at kindergarten. And if you visit the Mac websites, you’ll find that some Apple fanbots really have done that.
The problem is that Adobe’s panels, including the indexing one, are general purpose tools much like Swiss Army knives. Intended to do all things, they do nothing well. Adobe could deal with this problem with another set of features. They’d look a bit like general purpose panels, but be designed to do one specific task well. But given the still-slow pace of ID development, we might have to wait a long time for that.
Adobe’s core problem is different from Apple. Adobe’s executives envision themselves as Steve Jobs announcing wonders to awed fans at a Big Event. Creative Cloud should be giving out updates as soon as they’re done, perhaps every couple of months. Those executives prefer that ego-gratifying Big Event where every change in the past year or more to every app gets announced at once. From a user’s perspective that makes no sense. They have to wait a year for a feature that misses the Big Event by a few weeks. Tight deadlines like that also mean bugs slip through.
Like you suggest, third-party scripts are the best answer available to us now. I’d love to see one that makes indexing less a chore. I’ve already mentioned the need for one that converts between footnotes and endnotes, either en masse or one at a time. I’d also love to see a better UI than the one the S&R panel offers, particularly one that makes hitting “replace all” more difficult. And I’d love to see a S&R that offers two or more replace options. I often have to clean up book texts, converting hyphens to either an N-dash or an M-dash. When there are hundreds of them, doing the scan twice is a pain, particularly given the number of web references with hyphens that must be skipped. And yes, having an ability to do searches that exclude specific paragraph and character styles would also be nice.
Perhaps the most significant bit of good news in this release is that the ID team in India has now familiarized themselves with the ID code base and should be churning out updates faster. Their one limitation may be the same one that ID’s Seattle team faced—getting enough funding out of Adobe’s tight-fisted bean-counters to make those changes. When I lived in Seattle, I suspect that some on the ID team were putting in more hours than they were getting paid for. They really were that dedicated. I miss them.
Michael,
I assume you do know that most of the items you wished for in your post ARE available as scripts or plugins? I use MultiFindChange for every book – I routinely have query sets of betwen 75- 100 find/changes that I run for all of the cleanup and formatting. I’ve also used scripts by Peter Kahrel to work with endnotes/footnotes. I don’t do much indexing because it’s such a pain – we usually get that done by a professional indexer. But if you have any questions about how to do the other stuff, ID secrets has it all covered in the forums.
Not to say that Adobe shouldn’t be doing these things. I agree that they view InDesign as a finished project and probably only have it worked on by interns. They don’t talk about it at Adobe MAX. It’s not sexy. They only seem to care about new buzzwords that raise their stock value. I wonder if the top execs have ever even tried to use the software.
Hi Michael:
We use Virgnia Systems’ Sonar Bookends IndexPro for our indexing. Despite an installation process that will set your hair on fire and horrible documentation, it really does the job. Once you get the hang of it, you only have to format one set of keywords, do some funny but easy stuff with acronyms and plurals, and it finds all the instances in your book.
I wish Adobe would buy this software, easy up its installation and write some human documentation, and problem solved. Although who knows if the owner even wants to sell.
Hi Susan,
Have you tried IndexMatic Pro? If so, how does it compare to Bookends IndexPro? IndexMatic is a lot better than InDesign’s native indexing feature, but I’m wondering if there’s a better alternative out there.
Even though the much longed for endnotes ability has appeared, I’m still not impressed. Sticking with CS6 and Mavericks which, I’m really disappointed to say, means I’ll never be able to buy a new Mac because CS6 won’t run on the latest OS :( (heavy sigh!).
Not impressed at all. No real new features, I understand people who need items such as Endnotes, but Indesign is getting pretty stagnant in many areas.
One of the few desirable features in the latest Xpress is the ability to convert imported PDF’s to native, editable objects. I would like to have seen this in Indesign.
Furthermore; why are the panels still so large?
Trywing out the linked Text, I found it got auto updated, not giving me the choice to update as shown in the Lynda course video. Any setting I missed?
Wa,
I don’t understand what you mean by ” I found it got auto updated, not giving me the choice to update as shown in the Lynda course video.” Can you please explain further.
As I edit the ‘original’ library text item and save it, all ‘child’ instances of the linked cloud text get auto updated. In the Lynda video you see a pop up that allows to update (warning local edits may be lost) to be cancelled (so not update the link). I do not get that, all instances are updated automaticly, indeed loosing all local editing of the placed library text without warning…
Trying out the linked Text, I found it got auto updated, not giving me the choice to update as shown in the Lynda course video. Any setting I missed?
I think you get the option if the file that contains the child instances of the linked cloud text are CLOSED when you edit the text in the Creative Cloud Library version. When you open that file, I think you’ll see the update option.
Maybe Anne-Marie can shed some light on this because I see this happening in her video while the document is open and she clicks in the text frame. It is also very bad that this woukd update without asking me. I must be misd g some setting I feel…
Wa, sorry it took me so long to reply. I’m sorry, I can’t replicate what you’re seeing — losing all local editing without warning.
Here’s what I see, and just double-checked:
When you update the linked text (that is, editing and saving the instance in the CC Library), and you switch to a doc with a placed/linked instance of the CC Library text item, you’ll get the alert about losing all local editing if you update the linked item (and you have the option not to update by clicking No in the alert) in three situations:
1) You’ve made local edits to the item, and the doc is open
2) You haven’t made local edits, but it’s an Untitled (unsaved) document
3) You open a doc containing the item in its old state.
In all other instances, linked text automatically updates. For example, if I’ve placed the linked text into an open doc, did not edit the text, and saved it. As I said in my video, if you don’t want an instance of linked text to ever change, even if the original CC Library item changes, then you need to select its entry in the Links panel and choose Unlink.
Matt: “I assume you do know that most of the items you wished for in your post ARE available as scripts or plugins? I use MultiFindChange for every book – I routinely have query sets of betwen 75- 100 find/changes that I run for all of the cleanup and formatting. I’ve also used scripts by Peter Kahrel to work with endnotes/footnotes.
I have used the endnote/footnote script, but I didn’t know about MultiFind/Change. Those who develop third-party scripts have the same problem I face as an independent writer on medical topics—getting visibility.
Michael –
I understand your frustration, but don’t wish to hijack this thread by diving any deeper into corporate culture.
Here is the link for MultiFindChange: https://www.automatication.com/index.php?id=24
I hope that helps speed up your work, at least!
Just reading numerous reports of major problems with this New Version.. Almost went for it but glad I didn’t. As Archie Bunker once said, “Wup-Dee-Doo!” Not worth the trouble of updating and watching it implode… Been doing these New Features the old way for decades and we survived just fine!
Has anyone successfully upgraded to ID-v13 while running Yosemite (10.10.5)? Adobe’s sys reqs page says the new ID supports 10.11/12/13; no mention of 10.10. For a variety of reasons I need to remain on Yosemite. Any experiences would be appreciated.
Barry: I haven’t tried. It would not surprise me if they’re leaving 10.10 behind, though. It may still work, unofficially.
I think Adobe has only one programmer for indesign)).
What situation this wrong page numbering in book (Absolute vs Section Based page numbering bug)?
What situation with threading of linked excel tables (they don`t thread when they are in text).They thread only as separate story.
There is no automatic section numbering like chapter and page numbering. So you can`t use section based numbering.
Where is no prefix field in number field of numbered list, so you can`t make cross-reference to number only (not to “Figure X” but to “X”), cross-reference feature has possibility to get only first part of paragraph,but not the second.
Where is possibility to drag section or subsection in another place like in word navigation panel?
Many great updates in 2018. Though I wish Adobe would have added a corner / middle point section area in the Transform Tool.
So Many great updates in 2018. Though I wish Adobe would have added a corner / middle point section area in the Transform Tool. This idea and my mockup is in my profile picture – when it updates!!!!
Great new feature roundup! Glad there are some meaty new features this go-round! Now off to watch Anne-Marie’s Lynda course to get completely updated!
How does one go about updating to ID 2018? I don’t see the option in the CC app. What am I missing?
Did you update the CC app itself, first? My CC app has been trying to update for two days and keeps stalling. I might actually get ID installed by the start of 2018 if I’m lucky!
Kelly: Are you still running MacOS 10.10.5 (Yosemite)? Like you, I also don’t see the 2018 versions. Adobe requires 10.11 (or later) for the 2018 CC apps, so if you’re like me, it’s time to upgrade the OS. Le sigh.
This is odd. Indicators that installed apps were ready to update showed up on the Apps pane of my CC app a week ago. Are you showing ‘all apps’ or ‘installed apps’ there? I don’t think I had to restart the computer or reboot the CC app before they appeared but it might be worth a try.
Okay…I had to sign out from the CC app AND from my account on my Adobe account page. Re-signed in, the CC app updated and ID is there. I did notice that it doesn’t actually say 2018…it’s listed as InDesign CC…which led me to believe it was my old version (since I’ve kept the old versions installed)…but it’s there. And I may actually have the patience to install it over the weekend!
An additional minor comment: if you install ID 2018 and keep ID 2017 installed as well, note that in the Mac OS ID 2018 takes over the file associations. So, if you want to keep working in 2017 while you familiarise yourself with 2018, it might be worth while going to Get Info and resetting the file association to 2017.
And still no paragraph column rules. I’m constantly amazed how lazy Adobe are
That’s what scripts are for! I love the InGutter script for column rules.
Has anyone brought up fixing the size of the adjuster sliders in the tabs ruler of text? There really should be a mouse over action that grows and separates the sliders allowing us users to pick which slider we want to grab. Right now it’s a silly game of trial and error with those tiny hard-to-grab buggers.
FINALLY someone brings up the gawd awful tab ruler. I always set bullets with hanging indents from the tab ruler and I keep hoping that eventually Adobe will fix this and make the tab ruler easier to work with. Right 100% correct, it’s a silly game of trail and error.
Totally agree. Its a mystery why they don’t do anything about the old tabs window. It is very hard to adjust and move these small arrows – especially if you are using a pen which many InDesign users are. Very often you just want to know the position value of a certain tab, and so it’s very difficult to select it without moving it a bit. There should be a button to select the next or previous tab so it could be adjusted individually – either by entering a position or using the arrow keys to adjust the value field.
Can anyone tell me how to tag (for 508 compliance) VECTOR objects (made in Illustrator)? This just plain does not work. Just downloaded CC2018… same crap.
Here’s another feature we need in Indesign…When are we going to get tables that allow large cells to break onto a second page?!
Okay another feature needed. Just like object styles now allow for size and position…how about adding this same feature to cell styles. I always build my org charts with tables that have two rows, so that it makes it easier to when adding text, then the tables expand to accommodate. But when you only want the expansion to occur width-wise, one has to do it manually to all the tables.
Thanks for the Arrowhead fixes on strokes in the last version…that was a deal breaker before, leading me to use Illustrator. I only use Illustrator when I need to…too damn ram hoggy. There’s such little difference between ID and AI you all should just combine them. Heck, the only reason to go to illustrator is for that wonky bar/pie chart tool, and 3D stuff.
Here’s something that needs fixing really quickly. I found out the hard way. We used to use Incopy…oh brother. Once those linked files are created you’re in for a surprise. If you Alt+drag a text box in order to efficiently create another to create new type in, those incopy files will change to reflect the last box copied and all your boxes will have the same text in them! I build org charts that way, and when I had edits to make, i.e., adding 25 new names by Alt dragging copies…that ended that way of efficiency.
John (and Jared and others): This isn’t really the best place to put new feature requests. Instead, I suggest you visit:
https://indesign.uservoice.com
What would be awesome is the ability to select multiple in-line text segments, which is a standard capability on pretty much every program I use for design outside of Adobe products. It is a major hassle to not be able to apply, all at once, character styles and other ad-hoc meta-adjustments that aren’t efficient/possible using find tools.
Um, has anyone else’s swatches disappeared? I have the window, no swatches, and can’t add any like I used to. Not happy!!
Kaz: See this page for information about rebuilding your preferences when things go crazy like that: https://creativepro.com/resources/faq
Thank you! I appreciate the help
Thanks David! :)
I upgraded to 2018 today — and the font I use on all my web wire-fames and mockup files is still on my Mac, but InDesign can’t/won’t find it or read it. I’ve installed it in all the font folders — InDesign refuses to believe it’s there. It’s AppleCasual.dfont. Any recommendations? I’m in the middle of projects and have now lost hours last night and today trying to figure this out.
You’ll probably get a better response if you post this question in the forums, but you might also try the document fonts folder trick. Put a folder in the same folder your file is sitting in and call it Document Fonts. Put a copy of the font in there and restart the app/launch the doc. However, if the font is old, it can be corrupt…do you use fonts management software? That will usually alert you to a damaged or unusable font.
Thanks — I did go to the forums, but actually found better advice here. =-) The weird thing I finally figured out is that InDesign 2018 is calling the font “Casual” not “AppleCasual” (which is the actual name of the font file). It took a while to figure that out. PS still calls it “AppleCasual” — and I did use Font Book to validate that it was installed correctly and not corrupt. It’s been the strangest thing. Now I have a weird thing where all text boxes’ first paragraph is auto indenting. It’s not set at the paragraph, Tab, Object box, etc (I’ve checked every style sheet that exists in the document) and it happens in a new document too. No Line indents, No drop cap settings … ugh. lI have been an IND user since the very first edition when I switched from Quark, and for me this 2018 update has been the most frustrating (or else my memory is going bad). Thanks again! Pauline
A dfont is a Mac system font in which the contents are stored in the data fork instead of the resource fork. Open your copy in Font Book and see if it is corrupt. I’m not sure you should have multiple copies on your machine so check in Font Book to see how many there are on your machine. Font Book will offer to remove duplicates. Someone posted to the forum several weeks ago saying he had the same problem as you have when he moved a package containing a dfont to a Windows machine.
Thanks, that’s helpful LThS! (was that a typo?)
I don’t think the Document fonts folder thing works with T1 or .dfonts. Just TT and Open Type.
Yeah I think you’re right…forgot those were system fonts, right? (how easily we forget)…maybe it’s a permission thing?
Document fonts do work with T1 (old postscript type 1 fonts). Not sure about dfont. Here’s a post about why document fonts sometimes don’t work: https://creativepro.com/document-fonts-work.php
But my guess is that Erica’s suggestion that the dfont may be corrupt is the problem. Dfonts are not reliable and should not be used for professional work. I suggest finding an opentype version of that font.
Correct. =-( But I got it figured out — see above. Now I have a new weird issue …)
Thanks for this great overview Steve
Steve, You wrote above: ‘But InDesign CC 2018 adds the new Size and Position Options choice in the Object Styles dialog box … Note that the new options support not only independent objects like text or unassigned frames; they can also be applied to anchored objects, tables, and image frames.’
As far as I can tell, one can only apply an object style to, and record the size and position of, the text frame in which a table is placed (in line with a paragraph), not to the table itself. I was wondering what you meant when you wrote ‘can also be applied to anchored objects, tables, and image frames’. Am I missing something?
Thanks,
Lindsey
About the index: the article says:
*Index Tagging*: Now indexes are properly mapped to index only (rather
than simply mapped**to paragraph).
Can you explain what this means? Is it mapped to index “entries”?
I’ve jumped from CS 5 circa 2014 to the CC2018 — and now my photos won’t resize. I see that I need to “Auto Fit” but I can’t seem to find that button. And do I have to “Auto Fit” each individual photo? This new system seems more complex for a such a simple task. Help!?
* CS6
Hi,
Anyone have tried export endnotes to epub relowable using split document options?
The links are broken.
Regards
Hi Felipe,
I am new to EPUB reflowable and am experience angst with many aspects of this layout. But,the Endnotes conversions are one thing that are working very well for me. 2018 is converting my Footnotes to Endnotes at the end of each chapter without any hassles.
Hope you can solve your problem soon.
Hi,
Nice to know about it. But when endnotes are at the end of each chapter, actually are works like footnotes.
Please, try export endnotes to end all chapters and you will note that the link between refs and text notes are broken. Because InDesign don’t get all path to href in anchors tags
Let’s wait for a new release
Regards
Hi Philipe,
I’m not sure exactly how you are trying to create Endnotes for EPUB reflowable.
If you tick Endnotes in the ‘Text’ tab of the dialogue box (File>Export to EPUB, the process automatically converts your footnotes to Endnotes.
Is this the process that you have been using?
Cheril again
Hi, Cheril
Let me explain better. Footnote feature works great and when I export with split document options checked, all footnotes from each chapter become endnotes in ePUB. This is a regular workflow
But for some projects I want to use split document options and get all notes (from all chapters) at the end of eBook. To manage it I need to start with the new feature – Endnotes in InDesign. As a result, in ePUB I don’t have the link between references and text notes at the end of ebook.
Try to combine the new feature Endnote (InDesign) with split options documents in export ePUB, that you will see this bug.
Best regards!
Thanks for the helpful intro. I have been using InDesign CC 2018 for several days and I have discovered a major issue that makes continued used of it a nonstarter for now. I work on pubs that contain several disparate stories that each have their own story-level (or story scope) endnotes. I found that saving a file that contains endnotes as IDML and then opening the IDML in InDesign CC 2017, causes all of the endnotes to disappear. The number references in the story are gone and the endnotes themselves are gone. There were a few other more manageable anomalies, too. In the same IDML created from InDesign 2018, several two-column text frames that are in a template I have been using without problems for years open in InDesign 2017 with 34 columns!! The moral of the story is, be vigilant and careful when you jump to a new version of InDesign. Crazy things can happen. Losing endnotes in a document saved to IDML is an unconscionable oversight on Adobe’s part. There should at least be a means to convert the InDesign 2018 endnotes to static text (while retaining the numbered endnote references in the story body). If there is a means, I have not discovered it. I need to be able to save to IDML for all sorts of reasons.
New functions have NEVER been backwards compatible with older versions. Your endnotes are still stored in the IDML, but the older version just cannot use them – how on earth could it? It doesn’t contain the actual *code* to deal with them! That said, if you need to have your document opened with older versions, with the live end notes converted to plain text, I suggest posting a request in the Scripting Forum. It doesn’t sound hard to script (but be aware that opening such a ‘flattened’ document again in CC 2018 won’t magically restore the live endnotes either). The column number thing sounds like a genuine bug, though. You might want to report that one to Adobe.
Hi [Jongware]… thanks for your reply. I totally get that older versions can’t handle new features. This is why I raise the red flag about the much-touted new endnotes feature. For people who deal with documents that have tons of story-level endnotes AND who need to exchange files with clients and colleagues who do not use 2018, the endnotes feature is basically useless. It forces you into 2018. As I said, it’s a nonstarter in these situations. And there are tons of great reasons for not upgrading to the latest and greatest. The other major problem with the new endnotes feature is that there does not seem to be a way in 2018 to place a document with old style, static endnotes from the get go. It would be great to have that as an option: either live, editable endnotes, or static, old style endnotes. So again, we would have to resort to relying on scripts for what is essentially a feature that was taken away from older version (i.e., static endnotes), or not upgrade to 2018 at all. I don’t claim that the endnotes thing is a bug. I just think it’s terrible software design. It’s a half-baked, problematic feature.
JunesJunes, another option is to report both situations as bugs to https://indesign.uservoice.com/, where other users can concur in comments, and upvote issues. The InDesign engineers pay very close attention to bug and feature reports here; you can see them asking clarification questions via comments in some of the posts.
looks like they forgot to include an option to search for an endnote reference marker, using find/replace. footnote refernce marker is available on both regular search and GREP search.
My guess is that there is actually an undocumented code for making this kind of search. if you know it – please post it here, thanks.
Endnotes is a version 1 product and missing some things. I’d make a feature request here:
https://forums.adobe.com/external-link.jspa?url=https%3A%2F%2Fadobeindesign.uservoice.com%2F
Search ^U. Another useful command: Keyboard Shortcuts …, Type > Go to Endnote Text. I don’t think it appears in the interface but, if one assigns a keyboard shortcut, when cursor is beside the ref. to an endnote, the command will shift the view to the associated endnote. Cmd-Shft-F jumps back. I found I had to open Keyboard Shortcuts several times before the command showed up with its proper label.
As Lindsey points out, you can assign a KBSC to the “Go to Endnote Text” command. It will not appear as a shortcut in the Type Menu, but it will appear as the shortcut in the Contextual Menu, where the command also resides. The nice part about assigning a KBSC to this command is that it acts as a toggle: if you’re at the endnote marker, it will take you to the (end of the) endnote text. If you’re in the endnote text, it will take you to the endnote marker in the main text.
thanks. this really helps
After my upgrade to CC 2018 my CC libraries will not allow me to drag and drop items to my document. Is this just me or has a setting changed?
Found a solution. Relaunched the software.
Can you open CC2018 documents in CC2017?
No, you need to save CC 2018 back as IDML. Or, if you’re online, you’ll get an alert from Adobe the file you’re trying to open was created in a later version, and offering to convert it for you so you can open it. It works pretty well. (What happens is the file you’re trying to open gets sent to Adobe, where they have thousands of interns that take these files, convert them to IDML, and send it right back, all happens in a minute or two.) Just kidding about the interns. ;-)
If/when I upgrade to ID CC 2018 do I need to upgrade InCopy or is it compatible with IC CC 2014? I cannot find anything about this on the forums or on Adobe’s site.
You do need to update InCopy to CC 2018, they should always be at the same version.
Thanks Anne_Marie! As I suspected.
How wonderful to finally be able to position photos in a long document with object styles using the new size and position options. The only issue I have so far is that the x and y won’t accept a negative number so I can’t automatically position a photo with bleeds. Does anyone have a possible solution to this? Am I missing something?
Have they restored white and grey background colour options to Presentation mode? This was such a useful feature and a major part of my workflow when showing my work to my clients…
Alex: Yes, in CC 2018, you can press Shift-W to go into Presentation mode, and then press W, G, or B.
Excellent! Thanks for letting me know, David. :)
SmartStyles from WoodWing updated for ID 2018 today (28 Nov.).
I am getting an error when trying to package a document that is saved to our server. Anyone else? InDesign tells me “Unable to package the document. InDesign cannot access:”{{filename.indd}}”.
When I pull the InDesign doc to my desktop I am able to package, then place the package back into the folder in the server.
I’ve reset my preferences, quadruple-checked all file names, fonts, etc. All is good, it’s like this new InDesign doesn’t want to play nice with the server I’m working from.
“Caption Tagging: A Live Caption now gets a caption tag as a child of a figure tag.”
What exactly does this mean? Would it now be possible to have live captions that update on anchored images?
Excellent Steve! You have filled in a lot of areas I was wondering about.
I also thought Adobe was going to implement a jump back feature: In the endnote itself, it allowed you (within a pdf) to jump back to the source of the endnote? Am I wrong about this?
Robert-
If you choose to include Hyperlnks when you export to PDF, you can click on the endnote reference to go to the endnote text in the PDF. Then, in the endnote text, if you click on its number, you’ll be taken back to the endnote reference number in the main text.
Thanks so much for solving this for me!
what is the difference between idml (expert version) and idml (save as version) ?
I’m so confused
They are the same. Choosing IDML used to be in the Save As dialog only…then they moved it to Export. And sort of left it behind, I guess?
It’s dog slow and uses way too much memory compared to previous versions.
Cannot wait for Affinity Publisher to be released so I can stop using all Adobe’s bloated apps once and for all.