

What’s New With InDesign CC 2019

It’s autumn, so it must once again be time for a brand new version of InDesign! Indeed, Adobe has just released InDesign CC 2019, and I’m pleased to report that almost every InDesign user will find something to smile about. This upgrade brings significant (though often-hidden) changes to the user interface, as well as innovative ways to fit images to frames and to set spacing between paragraphs. A newly revamped font menu gives you more ways to choose and preview fonts. You can import comments from a PDF. And of course there are the usual small tweaks and changes, including some refinements to footnotes and endnotes. Whether you’re a beginner or advanced InDesign user, you’re going to want to check out the new features in CC 2019. (In addition to this article, you may enjoy watching some of Anne-Marie Concepción’s new Lynda/LinkedIn Learning video title that covers each of these new features in depth, InDesign CC 2019 New Features.)
New Version, New Format
It’s important to remember that all major upgrades bring a new file format. This means that if someone using InDesign CC 2019 creates a new file, and you open it using an earlier version of InDesign CC, the Creative Cloud will convert the file backward to your older version. (Or, as usual, you can export IDML for “saving backward.”)
Properties Panel
As you know, InDesign already offers many different ways to apply formatting to text and objects. For example, you can set the font size and leading for a paragraph of type in either the Character panel or in the character formatting controls of the Control panel. Well, now there’s one more: a Properties panel.
Why would you need another panel for applying formatting to text or objects? Adobe has found that InDesign’s plethora of panels and dialog boxes can be confusing, especially for those who are new to InDesign, or who use it less frequently. So, following the lead of Illustrator CC and Photoshop CC, the new Properties panel shows many of the relevant layout commands. And while it doesn’t offer all the same features as the Control panel (which still exists), even if you are an experienced user you may find the Properties panel faster for some of your workflows because most of your needed commands are found in one place.
Like the Control panel, the Properties panel changes based on what’s selected. The mode you’re working in (for example, Text Insertion or Linked File) appears listed at the top of the Properties panel. The rest of the panel is grouped into sections. For example, if you are editing text, the panel configures itself to show sections for Text Style, Appearance, Character, Paragraph, Bullets and Numbering, and Quick Actions (Figure 1).

Figure 1. The Properties panel adjusts its appearance depending on what you have selected. When editing text, the Properties panel displays controls that let you edit text style, appearance, and other properties.
A Work in Progress
When you start working with the new Properties panel, you’ll likely find yourself frustrated because it’s just “version 1” and is a work in progress. For example, when you see an ellipsis (…) at the lower right of a section, clicking it expands the section to show additional choices. However, currently the collapsed or expanded state isn’t “sticky” between sessions, so it often closes even when you want it to stay open.
Similarly, many features don’t appear at all in the Properties panel, and the paragraph and character style controls in the panel are very limited, so if you do a lot of work with styles, you’ll almost certainly want to revert to using the Paragraph Styles and Character Styles panels.
Fortunately, it’s likely that the Properties panel will be further developed in future InDesign versions—that’s what’s has been happening in Illustrator CC and Photoshop CC.
Layout Features
InDesign CC 2019 adds an optional new panel for adjusting layouts. It also adds some new features for adjusting the spacing between paragraphs, changing the sizing of page elements, and fitting images using content-aware technology.
Adjusting page size, margins, and bleed
There are many reasons why you might want to adjust the size of a layout, but the three most common adjustments are to page size, margins, or amount of bleed. It’s extremely easy to change any of these in InDesign, but changing them and altering your text frames and other page elements has long been a huge hassle. The new Adjust Layout feature in InDesign CC 2019 comes to the rescue.
The old (and buggy) Layout Adjustment feature found in previous versions of InDesign has now been retired. The Liquid Layout feature is still available, but few InDesign users take advantage of it. (Liquid Layouts provide a rule-based way of resizing pages. You can read about it in “Alternate Layouts” in InDesign Magazine issue #74.) Instead, the new Adjust Layout feature is easy to use and does a surprisingly good job of making changes to page items for you.
You can use Adjust Layout in one of four ways:
- Choose File > Document Setup, and click the Adjust Layout button.
- Choose File > Adjust Layout.
- Click the Adjust Layout button on the Properties panel.
- Choose Layout > Margins and Columns, and turn on the Adjust Layout checkbox.
The first three options open the Adjust Layout dialog box shown in Figure 2.

Figure 2. I used these settings in the Adjust Layout dialog box to change slides from 8.5 × 11 inches landscape to 8 × 10 inches.
By the way, InDesign CC 2019 also introduces a new option to adjust your document margins inside the Document Setup dialog box. (Previously, once you created a new document, you could only change margins for selected spreads or pages.)
The Adjust Layout feature can alter your page elements in several different ways, including resizing and moving frames. But it can also (optionally) alter the size of your text on the page. For example, if you’re converting a large A3 poster into a smaller A4 flyer, you probably want all your text to be half as large (and with half the leading). This is a pain to do manually, but it’s just a checkbox away with Adjust Layout (Figure 3).
Figure 3. (a) The original 8.5″ × 11″ layout in landscape orientation (b) Settings used in the Adjust Layout dialog box to reduce the page size and margins, and change the orientation to portrait (c) After making such a radical change some manual cleanup work is needed. (d) The final result
Figure 3a
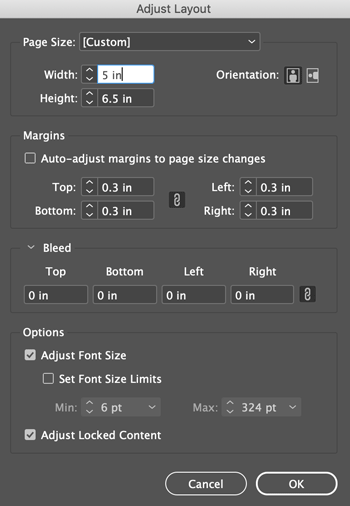
Figure 3b

Figure 3c

Figure 3d
New Spacing Between Paragraphs Option
A new feature with the ungainly name “Space Between Paragraphs Having the Same Style” is a useful addition to setting spacing in the Paragraph, Control, and Paragraph Styles panels. It is particularly useful when setting bulleted lists, numbered lists, and block quotes. It allows you to use one style for lists, instead of resorting to separate styles to create the proper space above and below the list.
For example, you could have a single style that adds Space Below and Space After a paragraph, and then change this “space between” setting to zero points. If you apply this to a group of five paragraphs, the first paragraph would have space before, the last paragraph would have space after, and none of these paragraphs would have space added between them.
We’ll cover how to use this exciting new feature in detail in the next issue.
Content-Aware graphic fitting
InDesign CC 2019 can now attempt to intelligently and automatically fit the best part of an image inside a frame, rather than your having to manually position it. Of course, what “the best part of the image” means is always open to argument, but Adobe is using a machine-learning algorithm—part of their Adobe Sensei artificial intelligence initiative.
Content-Aware Fit is not enabled by default. If you want to make it apply automatically to all placed images, turn on “Make Content-Aware Fit the default frame fitting option” in the General pane of the Preferences dialog box. You may find some type of graphics work well with the algorithm and some may not, so you may need to experiment with the images used in your workflow. In my experience, the feature seems to work better with raster images than with vector graphics.
In Figure 4, I placed six raster images from my sample files using the “gridify” feature, producing a 2 × 3 grid of frames. When the Make Content-Aware Fit preference was turned off, the images were placed using the Fit Content Proportionally option (in Object > Fitting). When Make Content-Aware Fit is turned on by default, the feature did a pretty good job of finding the useful content to include within the frames. Of course, you can continue to tweak the image position manually in individual frames after using the fitting command.

Figure 4a. Make Content-Aware Fit turned off in General Preferences is the default for fitting images to frames.

Figure 4b: When Make Content-Aware Fit is turned on, it does a reasonable job of fitting the best part of the image within the frames.
Note that if you place an image normally and later want to apply Content-Aware Fit yourself, it’s an option in the Fitting submenu, the Control and Properties panels, and in object style definitions.
New Font Features
If you’re like most designers, you spend a significant amount of time picking just the right font, including previewing the way it appears in different parts of your layout. So you’re going to be very happy about a new method of previewing and selecting fonts. Plus, InDesign CC 2019 introduces a new font type that supports glyphs with colors and gradients.
Live font preview when hovering
You can now preview type you have selected in a layout in any font by hovering your mouse over the font name in a list of fonts. This can be used in the Control panel, Character panel, and Properties panel menus. For example, in Figure 5, the heading for a book cover is selected on the page, and in the font family menu, Abadi MT Condensed Extra Bold is being previewed. (In earlier versions, you could do something similar, but you had to hover and also press a modifier key on the keyboard.) You can also preview the currently selected text directly in the font family menu by setting the sample text options pop-up menu to Selected Text.
Enhanced font browsing
To understand some of the type changes in this version, it’s important to know that Adobe has renamed its Typekit service “Adobe Fonts.” Their icon has changed from a TK icon to a “cloud” icon for Adobe Fonts, and the word “sync,” previously used for selecting fonts you want to use, is being replaced with “activate.”
The Cloudy Meaning of “Adobe Fonts”
Adobe has changed the name of Typekit to Adobe Fonts. However, it still appears as Typekit in some programs, such as Photoshop, which will undoubtedly cause some confusion for a while. But the confusion goes deeper than just branding. After all, the font called Adobe Garamond is an “Adobe font,” because it was designed and developed by Adobe. But hundreds of other fonts were designed and developed by other non-Adobe font foundries, and only licensed to be distributed through Typekit. Unfortunately, those are now also called “Adobe Fonts.” So when you’re talking with someone about “Adobe Fonts,” you need to be clear whether you’re referring to the fonts from Adobe or “the service formerly known as Typekit.”
There is an enhanced display of choices when browsing fonts in the Control, Character, and Properties panels font family menus. When you click the Font Family menu, there are two tabs at the top left (Figure 5): the “Fonts” tab shows currently installed or activated fonts. But here’s the cool one that is easy to overlook: The “Find More” tab previews Adobe Fonts that are available to be activated. Yes, that means instant access to thousands of fonts from within InDesign, without having to visit Adobe’s website.

Figure 5. Filters and options for previewing fonts have been added to the Font Family menus. Clicking the Fonts tab shows currently installed and activated fonts. Clicking the Find More tab lets you preview and activate Adobe Fonts (formerly Adobe Typekit fonts).
In both tabs, already activated Adobe Fonts show a cloud icon with a checkmark. If you activate some of the fonts from within a font family, but not all of them, you’ll see a cloud icon with an ellipsis (…) next to it. Non-activated Adobe Fonts show the regular cloud icon (Figure 6).

Figure 6. The Find More tab shows Adobe Fonts (previously Adobe Typekit fonts) and allows you to search, preview, and activate fonts directly within InDesign.
New filtering options for fonts (in both tabs) are available:
- A new filter shows recently added fonts.
- The Classification filter (Figure 7) shows the same categories and icons that are found on the Typekit/Adobe Fonts website for filtering fonts. There are icons for each of eight classifications that were available in earlier InDesign versions, such as Serif, Script, and so on. You can also select properties for weight, width, x-height, contrast, standard or CAPS only, and Default Figure Style.

Figure 7. The Classification font filter has been expanded to show both the classifications previously shown and properties which are found on the Typekit/Adobe Fonts website for selecting fonts.
- The Typekit filter is renamed Show Activated Fonts.
- The Add to Favorites star icon and View Similar filter option are now available in-line with the font names.
You now have three options for the size of preview text. Plus, the preview text can be the text you have selected on the page, or you can select between five preset text phrases. By the way, if you hate these kinds of font previews (some people do!), you can turn off the Enable In-menu Font Previews option in the Type pane of the Preferences dialog box.
Support for OpenType SVG fonts
InDesign now supports OpenType SVG fonts, including color fonts and emoji fonts. They appear in a new section of the installed and activated fonts list and have a new font type icon (see Figure 5).
Using Emoji fonts, you can include various colorful and graphical characters, such as smileys, flags, street signs, animals, people, food, and landmarks in your documents. Of course, you can’t just type an emoji inside InDesign, so to insert them, you can copy and paste them from another program, or double-click them inside the Glyphs panel (Type > Glyphs).
Trajan Color Concept—an OpenType SVG font that now ships with InDesign—includes color information, via 20 stylistic sets with various colors and gradients. However, because OpenType SVG fonts are already colored, you cannot apply different colors to OpenType SVG fonts within InDesign. The colors can be viewed in PDF, EPUB, or Publish Online documents. (Just be aware that some PDF and ebook readers may not be updated yet to display this color information correctly!)
TIP: To learn more about OpenType SVG fonts and how to use them, see this Adobe Help article.
PDF Enhancements
InDesign CC 2019 sports three important new features for working with PDFs. You can now import PDF comments, specify font family and style in PDF form fields, and exercise more control over how your PDF files are named.
Import PDF comments within InDesign
Acrobat’s PDF comment and review features are widely used for marking up documents, but there has always been a frustrating limitation: you couldn’t see those comments where you needed to most… on your InDesign page! (There have been some third-party add-ons that have helped with this, including the Annotations plug-in from DTP Tools.) Now, with CC 2019, you can import comments added in Adobe Acrobat or Adobe Reader as part of a review process, and the comments will show in the context of your InDesign layout (Figures 8 and 9). Even better, InDesign can now make some changes for you, including inserting or deleting text that has been marked in the PDF!
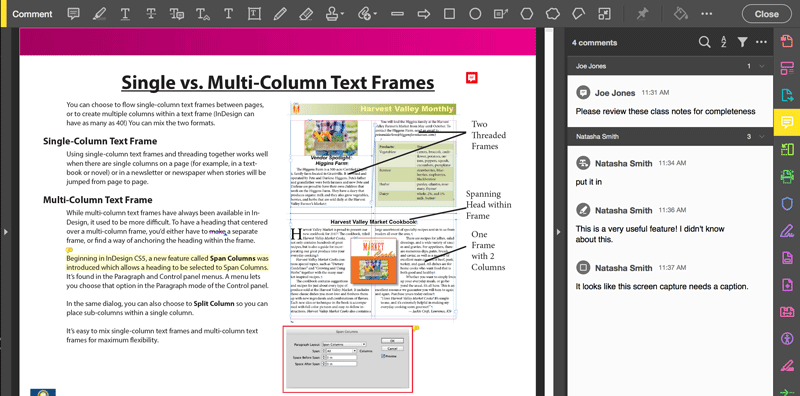
Figure 8. In this example, four comments have been added to this single page PDF review using the Comment tool in Acrobat Pro DC—one by the initiator of the review and three by a reviewer. Here, the comments are viewed in Acrobat.
However, there are a few caveats you need to know. First, you can only import comments on a PDF that was exported from InDesign CC 2019 or later. Second, don’t edit the InDesign document before importing comments; otherwise they may not be correctly positioned. And finally, PDFs created using the Book feature won’t work correctly in the PDF Comments panel.
TIP: For earlier InDesign files, open and save the file in InDesign CC 2019 or later and export a PDF file. Then you can use Acrobat to move the comments from an older PDF into the newly created PDF file.
To import PDF comments into an InDesign layout, do one of the following: choose File > Import PDF Comments, or choose Window > PDF Comments to open the Import PDF Comments panel, and then click the Import PDF Comments button.
InDesign’s PDF Comments panel and comment icons look similar to the comment list and PDF markup you see when you choose the Comment tool in Acrobat (Figure 9).

Figure 9. When comments are imported into InDesign, their appearance looks similar to those viewed in Acrobat Pro DC. However, they are now viewed and managed within the original InDesign layout.
PDF form fonts
In previous InDesign versions, it wasn’t possible to specify a font for form fields, such as a text entry field. All the text in the form would appear in Acrobat’s default font, usually Times Roman. But in InDesign CC 2019 you can now select a font family and style for the text in list boxes, combo boxes, and text fields (Figure 10).

Figure 10. You can now specify the font that can be used for PDF form fields created in InDesign.
However, note that just because you choose a font doesn’t mean your audience will see it. Fonts used for list or combo boxes are embedded (so the final viewer will definitely see them in the correct font). However, fonts you choose for text fields are not embedded in the PDF, and so the end user will only see the correct font if they’re using Adobe Acrobat or Reader and have those fonts active on their computer. If the fonts aren’t present, Acrobat and Reader will substitute Adobe Serif MM or Adobe Sans Serif MM.
Choose file name while exporting as PDF
Finally, here’s a small but welcome improvement: in earlier versions of InDesign, when you exported a PDF, the default file name would be the last one you used for a PDF export—even though the document name may have changed. This would often cause errors or confusion when the PDF name didn’t match the document name it was made from. Now, when you export a PDF, a new checkbox option appears in the Export dialog box: Use InDesign Document Name as the Output Filename. (Note that the new feature also appears and works in other export formats as well.)
Long Document Features
You may know that Adobe uses voting on the InDesign Uservoice site to help determine which new features to add, and one of the top vote-getters has long been “Please make it possible to insert footnotes in tables.” Well, hallelujah: You can now include footnotes within tables. Plus, you can convert footnotes to endnotes and endnotes to footnotes in your document. And, also in the category of long document feature improvements, Adobe made a few small tweaks to the Index panel.
Adding footnotes to a table
In past versions of InDesign, when you imported a Word file with table footnotes, the footnotes would be ignored. Similarly, if your text cursor was in a table, the Type > Insert Footnote feature would simply be grayed out. Now, those limitations are gone.
However, there are three important limitations to adding footnotes to tables:
- Table footnotes appear at the bottom of the text frame, not the table (Figure 11).
- If your table is anchored in a text story (they often are), the table footnotes are numbered alongside footnotes from the story.
- Only one numbering style can be used for both text and table (so you cannot make table footnotes use, for example, “a, b, c…” while the primary story uses “1, 2, 3…”).

Figure 11. Kerala Demographics.pdf. In the Kerala Demographics story, the table needed to be inserted in the story text. Then all the footnotes from text and table number consecutively at the bottom of the text frame.
These limitations will drive some InDesign users crazy, but there is an easy solution, at least for the first two problems: to have separate footnote numbering for a table, and place the numbering under the table rather than at the bottom of the page (interspersed with other footnotes), simply place each table in a text frame of its own. Then, if necessary, you can anchor that text frame into the larger text story. That said, if the new features still don’t meet your needs, check out Peter Kahrel’s article “Going Deep with Footnotes” in InDesign Magazine issue #95.
Enhancements for footnotes and endnotes
As I mentioned above, you can now convert footnotes to endnotes and endnotes to footnotes in your document. To convert footnotes and endnotes, choose Type > Convert Footnote and Endnote. In the dialog box, you can specify whether you want to convert all the endnotes and footnotes in your document or only from the selection. Also, when importing Word or RTF files, there is now an option to place Word endnotes as static notes. Choosing static notes imports endnotes the way they were imported in InDesign CC 2017 before InDesign’s own endnote feature was introduced.
Index panel improvement
Making an index in InDesign has always been hard, but here are two little changes that help: first, the size of the New Cross-Reference field in the Index panel has been enlarged, providing more space to find and locate index entries. Second, there’s now a Find field in the same dialog box to search within the index entries. Simply type the search term in the field, and use the Find Next Entry and Find Previous Entry buttons (arrows) to view the index entries.
Other Small Changes
A few smaller enhancements have been added as well.
Remember previous export format. Now your documents will remember the last file format that was exported from them. This information travels with the document, so when the document is passed to another user, it will still remember the last used export format.
Optional package instructions. Now while creating a package, you have an option to choose whether or not you want to include printing instructions. (Hint: you probably don’t.)
Add to CC Libraries turned off as default. The Add to CC Libraries option is no longer selected by default when you create new swatches, paragraph styles, and character styles. This change is a huge relief for most of us, as it was annoying to see the CC Libraries panel open unexpectedly.
Home Screen/Start workspace changes. The initial screen you see after launching InDesign is now called the Home screen, and it still appears as the Start Workspace. By default, it also appears any time that when no documents are open. You can turn it off by going to the General pane of the Preferences dialog box and turning off Show ‘Start’ Workspace When No Documents Are Open.
Better performance when working with text. Improvements have been made in text performance—for example, in typing, deleting, adding columns, and inserting footnotes—providing a snappier performance. However, note that at the time of this writing, there is a frustrating performance problem that appears the first time you select the Type tool after launching InDesign. Fortunately, this long delay doesn’t appear again until the next time you launch InDesign.
Stability Improvements. The most common sources of InDesign crashes have been fixed.
A Substantial Upgrade
With significant changes to the user interface, strong new features for working with layouts and fonts, and several welcome fixes for existing problems, InDesign CC 2019 will be a welcome upgrade for most users.
Editor’s Note: Check out what’s new with Photoshop CC 2019 and Illustrator 2019 at CreativePro.com
Another important change I didn’t include about Adobe Fonts (formerly Typekit fonts): There are no more sync limits. All 14,000 fonts are available with all plans. Also, there is no longer a distinction between Web fonts and Desktop fonts. All are available for both.
Read more about it here:
https://fonts.adobe.com/about
Marvelous news. I like what Adobe says at that link: “We talk to font lawyers so you don’t have to.” Since most of us avoid talking to lawyers, it’s good to know we can feel free to use all these fonts in any way we like without risking a dread cease-and-desist letter.
Alas, if my just-completed check is right Adobe’s font collection still comes up lacking in some ways. I’ve brought these up before, but repeating won’t hurt.
1. It still doesn’t include the open-source STIX font. Please, Adobe, it includes almost all the specialized characters needed for scientific and math documents. I added it separately, and haven’t had a problem. Make it available for everyone. It’s FREE!
2. Searches for specialized character sets. Adobe lets us make selections based on what a font looks like, i.e. serifs. But I’ve yet to find a way to search for complete specialized character sets. Searching for “Greek” showed nothing, nor did “math.” “Scientific” didn’t turn up anything useful. Since most font sets don’t include specialized character sets, we need an easy way to find those that do. You might even distinguish between some and near complete collections.
3. Add a find similar font search. Maybe it is there, but I didn’t find it. It’s be helpful is font-seekers could specify a font and have Adobe Fonts display those with similar traits in all areas. That wouldn’t just be the main categories. It’s include darkness on a page and a similar width. Sometimes we have a font we like but for one or two quirkily done characters. This would let us shift to a font without those quirks.
I like the example that you used – “Kerala – the Land of Paradise” by Neil Rosner. I’ve spent many years in Kerala myself. :) I’ve heard Kerala is a great spot for meditation.
Shame the pdf comments don’t work correctly with the ME version. Strange to release buggy software.
I should also point out that DTP Tools annotations is way more useful than Adobe’s weak implementation of this feature.
I suspect that’s Adobe’s policy, as the article hints. It’s better to release a feature that’s still feature-limited than to wait for perfection. Endnotes in 2018 ID, for instance, have to be handled just right to work, but having them still beats not having them.
I second this comment – Annotations shows you where the comments are on the page when you click on one, allows you to accept a whole page at once, and then leave highlights to show you where they were so you can check all the extra or missing word spaces etc. and then remove them once you’re OK with what has changed.
This feature is not ready for prime-time, and is likely to lead people to avoid using it altogether if it cannot map some of the comments to the text. Fixing 90% of the editorial corrections may be par for the course for some overseas compositors, but it’s not good enough for any of my clients. I need to catch 100% of them.
Also, once you have fixed the comments in InDesign — how do it report back to the PDF file? I see no evidence of it updating the PDF to show which of the edits I chose to make vs. not make, etc. This seems to be a one-way and poorly documented feature.
Jeff, you create a new PDF of course…(!)
Of course, I created a new PDF file — just don’t see how to export + comments?
This is very good news. The move to CC has long frustrated me because the enhancements seem to come far slower than when Adobe had to create enough new features to give us a reason to pay for an upgrade. We are now getting about what we used to get with paid upgrades coming about 18 months apart but coming in 12. All would be perfect if Adobe would just let the ID development team create a release every 6 months rather than every 12. If it is done, there’s no reason for us to wait. I particularly like “New Spacing Between Paragraphs Option.” That will save me a lot of time.
One suggestion for amending this article. I’ve not downloaded ID-2019 and it isn’t yet listed as available. But I suspect the usual principle applies. If you want to keep ID-2018 around when upgrading to 2019, you’ll need to change the upgrade preferences. Otherwise Adobe deletes the old when it brings in the new. You might want to point that out.
Didn’t they change that setting so it’s off by default now (i.e., it won’t automatically delete the previous version)? I know way back when it was turned on by default and people complained.
I’m not sure–as all our computers at work have it unchecked. Maybe it remembers the settings or the default was fixed.
Oh–that new spacing between paragraphs sounds sweet, as well. It will save me a ton of time and will easily cut my number of style sheets in half. (I usually have 50-70 style sheets per book I do).
The update isn’t showing in my creative cloud menu yet.
Make sure you go to the three dots at the top right of the CC menu and click “check for app updates” and the CC menu will refresh.
Choose Check for App Updates from the menu of CC desktop app.
Also make sure your OS. is up-to-date. Mac OS X 10.12 or later I think and updated Windows 10.
My system is up to date, I’ve done everything suggested in this article: https://helpx.adobe.com/creative-cloud/kb/creative-cloud-application-recognizing-available.html and still nothing… :(
Hi Steve, would be good if you could write an article with an overview of significant and substantial release features for each version of InDesign (1/1.5/2) CS (1/2/3/4/5/5.5/6) and CC (Quarterly/biannual/annual) for features that have been added, removed and so on.
CS versions always had features added, Cloud versions have had features both added and removed if I’m not mistaken?
Sam–maybe this would suit your needs?
https://prodesigntools.com/compare-all-indesign-versions.html
Hi Dwayne, I’d expect something from the staff here as they’re surely impartial users?
Sam (I had to reply to myself as I can’t reply directly to you):
What makes you think Steve has the time or wants to do such an article? Especially considering InDesign 1 came out in 1999.
I suppose if he has nothing else to do with his life than research all the InDesign versions since 1999 and do such an article, that’s up to him. But I wouldn’t expect him to.
It’s in James Wamser’s InDesign Feature Guide. Here’s a link to the Publish Online version.
He should have this updated in a short while to include the new featurss.
Using the Download PDf feature of Publish Online, you can get a PDF too:
https://indd.adobe.com/view/0fe50e63-71b1-4db5-91c1-c8f6c4738df2
It would be good to view on an independent from Adobe platform such as this?
Maybe as html rather than PDF as interactive pdf is dead, and no longer a portable document format as intended.
Sam — perhaps James would be interested in having you do the work to convert it to HTML.
I regularly use the PDF version of the document. It’s incredibly useful!
James just published it via Publish Online so folks would have one single URL to go to to see each version as he updates it, instead of having to download a new PDF. Just because it’s on Adobe’s servers doesn’t mean Adobe has any control over the content or anything to do with its creation, other than supplying the InDesign software. It’s how all Publish Online documents work, they are all hosted by Adobe.
I downloaded InDesign CC 2019 this morning! And I live in the UK!!
What makes you think Steve has the time or wants to do such an article?
He does write regularly on this site, as a reader its not an unexpected request.
Also as a reader why are there no replies allowed, is it a way to infer that this site is not impartial?
Replies are allowed, but I think only a few times.
And I know that Steve writes regularly, and maybe he’d be interested in doing it. I don’t know. But I do think it’s an unexpected request. If I was a frequent contributor and someone expected me to do an article on all the InDesign versions in the last 20 years and what they added/deleted/changed, I’d say “I have better things to do.” Especially then that information is already available via google.
Maybe he will do it. I guess it never hurts to ask.
Or in a more equitable user / software provider relationship we’d be able to ask Adobe or one of their staff directly on this site?
Maybe Adobe needs (at least) a user advocate for each product on a senior management level and also at board level.
I’d also ask why is it called Sensei?
Sam–I think it would be a good idea if someone from Adobe visited this site or the Facebook page. A rep would be nice.
I’m also confused about the Sensei thing.
Adam – why would I or James need to convert his article to html?
That’s what InDesign should do semantically and responsively.
Sam — yes, InDesign can do (some of) the work. But someone needs to think that work is useful before they make InDesign do it, and to keep those exports updated and bug fixed, etc, etc.
You seem to think it would be useful to the community, so in the spirit of bettering the community, you should be the one to offer to do it.
It would be useful to Adobe, they have plenty money, I have none. It’s up to them.
I think offering it in Publish Online and PDF (for printing) work perfectly fine. I don’t see a reason to have it as HTML.
Hosting it on Publish Online is perfect for InDesgin!
In other words, keep an old CS licence for print, use Capture One for processing images and use whatever personal (production ready) preference you have for making interactive content is a viable business model for Adobe?
Let’s please return this discussion to the new features in InDesign CC 2019. This is getting way off topic!
Synchronisation of colormanagement settings using Adobe Bridge (also updated to version 2019) doesn‘t work andmore:-(
Anyone else got this problem?
In the PDF export options under Output, the option ‘Convert to destination (Preserve numbers)’ seems to have disappeared.
The ‘Convert to destination’ now seems to have the same effect (leaving defined cmyk values in the document as they are)
Sorry. Color management had been switched off somehow.
The option reappeared when turned on!
This is probably a dumb question but how do I get my properties to display across the top of my document rather than down the right side? I tried dragging it to the top but it doesn’t go in there. It’s painful to have to click the … every single time to check what percent a photo is at. Especially when I’m going through a whole document doing a last check of everything before printing :)
Like in Illustrator or Photoshop, the Properties panel is a vertical panel and cannot be set up horizontally. You cannot change the width, only the height.
If you like horizontal panels, then learn to use and love the Control panel which can be arranged that way.
If you have requests for things to change in the next version of the Properties panel post them as requests on InDesign UserVoice here:
https://forums.adobe.com/external-link.jspa?url=https%3A%2F%2Fadobeindesign.uservoice.com%2F
How do I view the control panel? I sound like a noob but I have been working in this program daily for years and years. All that stuff was at the top before, now I update and it’s gone. I don’t know why they change so much. Also – in the properties when I want to adjust my page size, that little icon that helps you pick where you want your page to be anchored to is gone! So how can I take off an even amount from the sides vs only from one side? Maybe that moved somewhere else too?
Samantha: Can you use the Preflight feature to do these checks, instead of manually?
I feel like it’s easier to do it manually – that way I can open up a photo right then and there and adjust it, rather than need to make notes and go back. I think it’s just a problem of me needing to find where stuff is again :)
Maybe I’m not sure exactly what you’re looking for in your checks (non-proportional scaling, DPI issues?), but with Live Preflight you’ll get a list of only the images/objects/text that has the problems, and it’s one click to jump directly to them in the layout.
Here’s a screenshot of it in use on the book I’m currently working on: https://www.dropbox.com/s/v90yki5loietf32/Screenshot%202018-10-16%2011.23.39.png?dl=0
As for bringing your control panel back to the top: Window -> Control should bring it back.
HA! Niiiicccceee. Thank you for getting my control panel back :) It’s def a problem of me not knowing the root of where this stuff comes from. As for the pics, I was checking for proportion as well as DPI, not all the images were the best quality but I wanted to make sure that they weren’t being blown up too much, plus I also wanted to adjust some contrast as I went through the last pass before print. I for sure need to learn how to use the pre flight stuff – and actually have trust in it. I’m old school and do all this stuff by “hand” vs trusting that INDD has got my back. One day… Thanks again for your help and suggestions!
Samantha, you were probably using the Essentials workspace in CC 2018/prior. In CC 2019, the Essentials workspace (still the default) was changed radically, now it only has 3 panels: Properties, Pages, and CC Libraries. To get your old Essentials workspace back, which yes does have the Control panel going across the top, switch to the Essentials Classic workspace.
Thank you for the tip, just noticed I was too! I was so frustrated yesterday because I couldn’t find anything….now if I can just get my tab keyboard shortcut back I’ll be a happy camper. (I posed the question a few minutes ago but it is a sore spot right now as I do forms and constantly tab in the layout)
Problem solved once I switched to the correct workspace!!
The serial number of this version is different than 2018’s
this means i can’t use some paid scripts anymore.
did your serial number changed too?
(create a one-line script to display your SN:
alert(app.serialNumber);
see here: https://creativepro.com/locating-your-indesign-serial-number.php)
Yes I have the same problem. It’s going to be an expensive update!
@David,
I’m sorry but you’re wrong:
Creative Cloud applications DON’T HAVE SERIAL NUMBERS. They are tied to your Adobe ID. If they’re not working it may be because you’re not signed into your Adobe ID or you have entered a different one.
Only Creative Suite applications (like CS6) are tied to serial numbers.
Erm. Yes they do. Just because you don’t type them in, doesn’t mean they don’t exist. Software developers use this to tie in their scripts and plugins.
Then you’re saying that 3rd party products have serial numbers because the installation of the application itself is NOT tied to a serial number.
And yes, third party developers may try to recover the costs of updating their products by charging for updates via a serial number scheme.
I’m just trying to clarify this distinction.
No I’m not saying that. I’m saying that you are wrong. InDesign CC does have a hidden serial number which is available to be seen with the script that David mentioned.
Yes, but it confuses most users because most users DON’T INSTALL THIRD PARTY SOFTWARE. I agree with you: There IS a hidden serial number but it’s only used by third parties.
Right which puts David Hillel and I in a serious financial predicament. Why has Adobe changed the serial number. I have about a dozen paid scripts from ID-Extras. I now have to repurchase them all? And if I have 2018 and 2019 running at the same time?
That’s an insane and stupid decision of Adobe.
@Raphaël I suspect the SN change happened becuase i installed the prerelease version a week ago. Did you install it too, or just got the update today?
That problem I’ve not heard of before: You should post about it on the InDesign Use Voice so it will get the attention of product managers and engineers:
https://forums.adobe.com/external-link.jspa?url=https%3A%2F%2Fadobeindesign.uservoice.com%2F
You should probably also talk to the third party devleoprs and see how they are handling that situation.
thanks Steve. I’ve filed a bug for this problem:
https://indesign.uservoice.com/forums/601180-adobe-indesign-bugs/suggestions/35740027-serial-number-changed-on-cc2019
It does seem that CC2019 has a different serial (“hidden”) serial number. Id-Extras products are linked also to InDesign’s serial number, which has pros and cons.
But just to clarify, we are not going to be charging anything like full price to transfer licenses to the latest version of InDesign (for those who want to do so; for those who don’t, everything continues as usual). There will be a small, per-script fee, probably capped for those, like Raphael, who have wisely :-) invested in many Id-Extras scripts. Details on the Id-Extras blog soon… But as it was mentioned here, just wanted to clarify that…
I bought one script in July and another last week. Lesson learned.
I understand that updating scripts requires labor. Humble suggestion: The fact that a purchased script will be tied exclusively to only one version of InDesign should probably be clarified on the purchase page, since that puts a 1-year-or-less time horizon on its utility.
Responding to Laura S: It has NOT been the case that Id-Extras script only work for 1 year. In fact, this is the FIRST time since the Creative Cloud was launched (way back in 2012 (!) that Adobe decided to change the serial numbers. So anyone who bought a script back in 2012 had uninterrupted use of it for the last 6 years, through all upgrades of Creative Cloud!
Apparently, with the 2019 the entire licensing system has been redone by Adobe. But my guess is that this was a one-time change, and the next upgrades will continue using this serial number.
Also, certainly for someone who bought a script in the last 3 months or so, I will offer free transition to 2019. Please let’s continue this discussion on Id-Extras.com. It’s completely out of place here! (I’m only responding because this issue was raised, not by me, here, and the facts being mentioned are not correct.)
I apologize to Ariel W. I did not mean to imply that ID-Extras was operating in bad faith. When a primary vendor like Adobe changes their API or architecture, other vendors who rely on it can be caught out, and that’s not their fault. I apologize for any suggestion implying otherwise. (“Lesson learned” was unfair, and my entire previous comment could have been stated better. Mea culpa.) ID-Extras offers some awesome scripts that I’ve come to rely on. I’ll take further discussion directly, as Ariel W suggests.
Yes I was a beta tester.
Still doesn’t always take me to the image in the links pallet when I select an image on the page… annoying.
I am still waiting for ID developers to create tables that allow a single cell to break across pages. It’s the only hindrance to us using ID on proposals for billions of dollars of work when the authors are using MS Word to write. Yuck. Their table cells can be as large as 5-6 inches long…tough to justify two pages with 5″ of table cell on each “Page Limited” proposal.
@John,
That also should be posted as a feature request at InDesign User Voice:
https://forums.adobe.com/external-link.jspa?url=https%3A%2F%2Fadobeindesign.uservoice.com%2F
The engineers won’t read it here, I’m afraid.
InDesign New Features Guide has been updated to include the new features in InDesign CC (2019)
https://indd.adobe.com/view/0fe50e63-71b1-4db5-91c1-c8f6c4738df2
Awesome! Thank you, James.
so just an update. The engineers from Adobe took note of the user voice and are looking into it: https://indesign.uservoice.com/forums/601180-adobe-indesign-bugs/suggestions/35740027-serial-number-changed-on-cc2019?tracking_code=17dea6a098f860adf0ce6f53bc371d92
I see that a similar bug, Filetype is the same as CC 2018 has been reported.
And adding the file
DisableAsyncExports.txt
to disable background export does not work anymore (nor does Tomaxxi’s script that does the same…)
The adjust layout is problematic for reducing an ad from a larger size to something small like 2×3. It reduces the text size but not at 100% scaling. So unless you know to adjust that scaling back to 100% (so you aren’t printing 3.5pt text) is there a preference that fixes this? Since there are many ways to change the document size, and had no issues in 2018, how can we make adjust preference to not scale text?
@April: There is a checkbox for “Adjust Font Size” inside the Adjust Layout dialog box, and you can set the minimum and maximum font sizes you’ll accept.
Of course, scaling a big page down to 2×3 is going to be a problem no matter what… there’s a limit to what the AI can do! :-)
“Space Between Paragraphs Having the Same Style”
What’s that? The clouds have parted and I think I hear angels singing. I know it’s a small thing, but . . . finally!!!
It’s great to see InDesign catching up to Ventura Publisher. Now if we could just get Ventura’s modeless paragraph style dialog boxes.
I had a brief test of the new Affinity Publisher Beta today, for the same reasons as testing InDesign as a Quark user a while ago.
Things that I like about it are the colour space model in that you can use 32bit files and export to supported formats. The grid system is very comprehensive compared to InDesign. Obviously it’s not as polished and I had to make changes to the UI to get it a bit more neutral like CS as I’m not a fan of overly dark or light UI for working, 50%K is good for me.
Where both options are severely lacking and what I’d have hoped from Adobe for a new version about now is for style sheets to be external CSS files with the relevant unsupported standards (letter pair kerning, hyphenation etc) simply commented out on import/export as this alone would bring a bit more integration between publishing on paper or on screen.
It’s also high time that .indd files are version compatible or at least readable like .psd’s, because its a lot of mess with now more than 10 version numbers of InDesign CC.
@Sam,
It would be better for you to start a new discussion in the InDesign Secrets forums about Affinity rather than highjacking an existing discussion. We already have 70 messages here so adding extraneous stuff make it harder to read.
Here’s the link to InDesign Secrets Forums:
https://creativepro.com/forums
Noticing several screen lock-up bugs where the program freezes for anywhere from 5-60 seconds, sometimes with a tool cursor or guide-pull cursor until whatever is frozen thaws out. Anyone else? I’m on Windows 10…
It happens to me too.
Especially when opening a file – it could take 30 secinds or more befire i can use the text tool. it didn’t happen on 2018
Agree. Definitely new to CC 2019. I should have known better than to update to a x.0 version!
More people experience that InDesign 2019 is running extremely slow!?
Every click or selection etc. takes an annoying loading time to perform action.
Before the update to 2019 it was working way smoother and faster. As in my experience that is.
So far I have to say I am excited about the properties panel. I am moving much faster when working on my laptop and all the items are in one easy spot for me to access on a small screen. Love that new feature.
Thanks for the article. Do you (or anyone else) know if there are news about the performance of Indesign (and Illustrator and Photoshop) – I’m thinking about (PC version, I know it does on Mac) if they finally make use of the GPU instead of the CPU to render the screen (have a 5GB graphics card which is not being used at all by adobe, more or less..) … plus wether they finally can make use of multicore cpus instead of just using one core (have a 8-core i9… again wasted on adobe…) ..? :-) The features sound nice – but these things are what I am really waiting for from Adobe…
I didn’t think I would like the Properties panel at all, but it’s so much faster and easier to handle – I’m amazed! I love it! However, I have experienced quite a few crashes and when using Publish Online, documents are flying all over the place.
There seems to be a glitch with the control panel InDesign 2019. I think the new Properties Panel is great, but I still like to utilize the control panel. My control panel is blank. I’ve tossed my preferences and the control panel appears again, and eventually disappears (the control panel is visible, but there is nothing in it—blank). I really don’t want to rebuild my preferences every time the control panel appears blank. Can anyone offer any assistance or am I the only one this is happening to?
Adobe, Adobe, remember file name? Remember format? Remember path? fine, but what about book?
Can anyone tell me how I move the Properties bar up to the top? Mine insists on staying on the left side of my screen and whenever I click and drag it refuses to move!
You can’t move it to the top, that is why you have the Control Panel.
I’m a book designer. I work with multiple master pages that often have different margins-example: 1st page of a chapter usually has a larger top margin. My problem is, when I apply the different master page, the text frame doesn’t automatically adjust to the new margins like it used to under “enable layout adjustment”. I’ve tried the new “adjust layout” – checked boxes and unchecked boxes. I’ve spent a couple hours trying to figure this out because I’m one of the first in our company to upgrade, and I know everyone is going to be coming to me for the info. Help!!!! What am I missing? TIA!!!!
Did you use the Primary Text frame on the Masters. If not it will not adjust.
I’ve never used text frame on the Masters and it’s always worked before. I uninstalled InDesign 2019 and will wait until the bugs get worked out of it.
took them a while to use the idea of the properties panel from MM fireworks from years ago :)
Indesign CC 2019 crashes very often. When I managed to start it finally, the App is VERY slow – not possible AT ALL to work with it! I am back to CC 2018 now …
I really don’t understand the release of such a faulty program. I am working on a new Mac, using the newest software and the CC Adobe professional plan for years.
Initially, everything was fine but CC 2019 has gone into slo-mo mode! InDesign is crashing non-stop! I’ve uninstalled, reinstalled the app; deleted and created new workspaces; reverted to Control Panel, and deleted/created new preferences.The glitches don’t apply only to InDesign, as Photoshop and Illustrator are having similar problems…! And I’m working on a new iMac!
Still no stupid HSB in color/swatches panel.. no comments.
Ever since this update ID has been freezing on me regularly, especially happening when I press V (choosing the selection tool). It only lasts about a minute, but it’s very frustrating and I’m not sure why. I uninstalled the older version, thinking that may be the cause. It’s probably a problem I’ll have to take up with Adobe themselves, but just wondering if this has happened to others.
You are not the only one experiencing the lag/freeze when switching tools. Terribly annoying!
Thanks for the overview.
Anyone else having problems with styles in the new release? Redefining based on changes failed to work, as did the system of plus-signs for corrupted styles, option-shift click to override, etc.
Also, the new Adobe Fonts system seems buggy. It overrode my already installed Font Explorer settings in favor of wrong versions of same font. When I used Find Font to supply correct version, the position of the type shifted.
Is it me, or is it v.2019? Have gone back to 2018 version for now.
Still running High Sierra. Could that make a difference?
Thanks.
InDesign CC2019 freezes when making a package wth links that are on a server.
Anyone else experiencing this? I’l seriously considering donwsgrading again, this is unacceptable, Adobe!
Has anyone had issues with InDesign CC 2019 not letting you undo anything? It’s grayed out no matter what I do.
This seems to be a very common problem in 14.0 you can read more about it on the ID User Voice page. A quick Google search should give you the link to the page.
Yes they know about the problem.
You Forgot to mention the awesome new Spinning Beach Ball Feature in Indesign 2019…. yea hundreds of upgraders report Spinning Beach Balls at every turn.. even in iMac Pros w/ 40GB of RAM.. Yea just like last year, riddled with Bugs. I’ll stick with 13.1.0 until March or April 2019 when Adobe addresses all this and more in the one and only update for the year. Quark is waiting stage left.
Not working on Mac, but had the same issue on my PC (both in v.13 and 14). It disappeared after uninstalling CC Desktop Application after finishing ID installation (with Adobe uninstaller – https://helpx.adobe.com/creative-cloud/help/uninstall-creative-cloud-desktop-app.html) I’m not using CC Cloud so it’s not a problem for me, but I guess it will be a problem if somebody actually needs CC Desktop APP.
In order to resize your A3 poster in an A4 flyer you’d have to scale by 70,71% not 50%. ;-)
Is there a way to turn off the new Adjust Layout feature completely? It seems file specific. It has tripped me up a few times adjusting sizes of items slightly that have then gone off to print, It would be better if it was a Program preference.
Has anyone come up with a keyboard shortcut to tab? I find it cumbersome to use the menu approach each time I need to tab.
And thanks for the summary.
Please ignore my previous comment, I realized I was on the Essential tab and not the Interactive for PDF tab, so problem solved. Didn’t realize what a difference it made
I noticed there is a new feature that text boxes are being linked when copied, meaning that if i type something, then copy it to another page etc., then changing the text content (not the formating or effects), i’m getting an update icon in the object link panel so when im clicking on it, all the text boxes i copied from the first one are getting updated with the new content. this is working sometimes and sometimes there is no sign of it, i’m not sure if this is even a new feature and when it decides to work. Does anyone know more about it?
Is there any way to get rid of the CC library panel altogether? I have it minimized so only the logo is visible but would prefer that it was gone completely. It seems to be permanently attached to the right of my property panels, meaning that when I dock them to the right side of my workspace there’s a half-inch of unusable nothingness in my workspace. When I hit the ‘x’ in the corner of the CC Library panel, it along with all the other property panels disappear. I need as much real estate for my document as I can get, the CC Libraries aren’t working anyway…”uninitialized” so it’s completely useless waste of space. I’ve tried resetting my workspace, nothing seems to work. I’m using a Windows 2007 OS and Adobe InDesign CC 2018. I am not the administrator of my computer or software.
Please disregard and delete my posted question. I have solved the problem.
Our design firm is cautiously investigating the Adobe Fonts feature in each user’s CC account. I am just beginning my research into how Adobe Fonts works, and would appreciate feedback from InDesign users who have spent time with this new offering (and I’m not sure how different it is from TypeKit, which we never used.)
Questions:
– Are enabled / activated Adobe Fonts downloaded to the computer? Are they actual files with actual icons and sensible names in an organized location?
– Are enabled / activated Adobe Fonts completely dependent on an internet connection? If a user were to open an InDesign file on a computer which did not have, temporarily, any internet access, would the fonts be available?
– If an InDesign file with Adobe Fonts is transferred from one designer to another, will the included Adobe Fonts in the file auto-activate on the recipient’s computer if that second designer did not already have those particular fonts enabled?
– When exporting an InDesign file to PDF, are all included Adobe Fonts embedded? Can that PDF be opened by any other person and have those fonts displayed correctly and printed in perpetuity as intended by the designer?
– How does an InDesign user see Adobe Fonts displayed and managed, if at all, in FontExplorer? How does FontExplorer deal with different versions and/or style changes of the same Adobe font (or a third-party font under the Adobe Fonts umbrella) that the user has already activated previously in FontExplorer? Will FontExplorer be partial to using/activating an Adobe Font (cloud-based) preferentially over a purchased and already-installed font?
– How does a designer get a comprehensive list of the exact Adobe Fonts used in an InDesign document and the exact cost of those fonts in order to notify the client for proper licensing and billing purposes?
Adobe Fonts is a boon to designers. Replaces TypeKit. I think it’s going to change how / which / how many fonts are used. The only downside is that anyone working with the document needs to be a Creative Cloud subscriber. There is nothing to download, no “cost”, etc. Font management tools no longer involved. PDF works fine, as does working offline. (Though you wouldn’t be able to load new fonts.) Printers need to be subscribers because those fonts don’t get packaged. Would love to hear from a type designer. The few I’ve spoken to say it’s like dancing with the gorilla. In this case the gorilla is a very good dancer. Though s/he/they always lead(s).
Great questions, Scott! This article answers some of them: https://creativepro.com/using-adobe-fonts/